Surebeans Guide
Surebeans is a privacy-focused budgeting app for Windows, macOS, Linux, and the browser.
This guide covers setup, daily usage, and advanced features. You can start with the Quick Start or jump to the Reference.
For bank transaction scraping, see Beanscrape.
Questions? Send an email or visit the forum.
Quick Start
Create a new journal
Click ☰ → New Journal and choose how to start:
- From Scratch: creates an empty journal with starter accounts. See Create a Journal.
- From nYNAB export: imports a
.zipfile exported from YNAB. See nYNAB. - From nYNAB API: imports directly from the YNAB API. See nYNAB API.
- From YNAB 4: imports a
.ynab4budget folder. See YNAB 4.
Import into an existing journal
Once you have a journal open, click ☰ → Import to add records from external sources:
- File (CSV, OFX/QFX)
- SimpleFIN
- hledger
- Beanscrape
- nYNAB export and nYNAB API also support importing into an existing journal.
All import sources open the Import Review screen before writing to your journal.
Create a Journal
A journal is a folder containing plain-text hledger files tracked by git. It holds your accounts, records (that is, transactions), categories, budget allocations, rules, and sync configuration.
my-budget/
├── .git/                  # version history
├── main.journal           # root file. references the other files
├── accounts.journal       # account definitions
├── surebeans.json         # rules, remotes, app config
└── includes/
    ├── 2025.journal       # records for 2025
    └── 2026.journal       # records for 2026
Create the journal
Desktop: Click the hamburger menu (☰) → New Journal. Pick a folder.
Browser: Click ☰ → New Journal. Enter a name.
Surebeans creates a starter journal with example accounts and sample records.
Add an account
Navigate to Plan. Your starter journal includes some default accounts. To add more, go to Records, add a record, and type a new account name. Surebeans creates it automatically.
Add a record
Navigate to Records. Click + Add.
Fill in:
| Field | Example |
|---|---|
| Date | 2026-01-15 |
| Payee | Grocery Store |
| Amount | -85.50 |
| Account | Assets:Checking |
| Category | Budget:Groceries |
Press Enter or click away to save.
Assign money
Navigate to Plan. This is the envelope budgeting view.
- Income appears in Ready to Assign at the top.
- Click a category’s Planned column.
- Enter the amount to budget for that category.
- Repeat until Ready to Assign reaches zero.
The Available column shows Planned - Actual for each category. Green means under budget. Red means overspent.
Next steps
- Set up Sync to back up your journal.
- Create Rules to auto-categorize records.
- Import bank records with Beanscrape or SimpleFIN.
Reference
Detailed documentation for every area of Surebeans.
| Section | Description |
|---|---|
| Open Journal | Opening, cloning, and loading journals |
| New Journal | Creating a fresh journal |
| Plan | Envelope budgeting: categories, planned spending, available amounts |
| Records | Ledger: add, edit, filter, split, delete |
| Accounts | Account overview and balances |
| Reflect | Reports: net worth, spending, trends, cash flow |
| Rules | Auto-categorization rules |
| Sync | Cloud sync with git, S3, WebDAV, and more |
| History | Git-based change history, undo, redo |
| Settings | Theme, license, updates, Beanscrape |
| Import | Import from nYNAB, YNAB 4, CSV, OFX, SimpleFIN |
Open Journal
Click ☰ to access journal options.
Recent
Lists up to 10 recently opened journals. Click one to open it.
Pick Folder Desktop
Opens a native folder picker. Select a folder containing a main.journal file.
Browser: Not available. Journals are stored in browser storage and appear in the Recent list.
Clone from Remote
Downloads a journal from a remote server. See Sync for supported remote types.
- Select remote type (GitHub, GitLab, S3, etc.).
- Enter connection details (URL, token, etc.).
- Desktop: Choose a local destination folder.
- Surebeans clones the journal and opens it.
Browser: Limited remote types available. See Sync for browser vs desktop support.
Load Demo
Loads a pre-built demo journal with sample accounts, records, categories, and budget allocations. Useful for exploring the app before creating your own data.
New Journal
Creates a fresh journal: a git-tracked folder of plain-text hledger files, with starter accounts and a sample record.
Desktop
- Click ☰ → New Journal.
- Pick a destination folder via the native file dialog.
- Surebeans creates the journal files and initializes a git repository.
Browser
- Click ☰ → New Journal.
- Enter a name (e.g.,
my-budget). - Journal is created in browser storage at
/journals/<name>.
What gets created
my-budget/
├── .git/                  # created automatically
├── main.journal           # root file with include directives
├── accounts.journal       # account definitions
├── surebeans.json         # rules, remotes, app config
└── includes/
    └── 2026.journal       # records for the current year
A git repository is initialized and an initial commit is created automatically. Surebeans adds a new includes/<year>.journal file as needed.
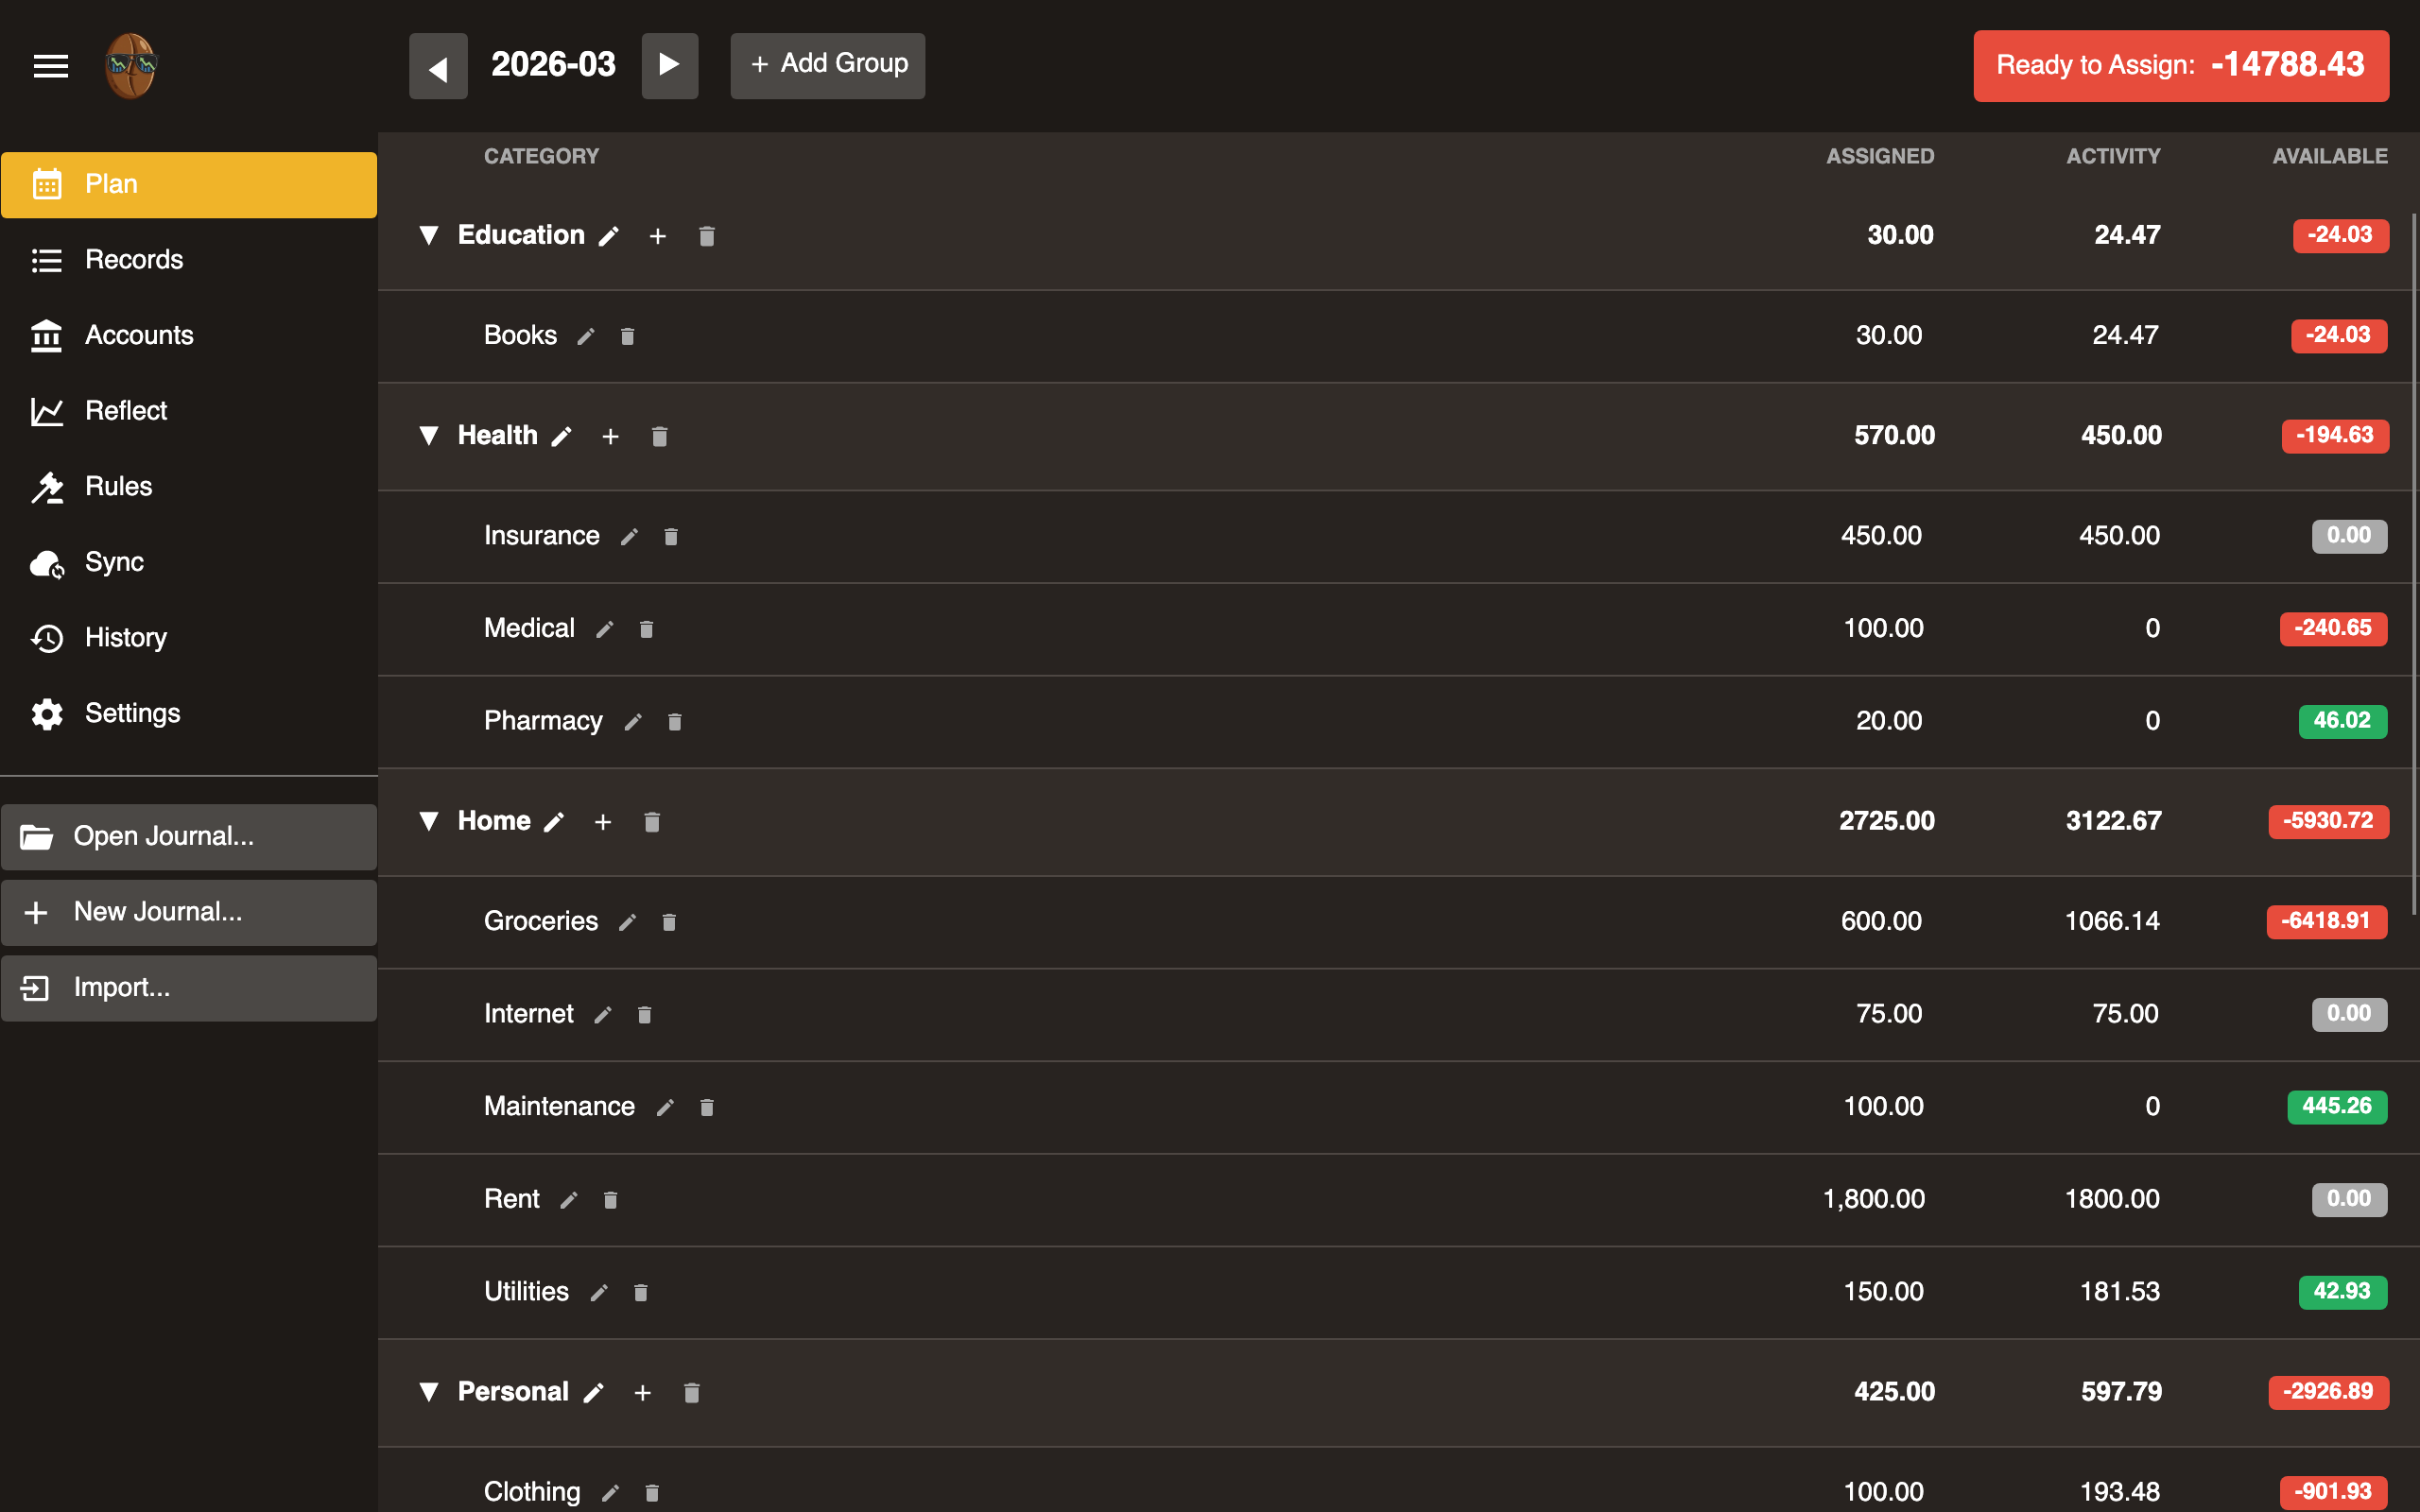
Plan
The Plan tab provides way to do envelope budgeting. Here, you can assign income to categories (called envelopes) and track actual spending to what you planned.
Ready to Assign
This prominently displayed number shows unbudgeted income, that is, money you have received but not yet allocated to any category. The goal is to make this number zero each month.
Category groups
These are collapsible sections that organize categories. Examples: Fixed Expenses, Variable Expenses, Savings Goals. Each group row shows totals for Assigned, Activity, and Available across its categories.
Rename and Delete are header actions: click a row to select it, then use the buttons in the header.
- Add group: Click + Add in the header.
- Select: Click a group row to highlight it.
- Rename: With the group selected, click the pencil button. Edit the name in place; Enter saves, Escape cancels.
- Collapse/expand: Click the arrow on the group row to toggle visibility of its categories.
- Delete: With the group selected, click the trash button. A banner says how many categories will be removed; click Delete to confirm or Cancel to dismiss.
Categories (envelopes)
Each category represents a spending envelope.
| Column | Description |
|---|---|
| Category | Name of the envelope. |
| Assigned | Amount budgeted this month (editable). |
| Activity | Amount spent this month. Click to view matching records. |
| Available | Cumulative balance: prior months’ carry-forward + Assigned - Activity. Shown as a colored pill: green (positive), red (overspent), grey (zero). |
- Add category: Click + Add within a group.
- Rename: Select the category, then click the pencil button in the header. Edit the name in place; Enter saves.
- Delete: Select the category, then click the trash button in the header. Confirm via the banner.
Uncategorized Records
When records exist without a budget category, an Uncategorized Records row appears at the top of the plan.
| Column | Description |
|---|---|
| Assigned | Always “-”. You cannot assign money to uncategorized spending. |
| Activity | This month’s uncategorized flow. Click it to view those records. |
| Available | Cumulative balance, like any category. A positive balance carries forward. When you overspend, the value is red and negative. It resets at month-end and folds into Ready to Assign. |
This row is a hint to categorize records: as you assign records to categories, the values in this row move to zero.
Move Money
You can click a category’s Available pill to open the Move Money popup. Enter an amount and select a target category. The budgeted amounts for both categories are adjusted so Available balances shift accordingly.
Month navigation
Use the left/right arrows or month/year picker to navigate between months. Each month has independent assigned amounts.
Responsive layout
On narrow screens (under 600px), the Plan switches from a columnar table layout to a card-based layout with each category shown as a stacked card.
Overspending
When a category’s Available goes negative (red pill), you’ve overspent that envelope. Move money from another category or add more to Assigned.
Funds by Currency and Other Holdings
When your budget holds money in more than one currency, a Funds by Currency card appears above the categories. You budget in your main currency, but foreign money is worth more or less in your main currency as exchange rates move. Money you have already assigned can become worth less than you planned. The card shows that exposure so you can react before you overspend.
For example, say your main currency is the US dollar. You hold savings of 1,000 EUR, worth 1,090 USD today, and you assign all 1,090 USD to categories. The euro then falls, and the 1,000 EUR is worth 1,050 USD. About 40 USD you assigned is no longer there, so the budget is over-assigned, even though you neither earned nor spent anything.
Each row shows the amount held, its cost basis in your main currency, its market value, and the gain or loss from rate movement. The Show in toggle switches the rows between your main currency and the amount actually held.
When a currency has no exchange rate, its value cannot be computed and a warning appears below the rows. Resolve it with Fetch prices in the toolbar, or Add price to type today’s rate yourself. Both save a P directive to prices.journal. See Multi-Currency for how prices work.
A separate Other Holdings card lists securities such as stocks or crypto that sit in a budget account. These are not currency and do not affect currency planning. To keep them off this card, move those records to a Tracking account.
Records
Ledger showing all records across accounts.
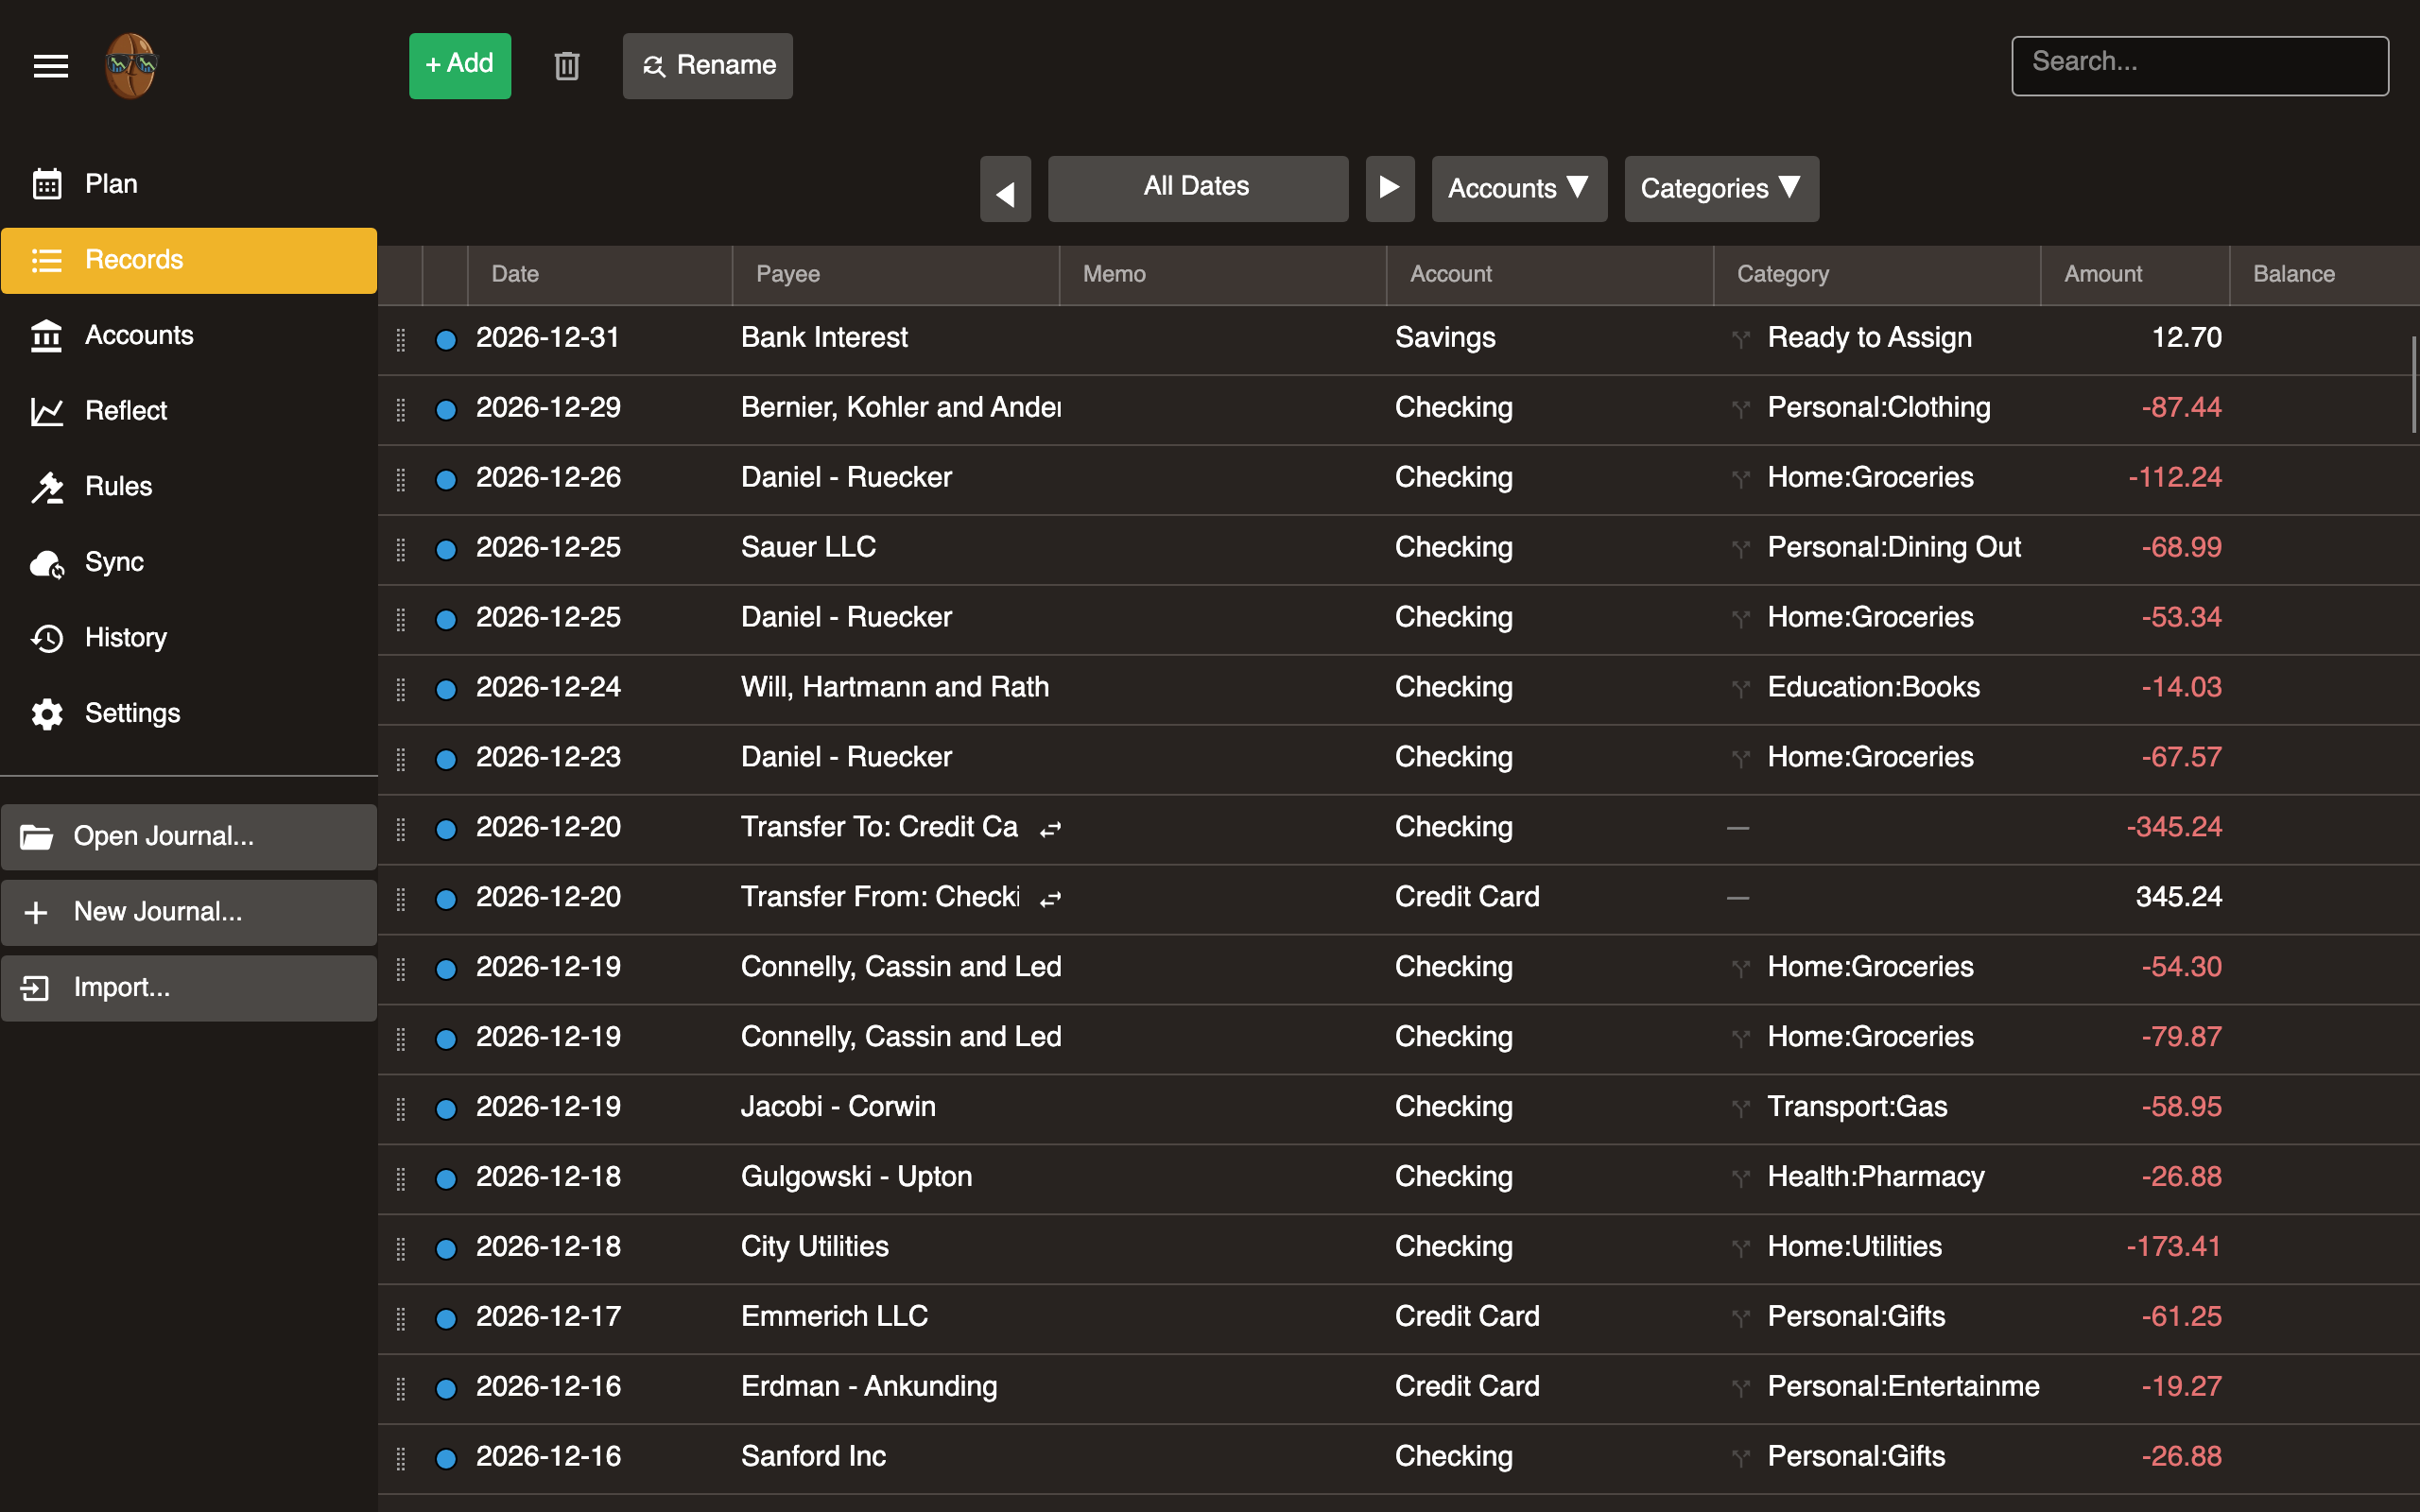
Columns
Each row has the following columns from left to right:
Grip handle. Drag a record up or down to reorder it. Drop it between rows to change its date. The record takes the date of the row below the drop line. Dropping above the first row sets the date to today.
Status dot. A colored circle showing the record’s cleared status:
- Blue - New
- Orange - Pending
- Grey - Cleared
Click the dot to cycle through statuses. If multiple records are selected, clicking any selected dot cycles all of them together. Hover for a tooltip describing the current status and next action.
These map to hledger’s record status markers: New has no marker, Pending is !, and Cleared is *. You can use any workflow you like -for example, mark imported records as Pending and flip them to Cleared once you’ve verified them against your bank statement.
Date, Payee, Memo, Account, Category, Amount, Balance. Standard record fields. Balance is visible only when a single account is selected.
Selecting records
Click a row to select it.
Cmd+Click (macOS) or Ctrl+Click (Windows/Linux) to toggle individual rows in and out of the selection.
Shift+Click to select a range of rows from the current selection anchor to the clicked row.
Filter bar
Narrow the visible records.
Date range. Select a preset (Today, This Month, This Year, All) or a custom date range.
Account. Select one account. When a single account is selected, a cumulative running balance column appears.
Category. Filter to records in a specific budget category.
Search. Free-text search across payee and memo fields.
Adding a record
Click + Add. Fill in date, payee, amount, account, category, and optionally memo. Press Enter or click away to save.
A record is committed to your journal immediately.
Editing a record
Click a field to edit inline. Changes save when you click away or press Enter.
Editable fields: date, payee, amount, account, category, memo.
Splitting a record
Expand a row to view its postings. Split one record across multiple categories (e.g., a store receipt split between Groceries and Household).
Deleting records
Select one or more records. Click Delete or press the Delete key. A confirmation banner appears -press Delete again to confirm, or Escape to cancel (two-stage delete). Selected rows are highlighted in red while pending confirmation.
Renaming multiple records
Click Rename to open the bulk find-and-replace tool. Select a scope (payee, memo, category, or account), search for a value, and replace it across matching records.
Transfers
A transfer is a record between two asset/liability accounts. Enter both account names in the record. Surebeans marks the movement as a transfer. Click the swap icon on a transfer row to filter and show both sides.
You can also click Transfer to build one in a dialog: pick the two accounts and the amount. If the two accounts use different currencies, the dialog turns into a currency exchange and also asks for the amount received, recording both real amounts and the rate between them. See Multi-Currency.
Reordering records
Drag a row by its grip handle (the leftmost column). A blue line shows where the record will land. The record takes the date of the row below the drop line, or today’s date if dropped above the first row.
Reconciliation
Click the status dot to cycle a record’s cleared status: New (blue) → Pending (orange) → Cleared (grey). When multiple records are selected, clicking any dot in the selection cycles all selected records to the same status.
Infinite scroll
Records load progressively as you scroll. No pagination controls needed.
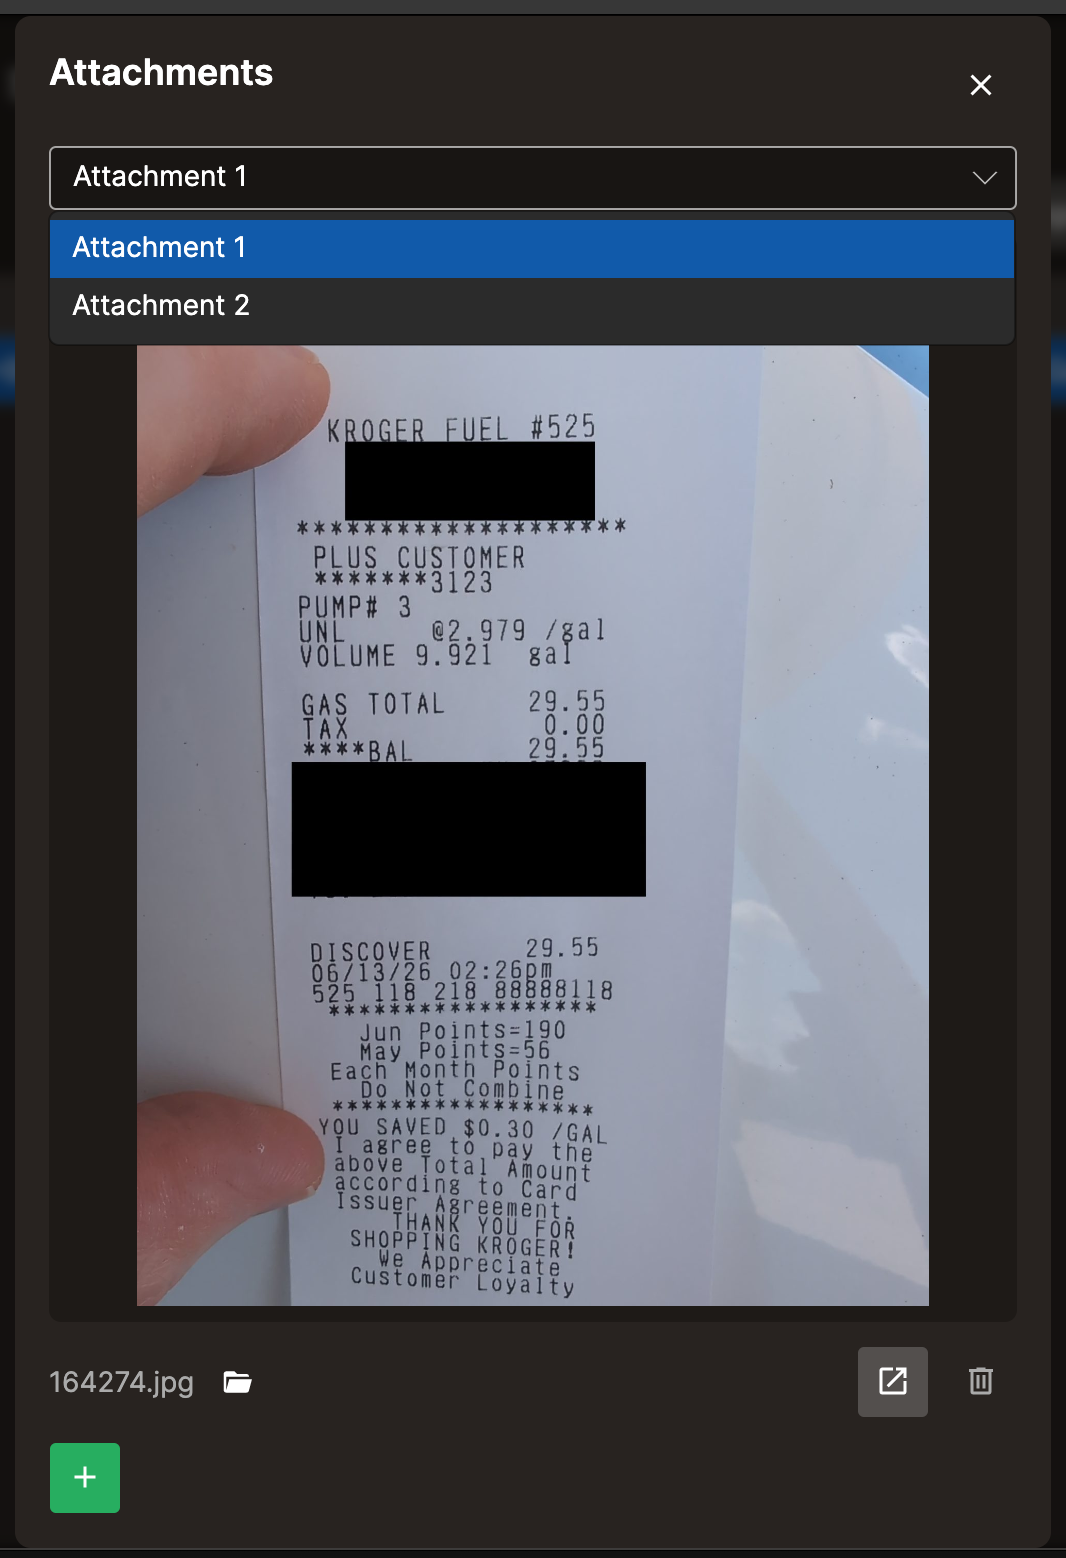
Attachments
You can attach files to records, such as receipts, invoices, or statements.
Drag and drop. Drop a file directly onto a record row to attach it.
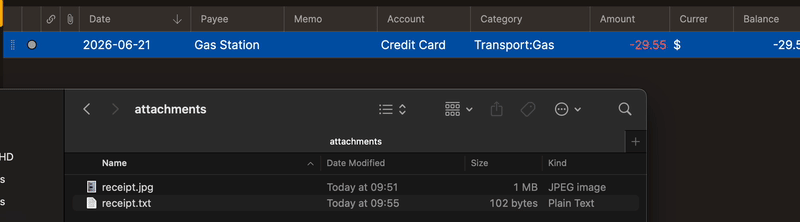
Attachment dialog. Click the attachment icon on a record to open the dialog.

From there, drop a file into the dialog:
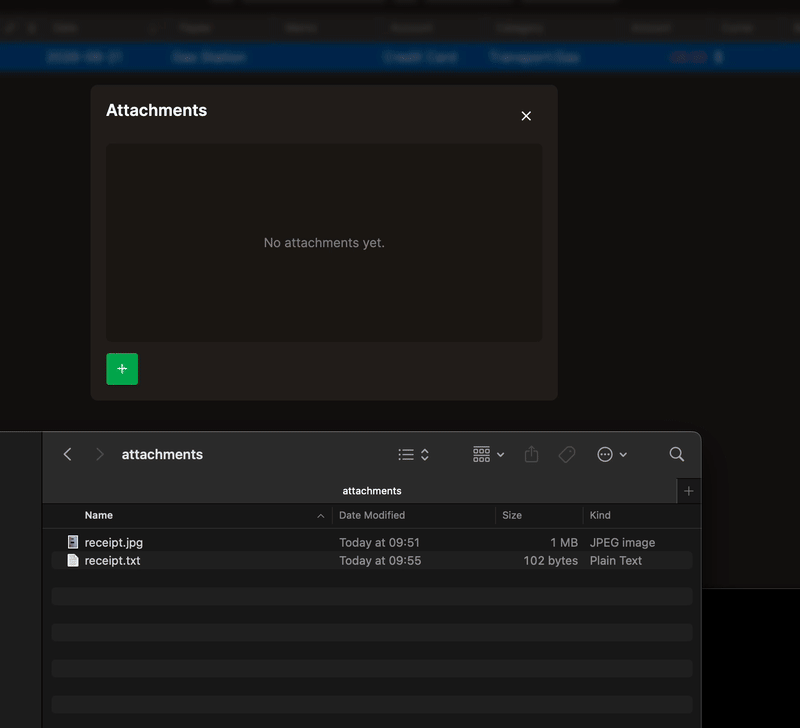
Or click + to pick one.
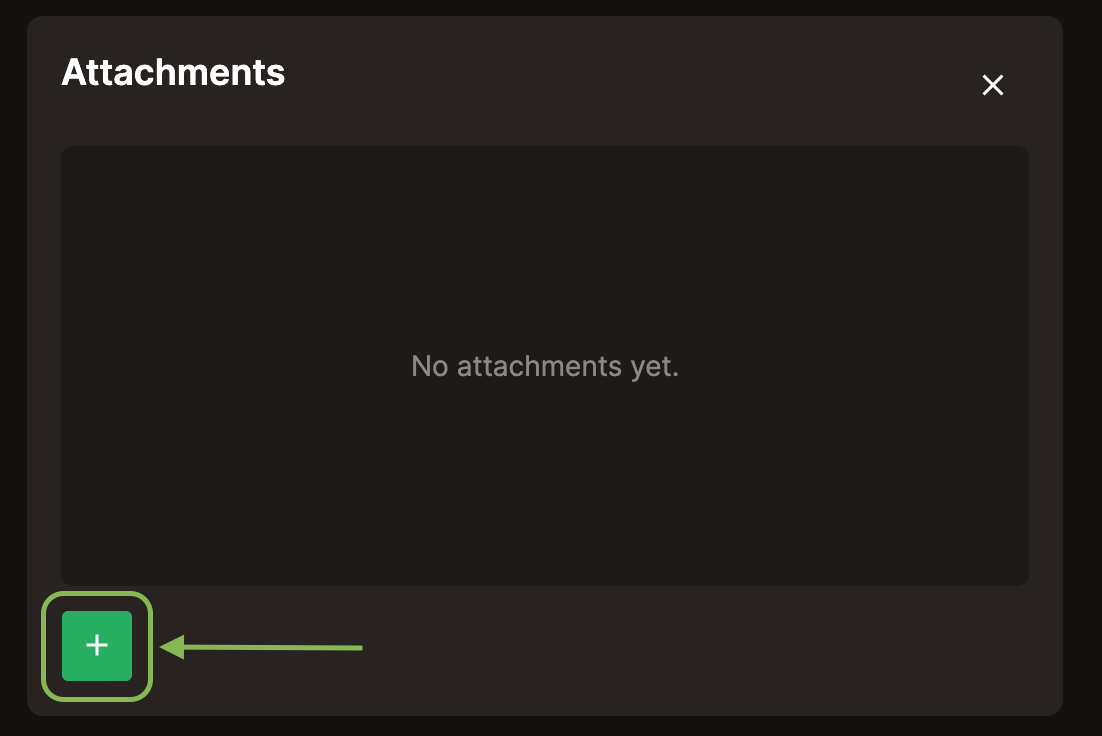
The dialog displays images and text inline. For other file types, click Open to launch the file in its associated app.
Keyboard shortcuts
| Key | Action |
|---|---|
| Enter | Save current edit |
| Escape | Cancel current edit / cancel pending delete |
| Delete | Mark selected for deletion (first press), confirm (second press) |
| F2 | Enter edit mode on selected cell |
| Cmd/Ctrl+Click | Toggle row selection |
| Shift+Click | Range select |
Accounts
Overview of the accounts that make up your net worth, with balances grouped by type.
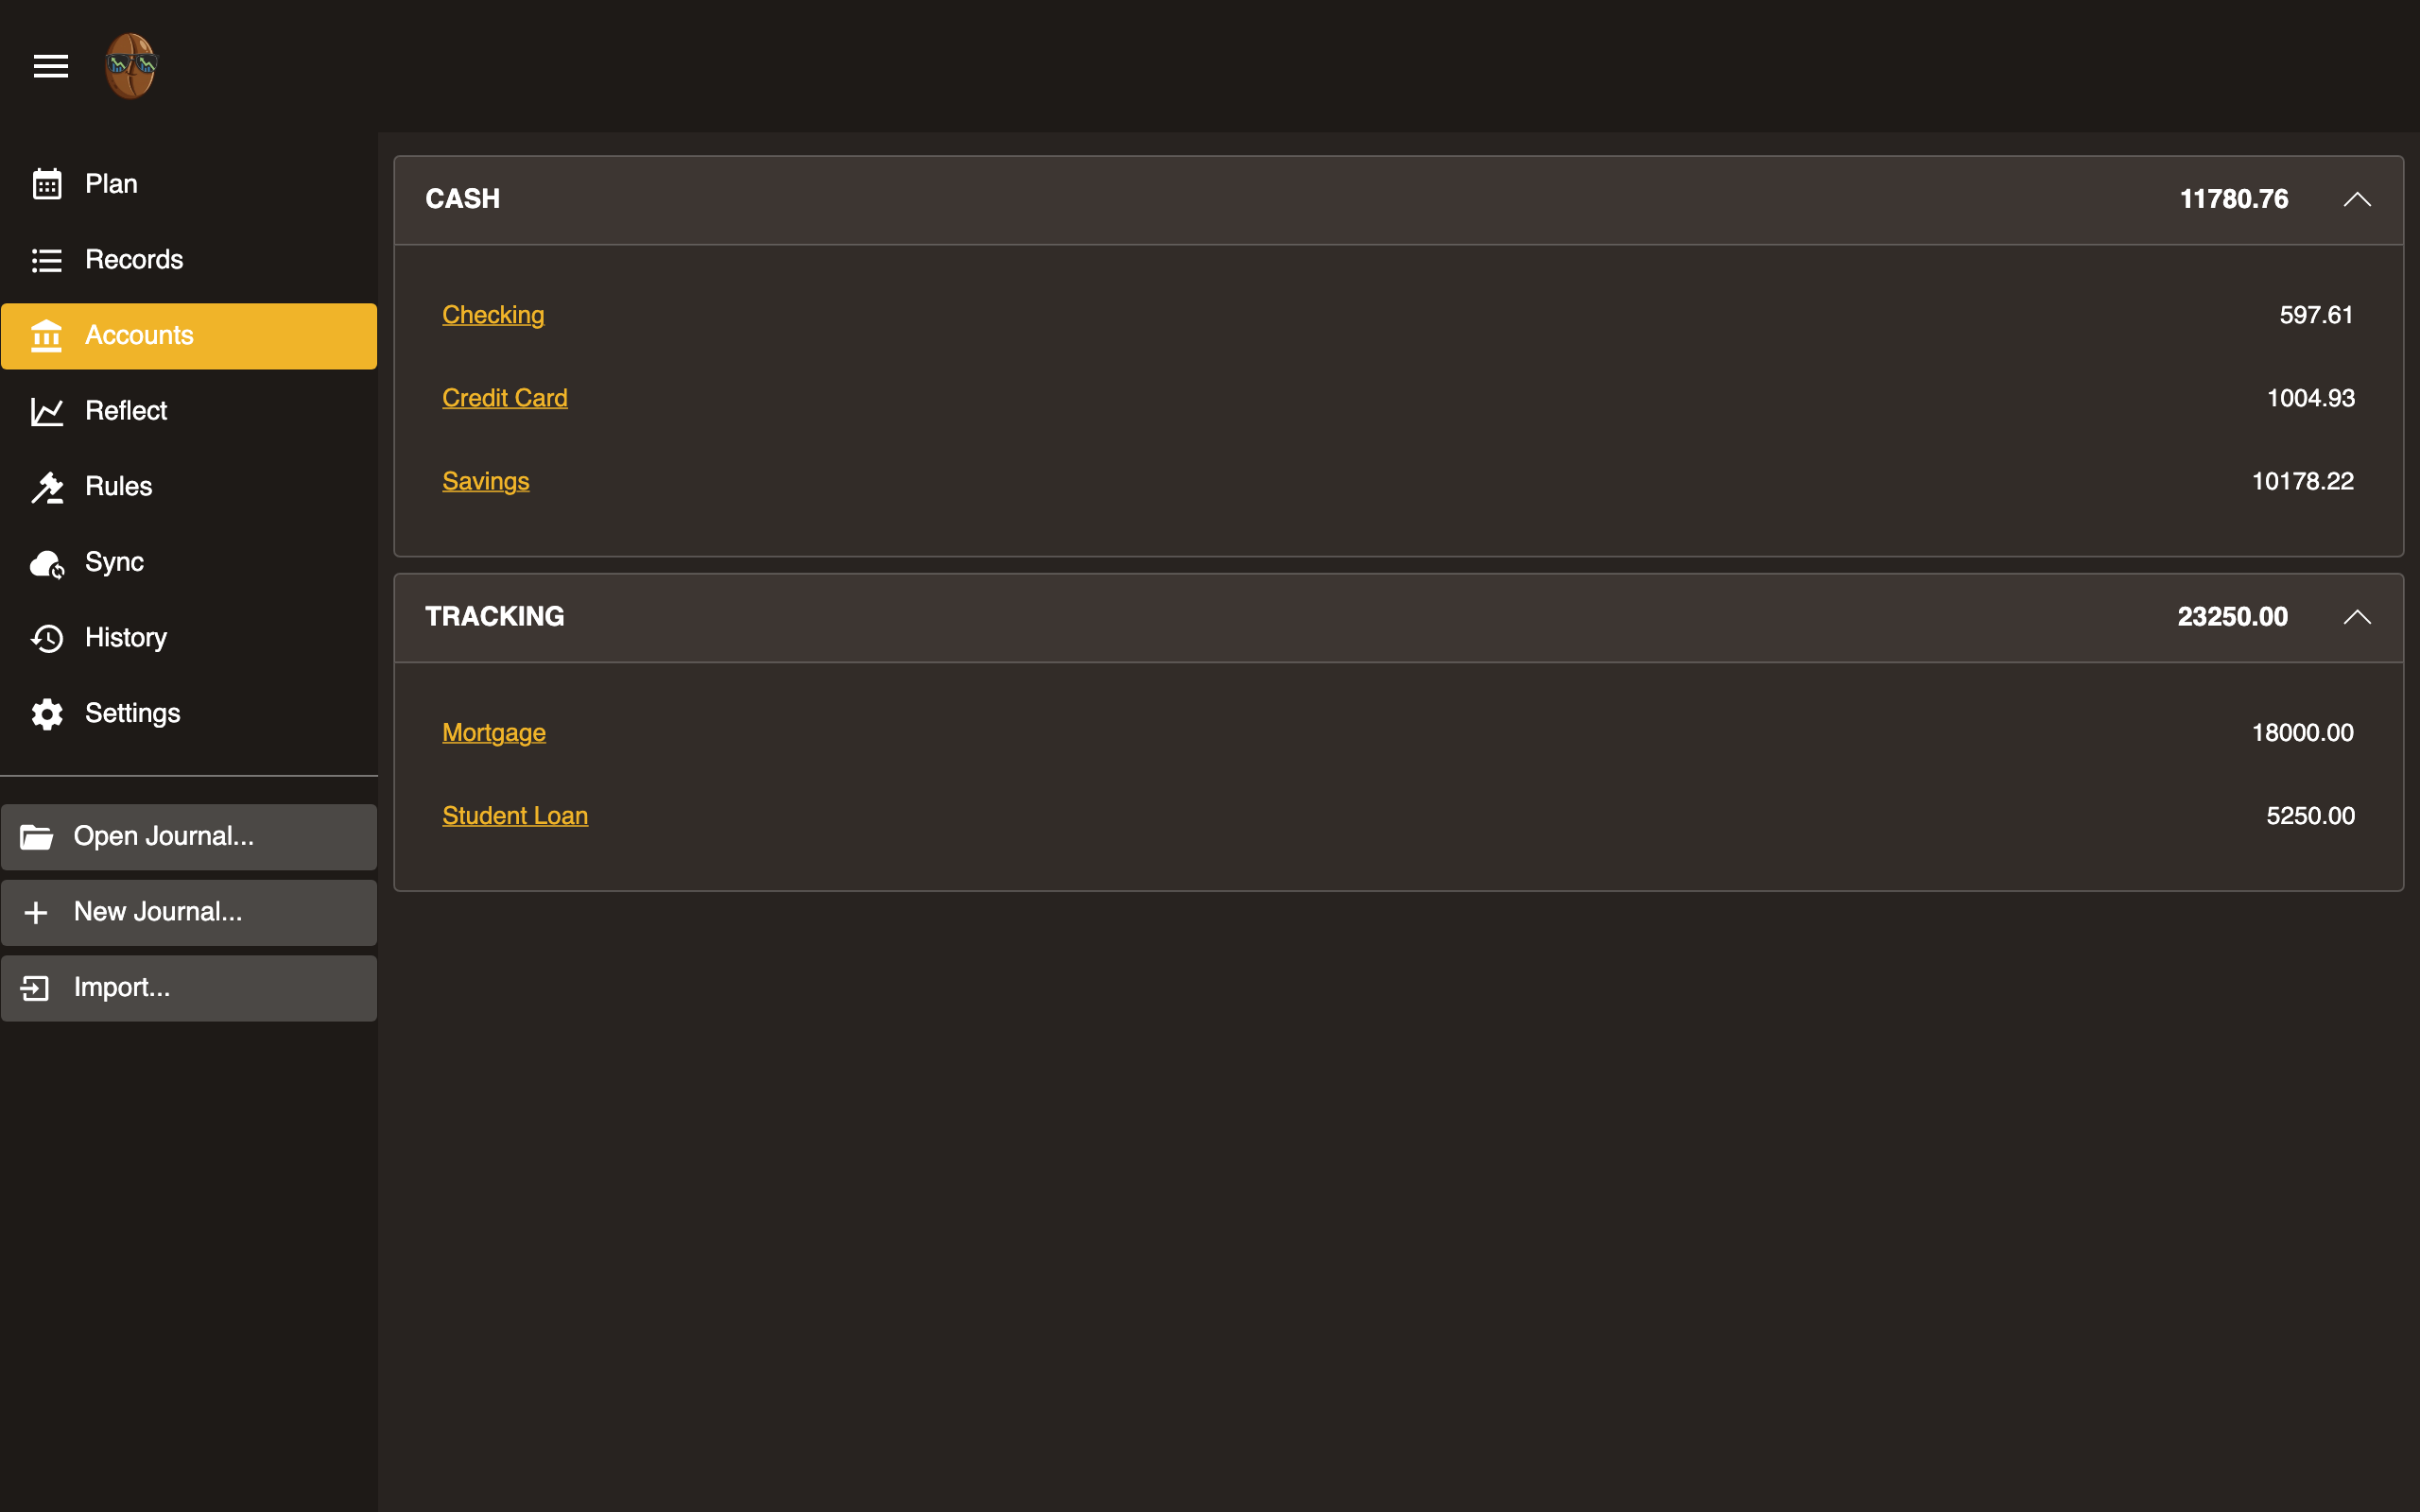
Account groups
Accounts are shown in three groups:
- Assets: checking, savings, cash
- Liabilities: credit cards, loans
- Tracking: balances you watch but that sit outside the budget, such as investments or a mortgage
Each group shows a running total. Click the arrow on a group row to collapse or expand it. Income and expense categories live on the Plan tab, not here.
Adding an account
Click + Add in the header. Enter a name, choose a type (Asset, Liability, or Tracking), and click Add. The type sets the path root, so an Asset named “Checking” becomes Assets:Checking.
Selecting an account
Click an account row to select it. The selected row is highlighted, and the Rename, Delete, and View records buttons in the header act on it.
Renaming an account
Select an account and click the pencil (Rename) button. The name becomes editable in place. Press Enter to save or Escape to cancel.
Deleting an account
Select an account and click the trash (Delete) button. A banner asks you to confirm. If the account is used by records, the banner says how many records will be deleted with it. Click Delete to confirm or Cancel to dismiss.
Viewing account records
Select an account and click the View records button, or double-click the row (long-press on touch), to open Records filtered to that account. The cumulative balance column becomes visible there.
Account balances
Balances are computed from all records in the journal. They update in real time as you add or edit records.
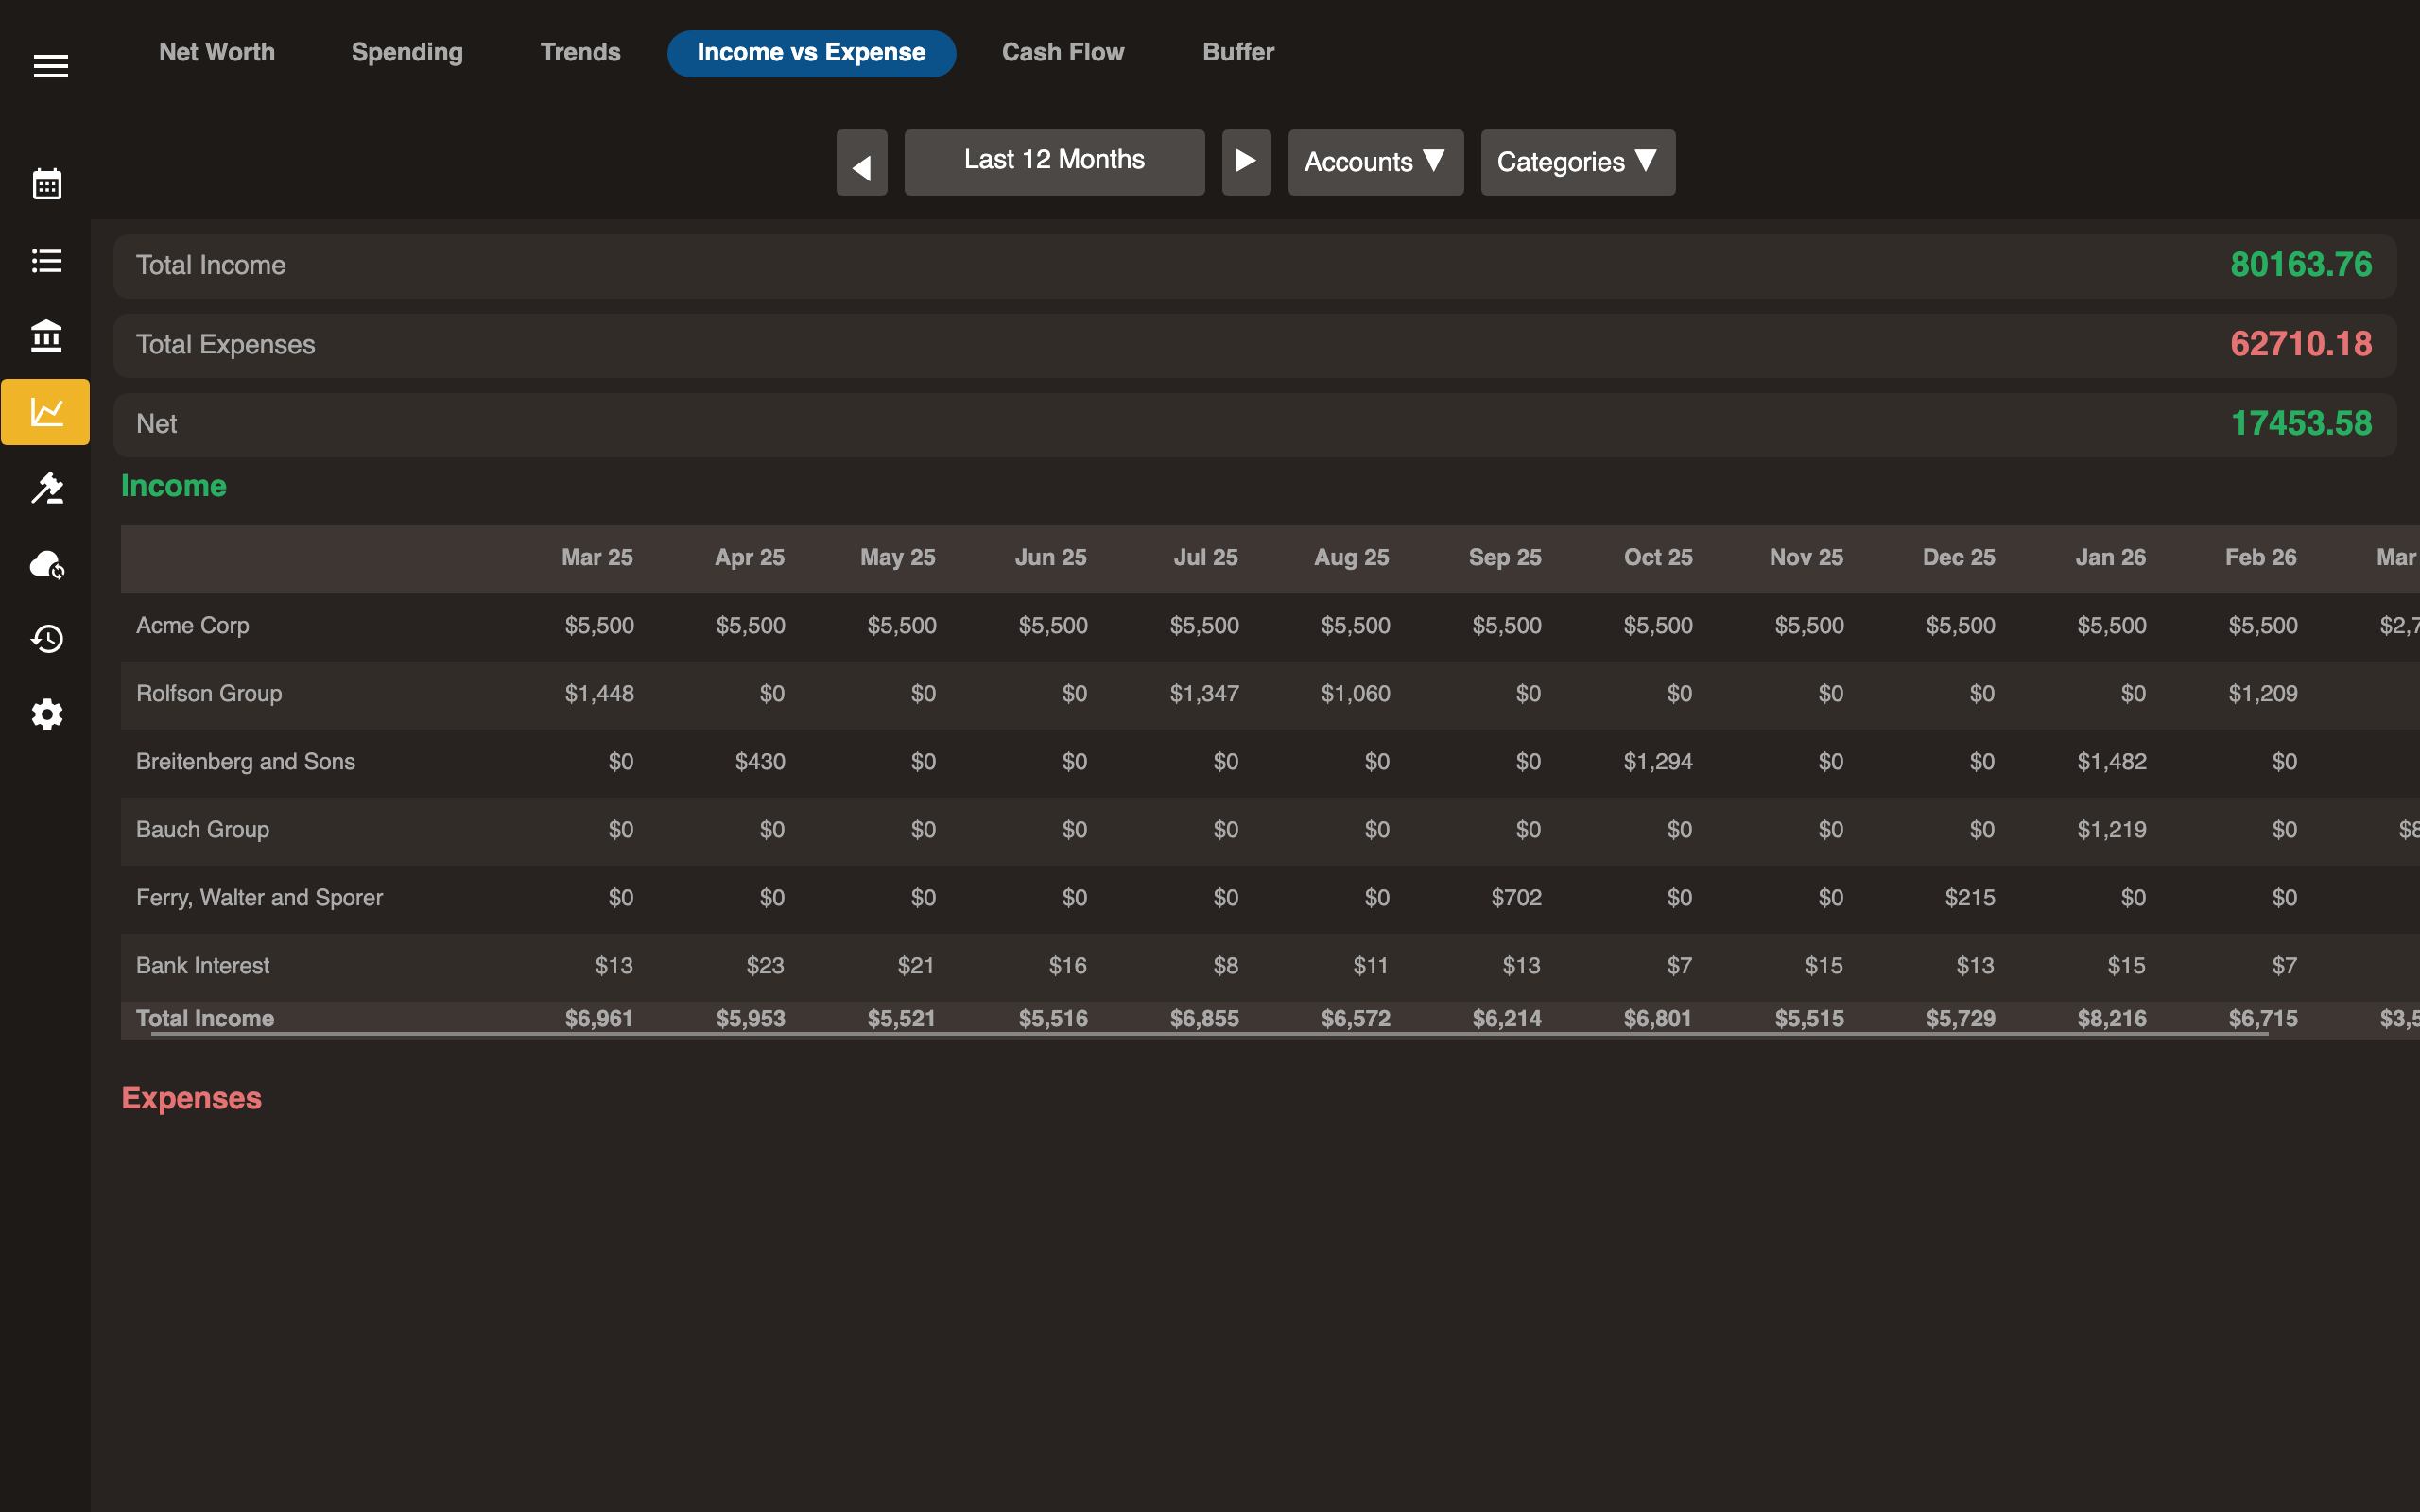
Reflect
Reports and analytics. Select a report type from the pill bar at the top.
| Report | Description |
|---|---|
| Net Worth | Assets minus liabilities over time |
| Spending | Breakdown by expense category |
| Trends | Spending patterns over time |
| Income vs Expense | Monthly income and expense comparison |
| Cash Flow | Inflows and outflows |
| Buffer | Days of runway based on spending rate |
| Gain/Loss | Realized and unrealized gain on securities and currencies |
When your journal holds more than one currency or any securities, reports convert to your reporting currency. See Multi-Currency.
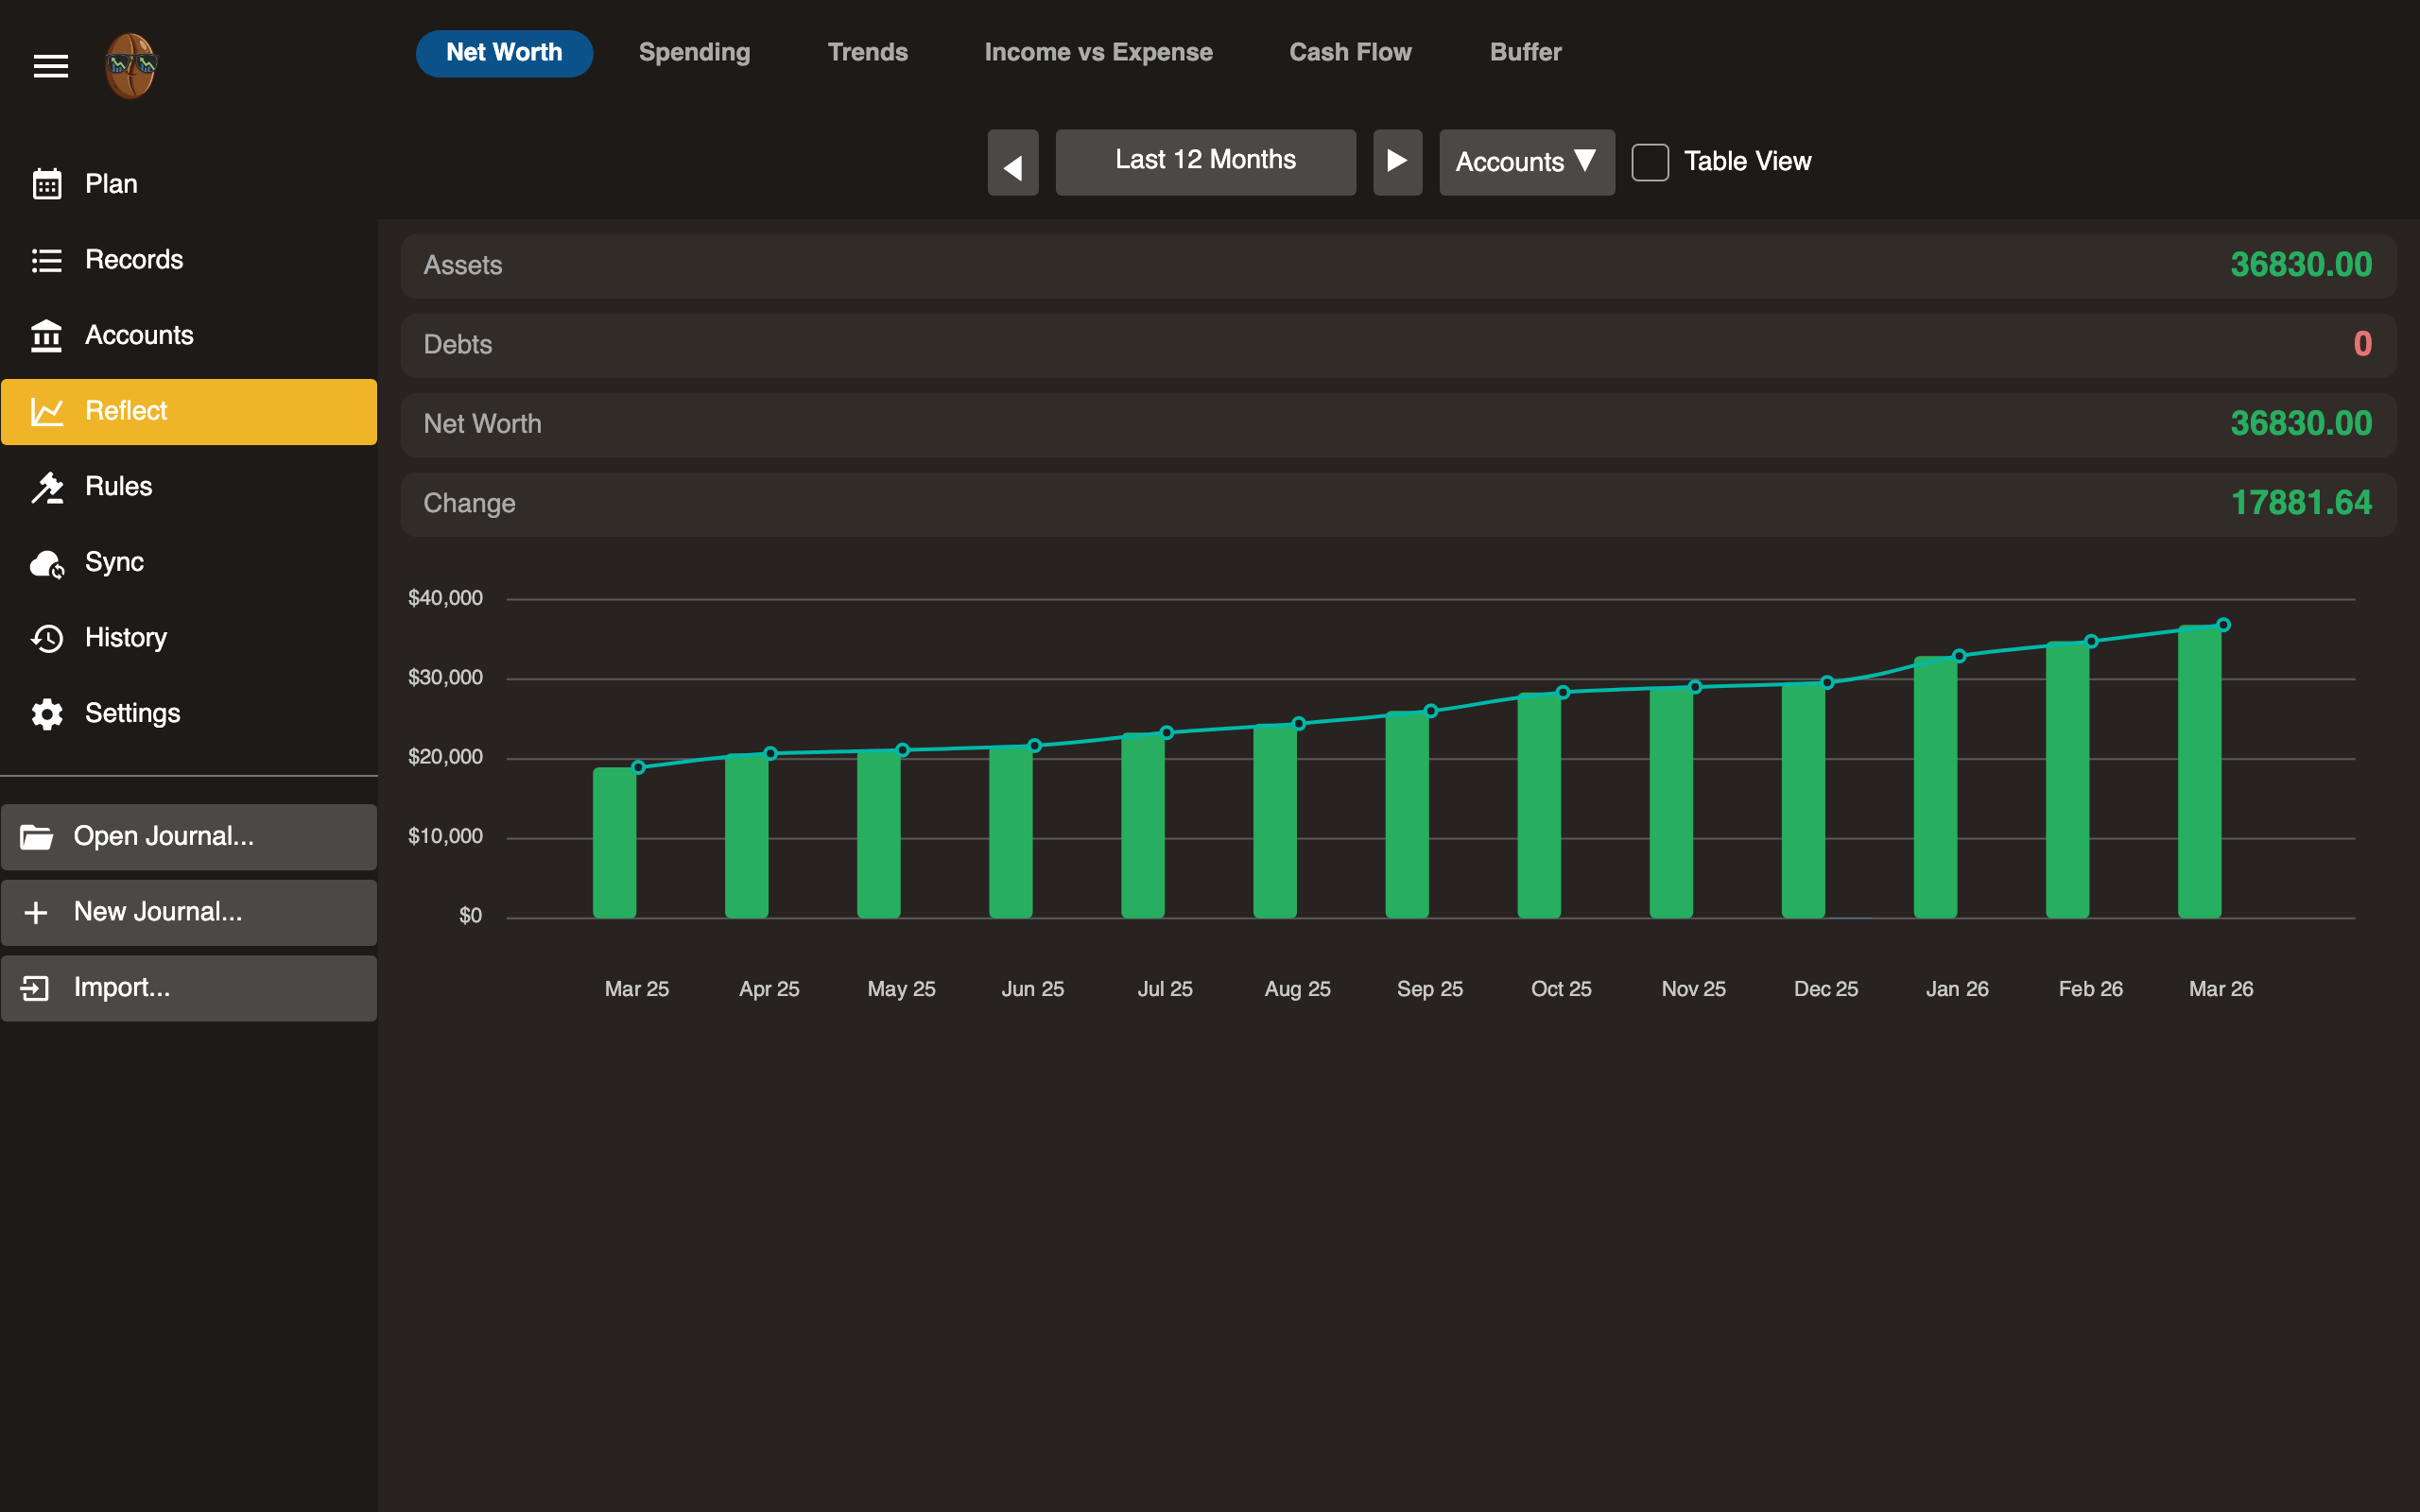
Net Worth
Tracks your total assets minus total liabilities over time.
Reading the chart
- Assets (top line): Sum of all asset accounts (checking, savings, investments).
- Liabilities (bottom line): Sum of all liability accounts (credit cards, loans).
- Net Worth (middle area): Assets minus liabilities.
The chart shows monthly data points. Hover over a point to see exact values.
Date range
Adjust the date range to zoom in on a specific period or view the full history.
Multiple currencies and securities
When your journal holds more than one commodity, net worth is converted into your reporting currency using market prices, so the chart stays one readable number. Each historical point is valued at the prices as of its own date, so past months do not shift when new prices arrive.
A By currency breakdown lists each commodity you hold, its native amount, and its converted value, so you can see what makes up the total.
Fetch prices pulls current rates and security prices and appends them to your journal. If a commodity has no price, net worth flags it as unpriced rather than guessing; fetch prices or add one to include it. See Multi-Currency for how prices work.
Currency change
Net worth uses current market prices, so it moves as exchange rates and security prices move, even when you make no transactions. Holding euros while the euro strengthens raises your net worth on its own. This is unrealized currency gain.
The currency change line isolates how much of a period’s change came from rate and price movement rather than real activity, so a market swing never looks like income or spending. Your Spending and budget reports are unaffected: a foreign purchase is valued at the rate on its date and never re-valued.
Spending
Breakdown of expenses by category for a given period.
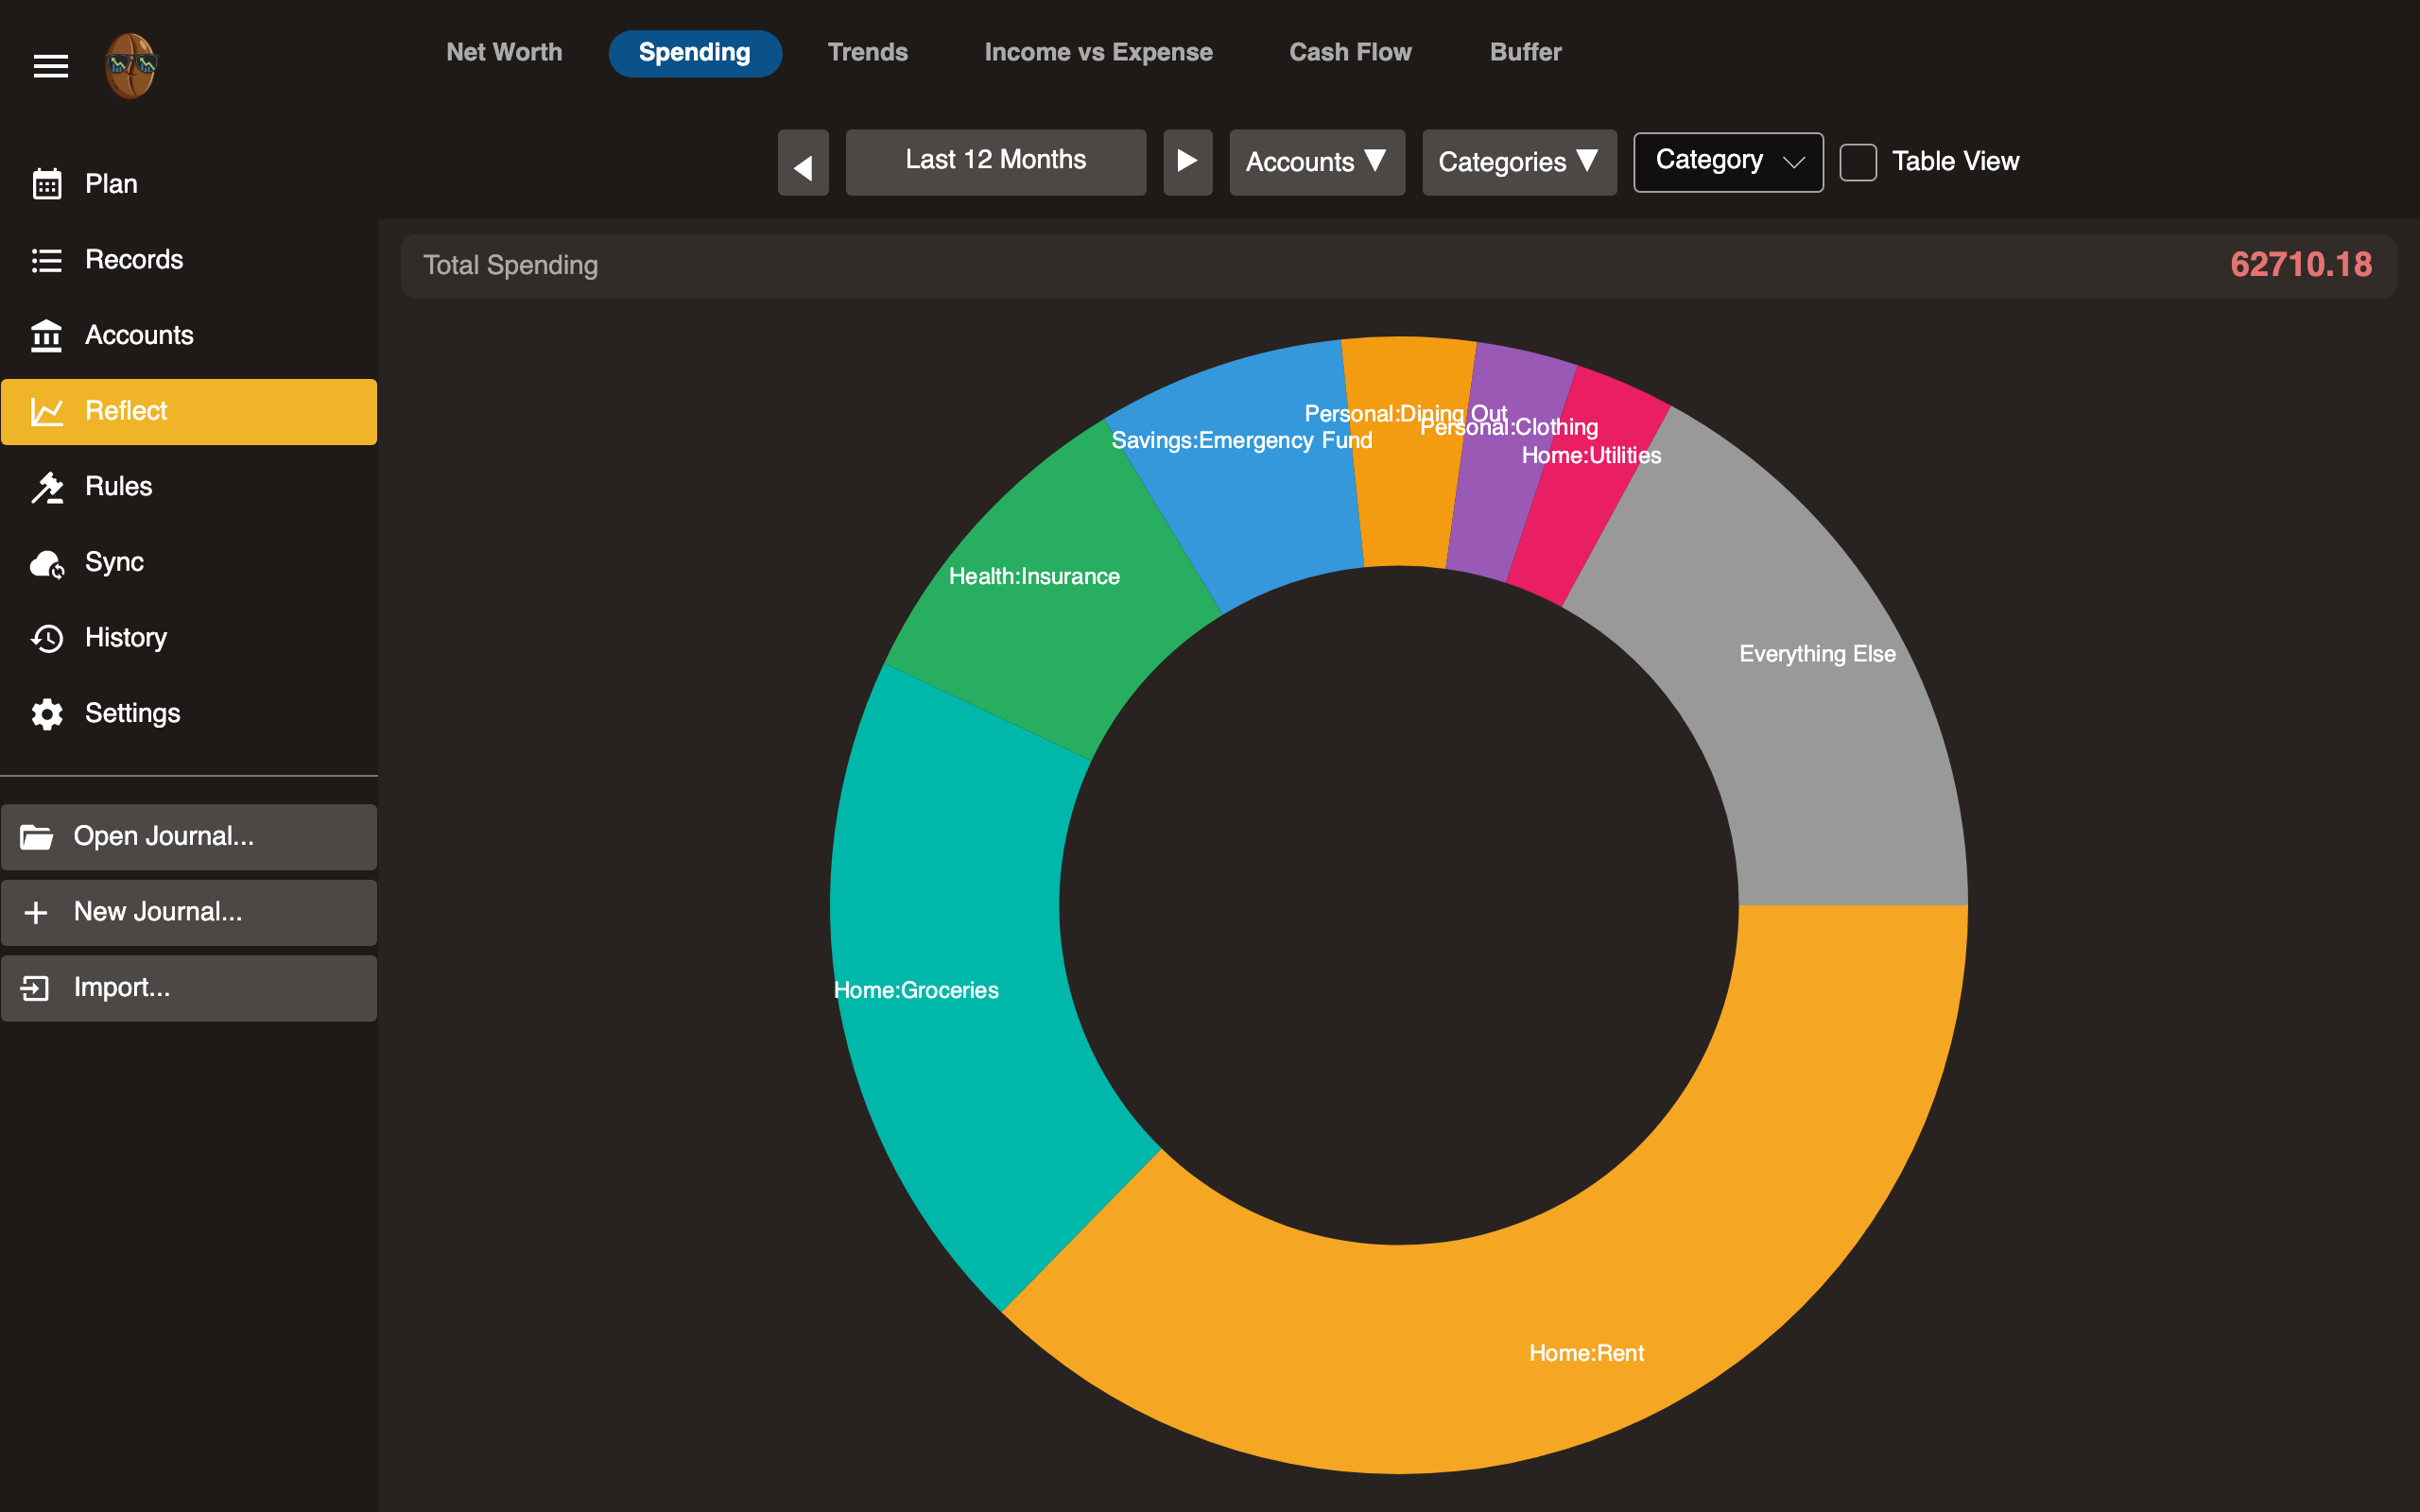
Reading the chart
Shows each expense category’s share of total spending. Categories are sorted by amount.
Date range
Select a month or custom range to analyze spending for that period.
Trends
Spending patterns over time, broken down by category.
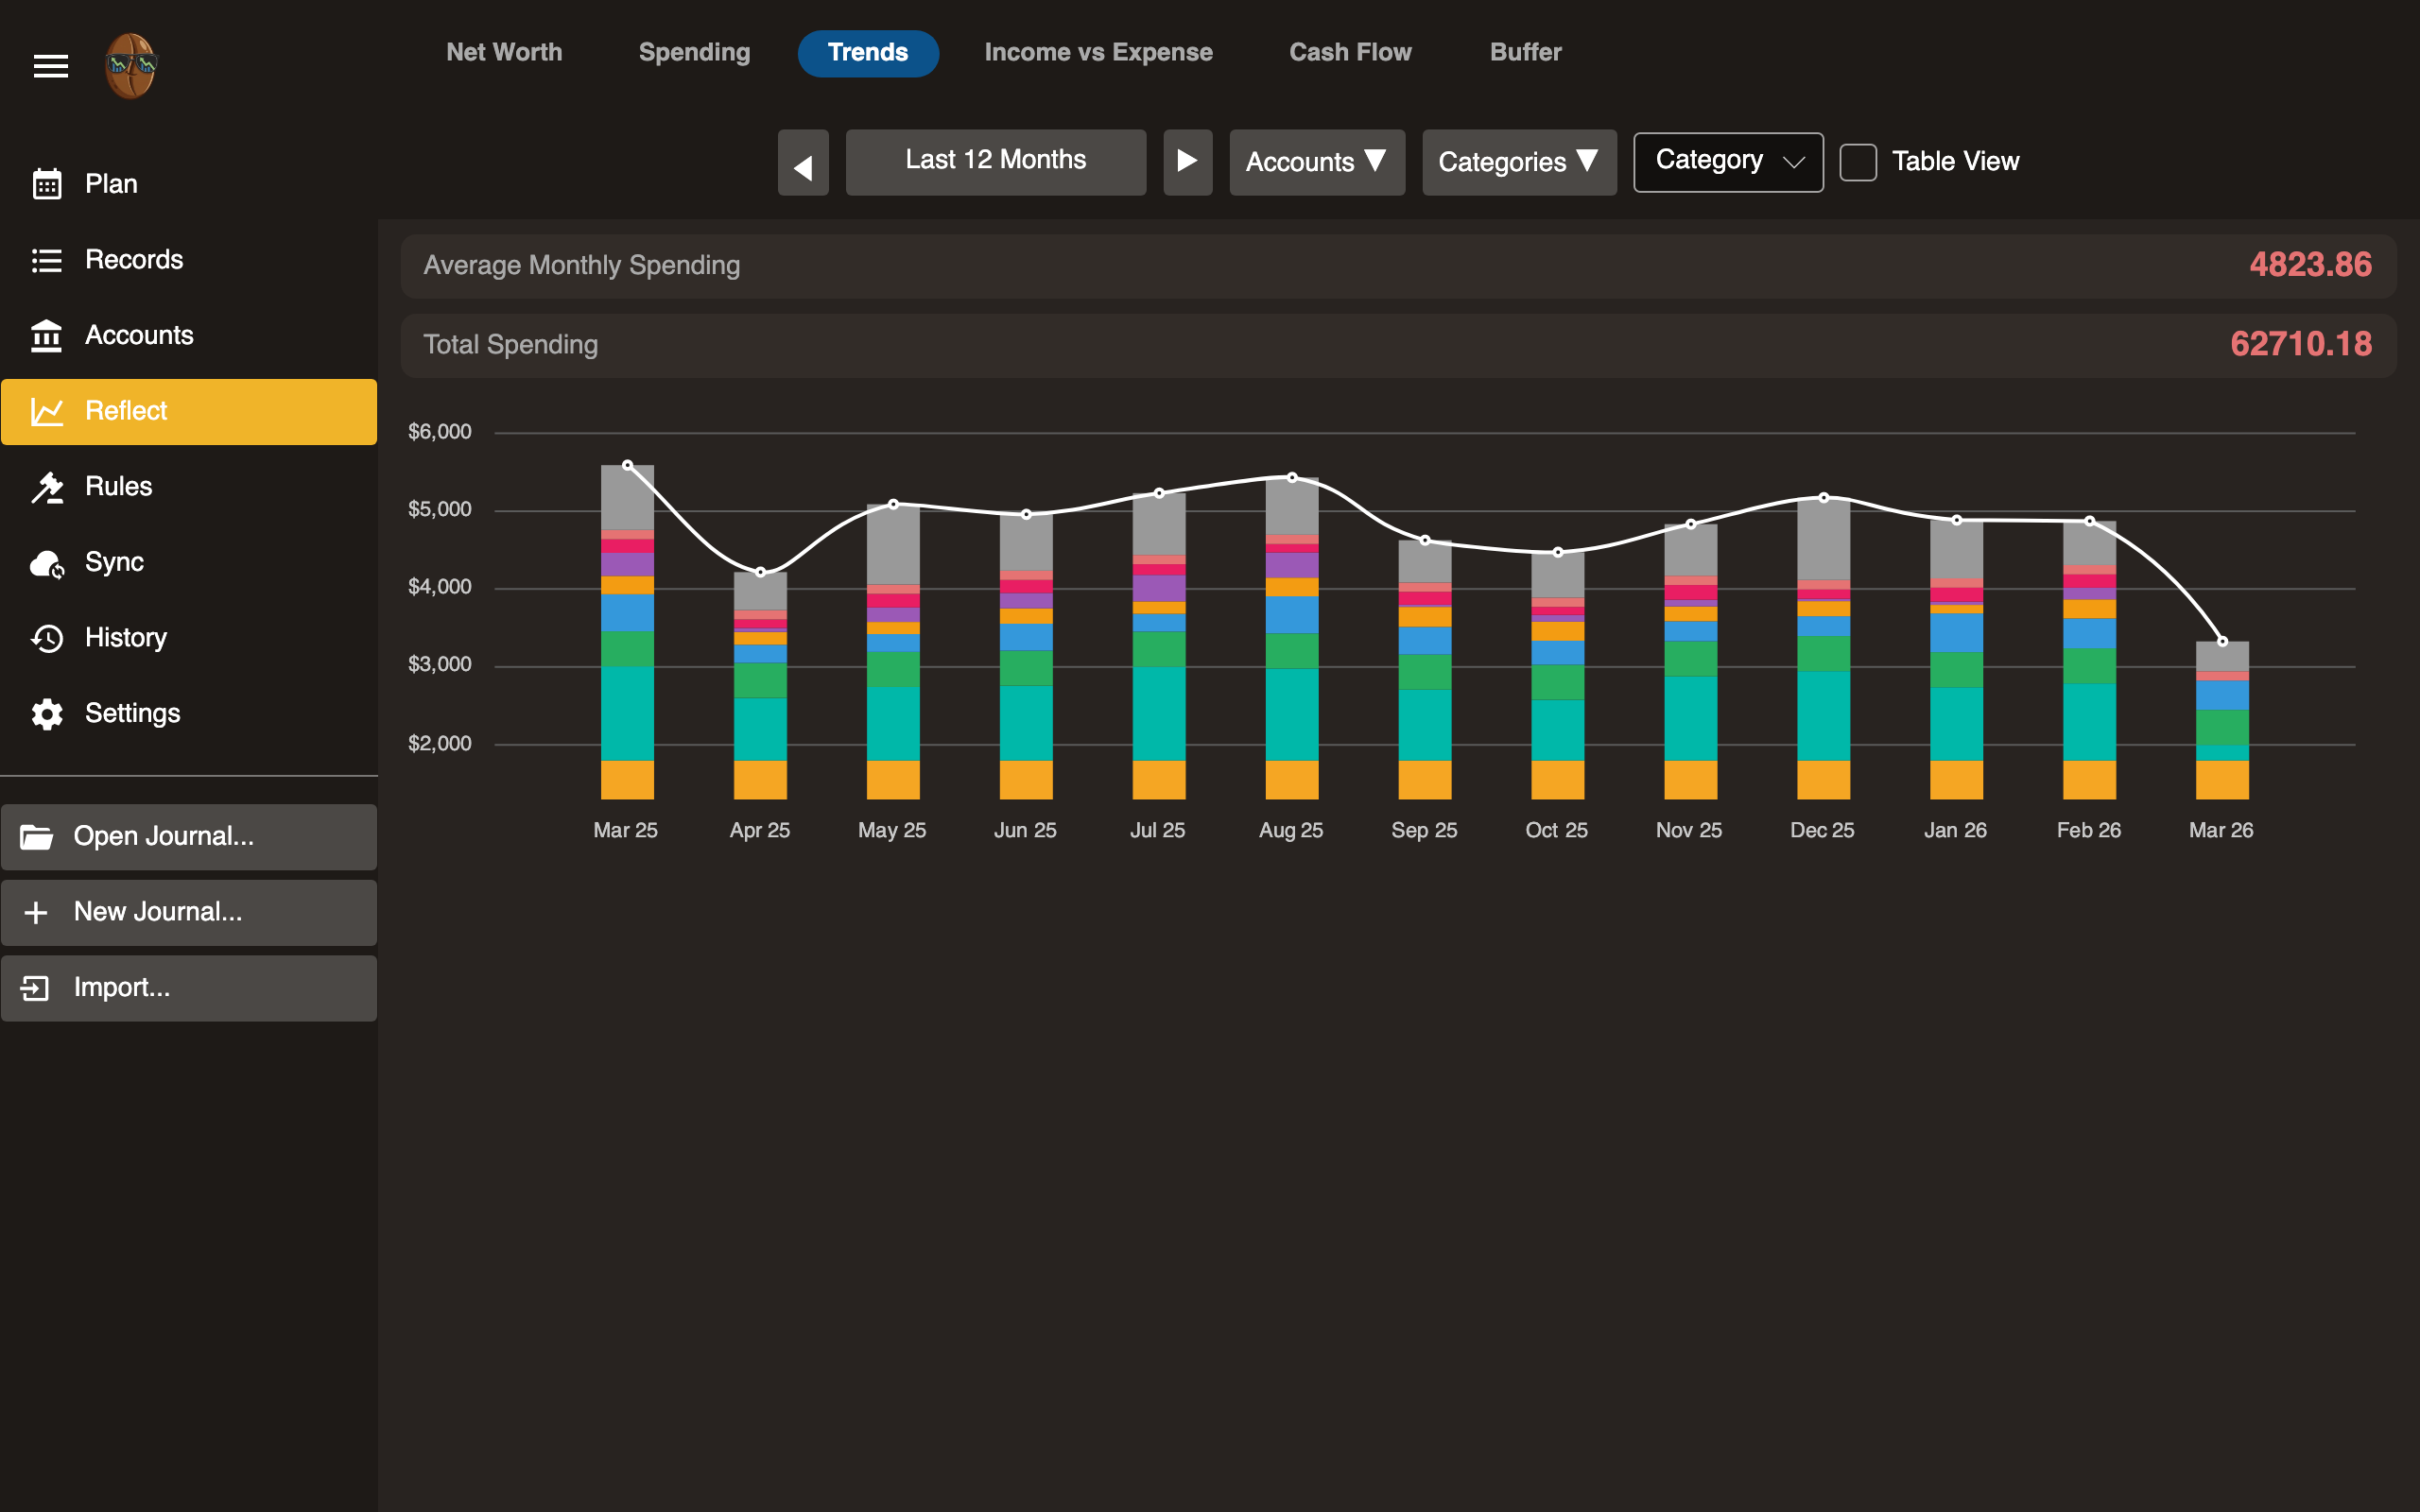
Reading the chart
Line chart showing monthly spending per category. Identify categories where spending is increasing or decreasing.
Date range
Adjust the range to view short-term or long-term trends.
Income vs Expense
Monthly comparison of total income and total expenses.
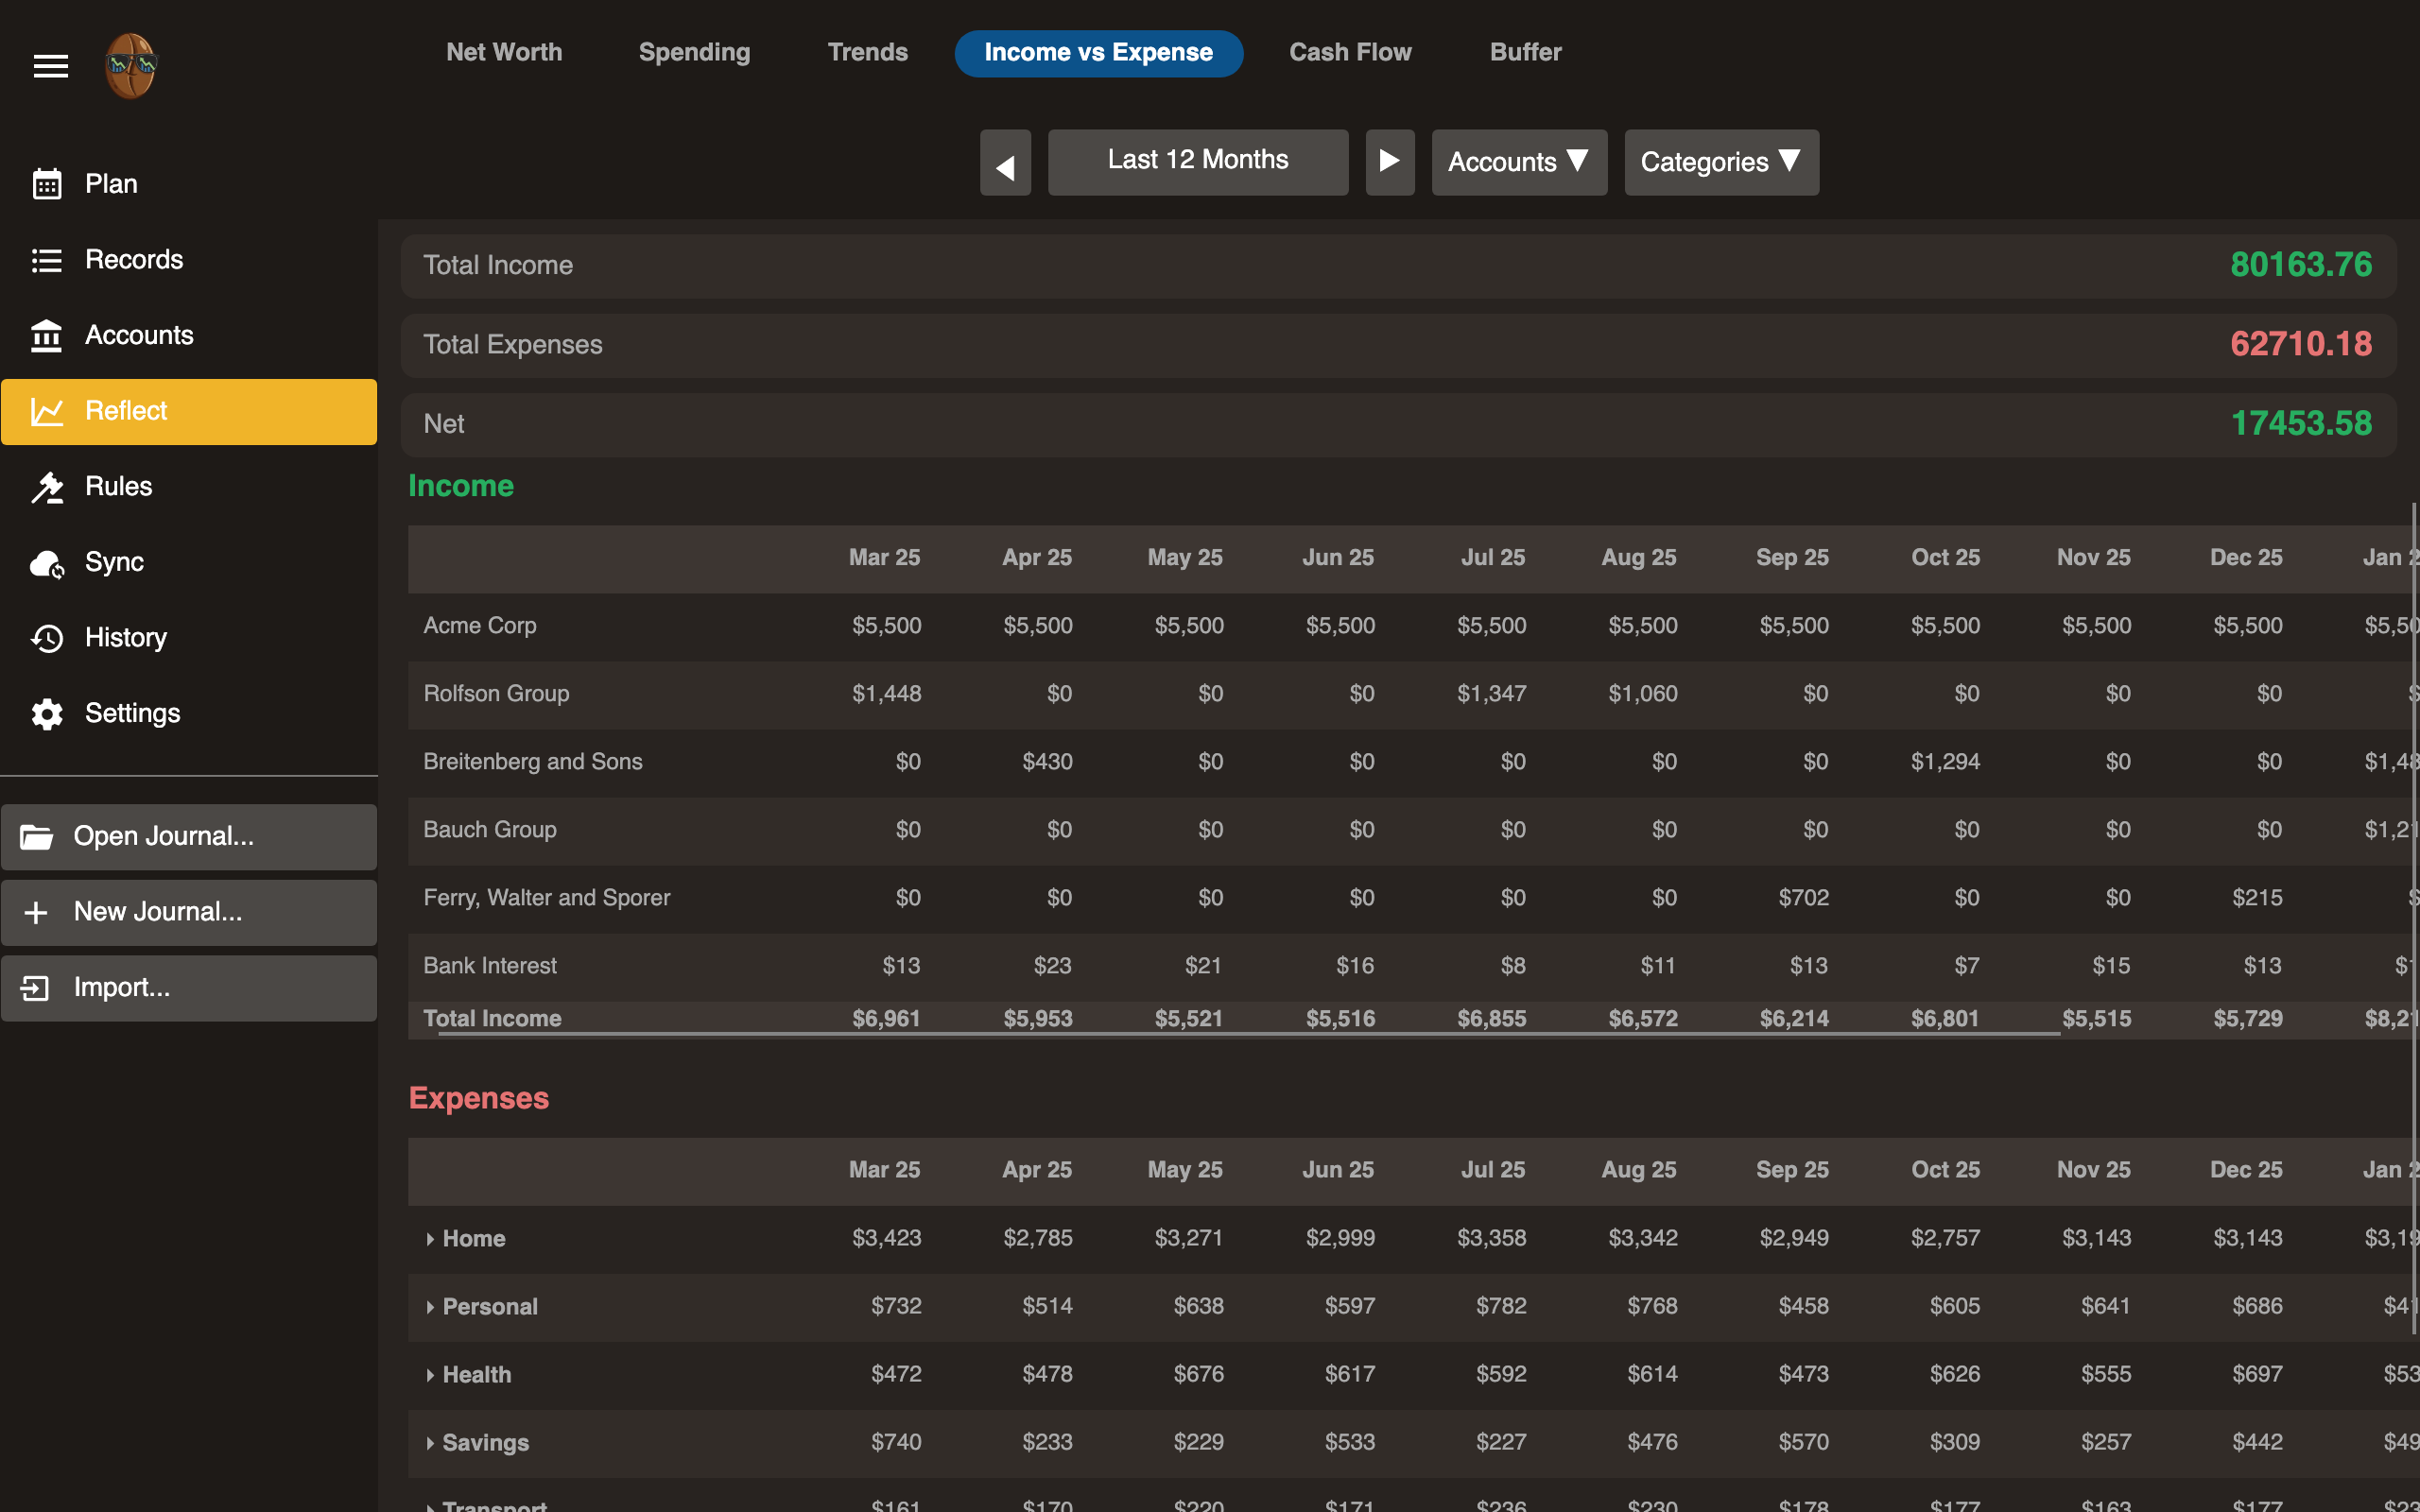
Reading the chart
- Income bars: Total income received each month.
- Expense bars: Total expenses each month.
- Net: The difference. Positive = you saved money. Negative = you spent more than you earned.
Date range
Shows monthly bars for the selected period.
Cash Flow
Inflows and outflows of money over time.
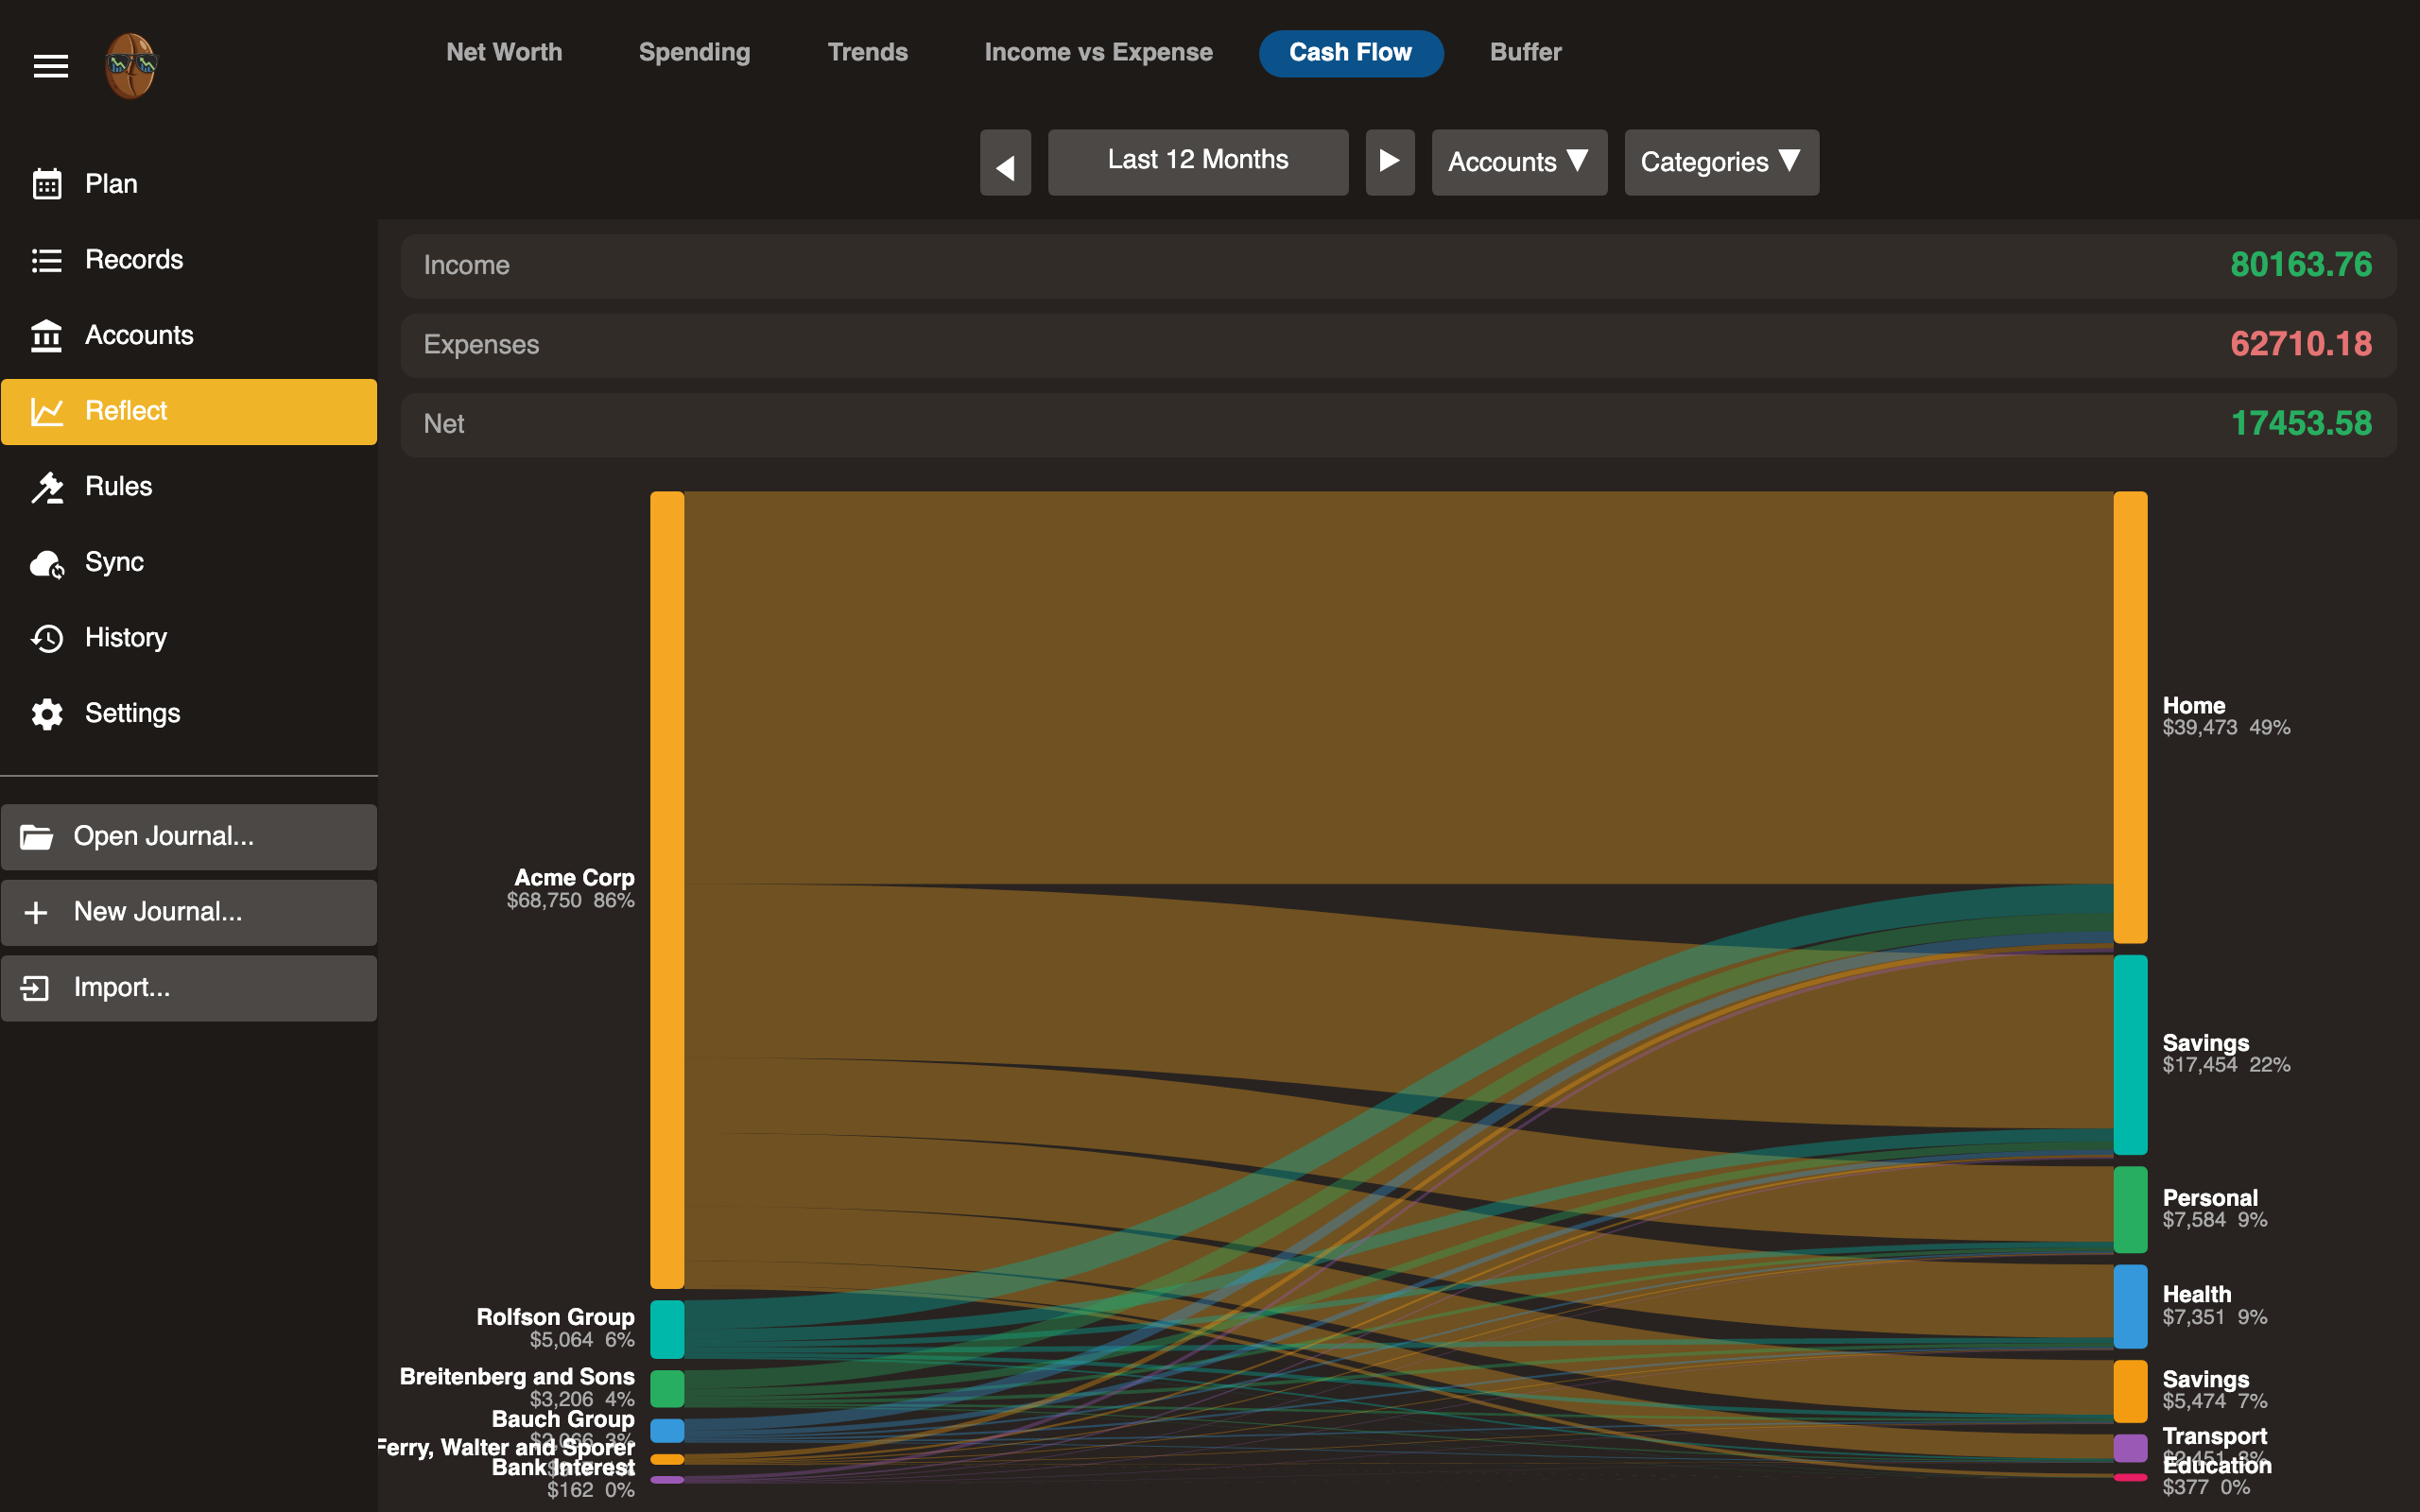
Reading the chart
- Inflows: Money coming in (income, refunds, transfers in).
- Outflows: Money going out (expenses, transfers out).
Helps identify months with cash shortfalls or surpluses.
Date range
Adjust to view monthly, quarterly, or yearly cash flow patterns.
Buffer
How many days of expenses your current balances can cover.

Reading the chart
Buffer = total liquid assets / average daily spending. A buffer of 30 means you could cover 30 days of expenses with no income.
Interpretation
| Buffer | Meaning |
|---|---|
| < 30 days | Living paycheck to paycheck |
| 30-90 days | One to three month cushion |
| > 90 days | Solid financial buffer |
Track this over time to see if your financial resilience is improving.
Gain/Loss
Realized and unrealized gain or loss per commodity, for securities and foreign currencies together.
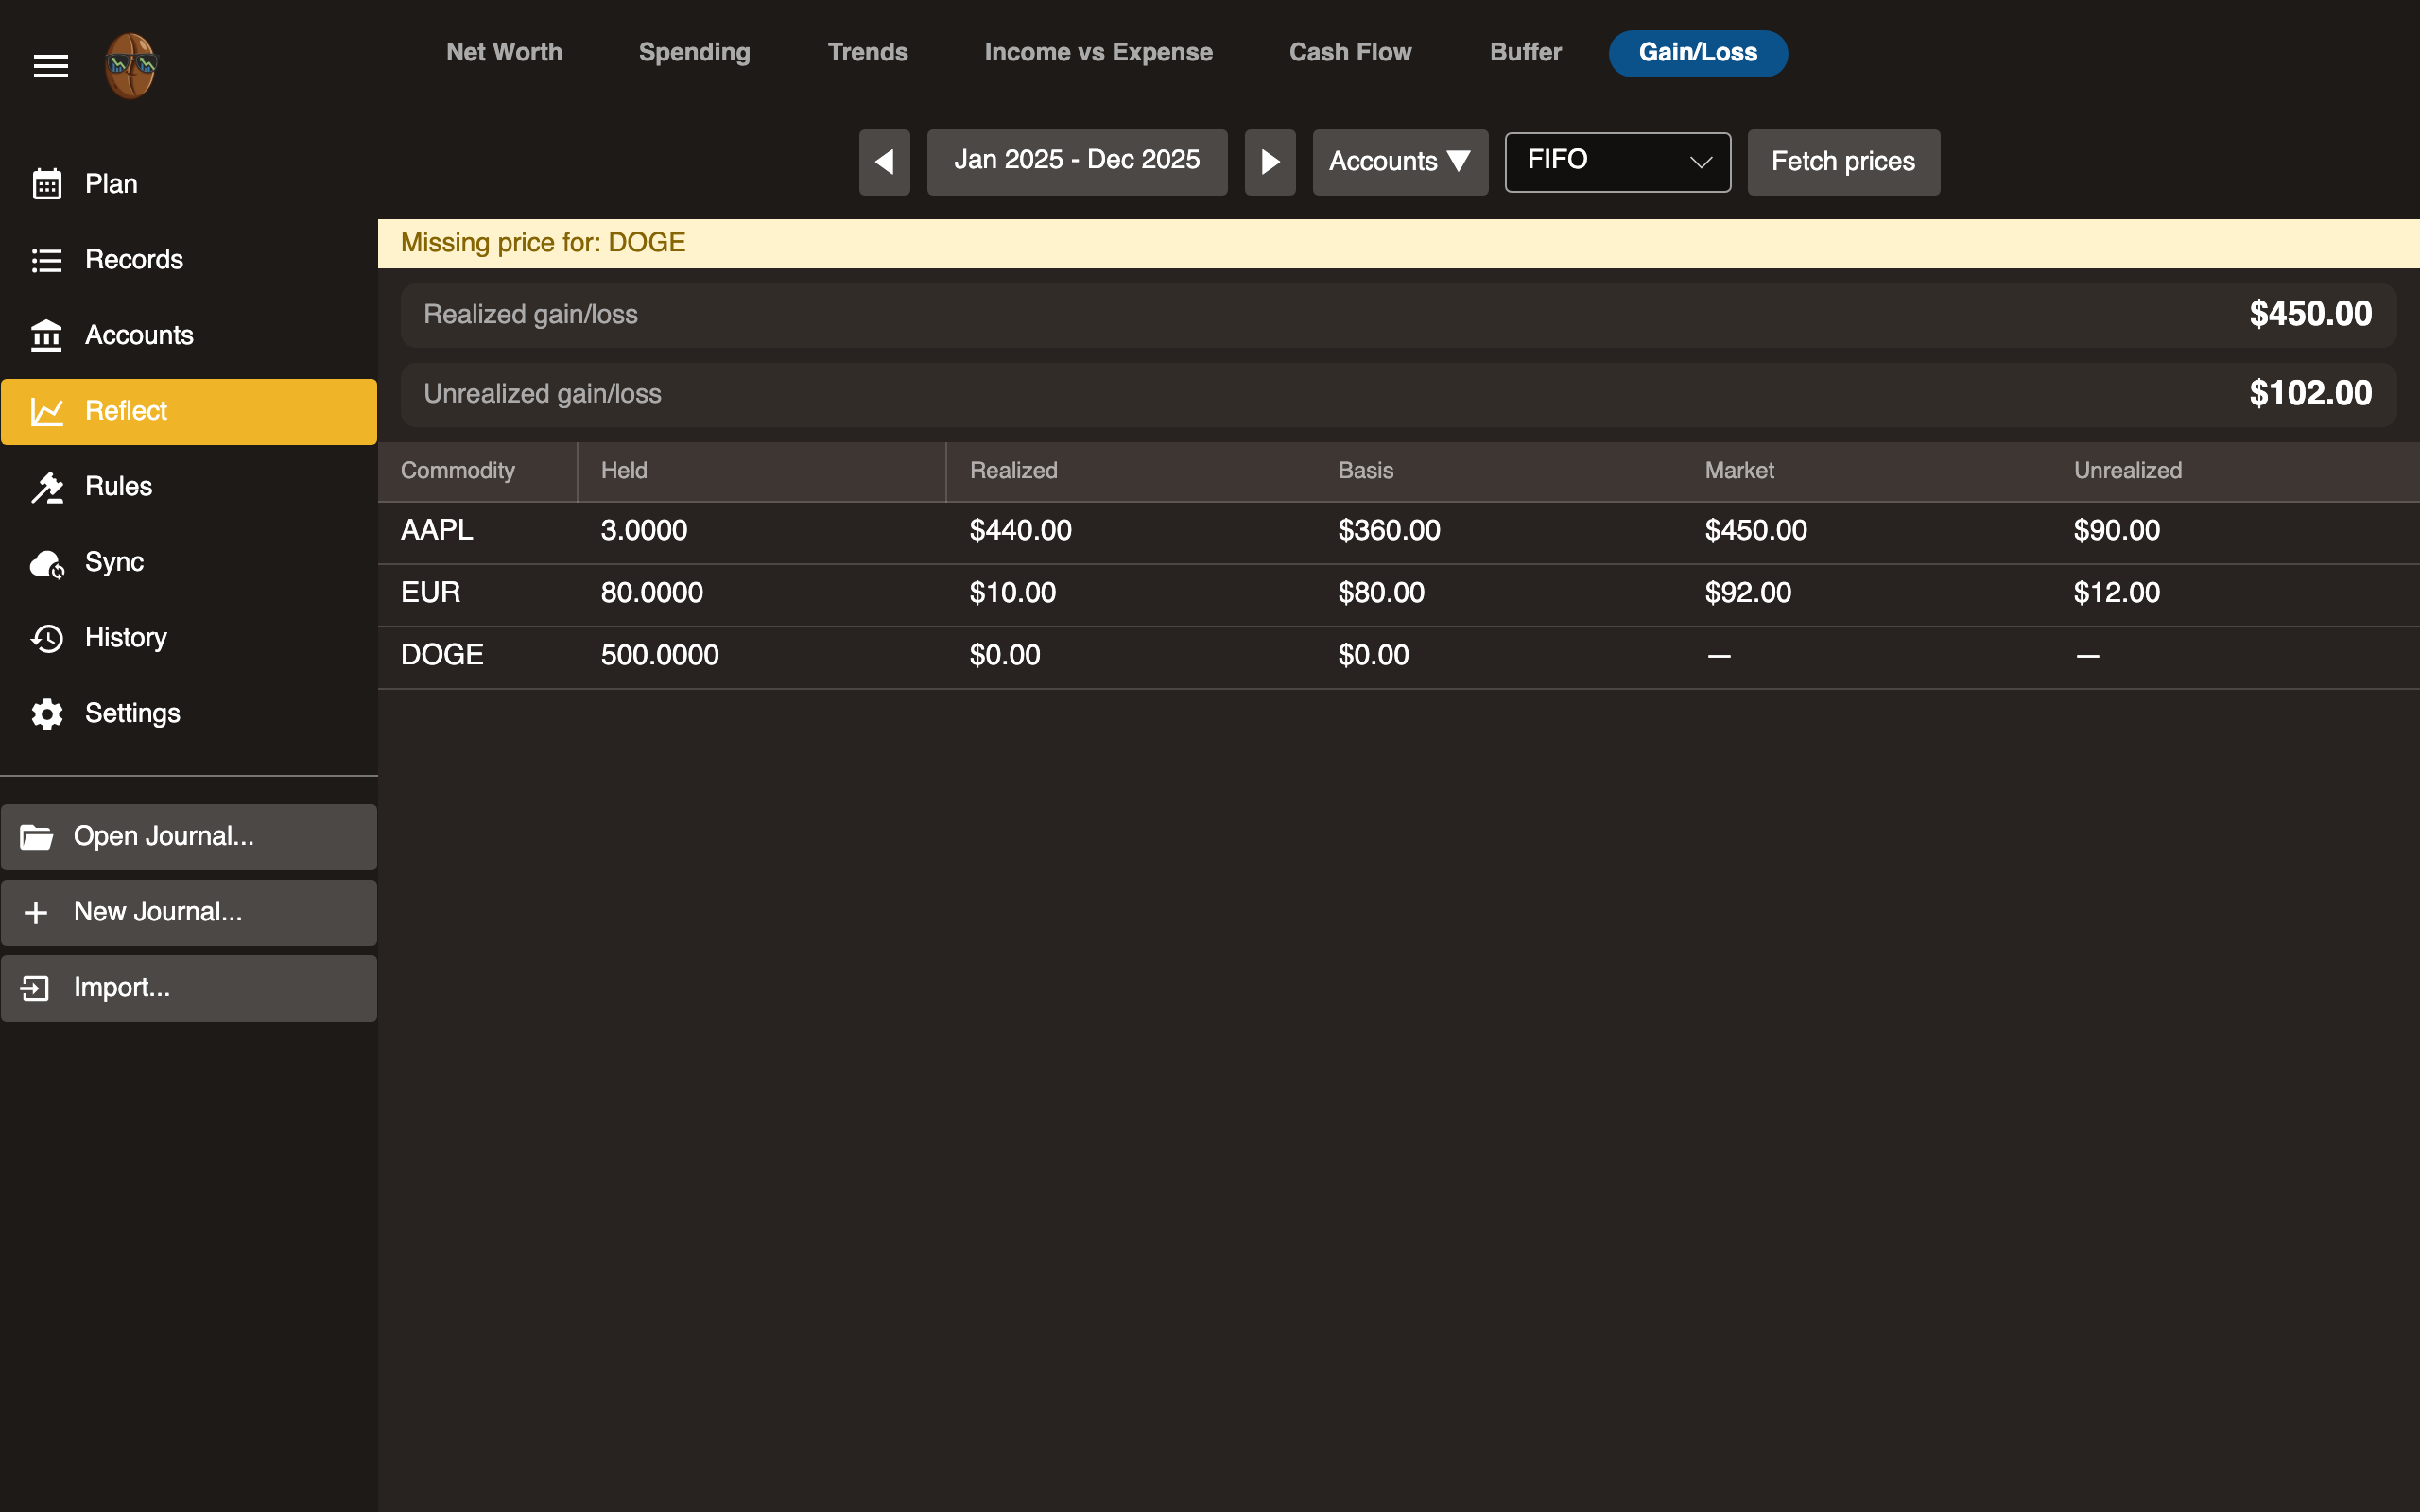
Reading the report
Two totals sit above the table:
- Realized gain/loss: proceeds minus cost basis for everything you sold or converted within the selected period.
- Unrealized gain/loss: market value minus cost basis for the lots you still hold, valued as of the period end.
The table breaks both down per commodity:
- Commodity: the security or currency. Your reporting currency is omitted, as it has no gain against itself.
- Held: quantity you hold as of the period end.
- Realized: gain or loss booked from sales and conversions in the period.
- Basis: cost of the lots you still hold.
- Market: market value of those lots as of the period end.
- Unrealized: market minus basis.
Select a row to drill in. It lists the open lots you still hold and each past sale matched to the lots it drew from.
What realizes a gain
Selling a security and exchanging one currency for another both realize a gain. Spending a currency you hold does not. Securities use the cost basis method you choose; currencies use average cost.
Controls
- Period: the window for realized gain. Unrealized is always as of the period end.
- Accounts: limit the report to selected accounts.
- Cost basis method: FIFO, LIFO, HIFO, or average, applied to securities. See Tracking Securities.
- Fetch prices: pull current market prices so holdings can be valued.
A commodity with no price is flagged, as DOGE is above, and left unvalued rather than guessed. Fetch prices or add one to include it.
Multiple currencies and securities
Like the other reports, Gain/Loss converts to your reporting currency. See Multi-Currency.
Multi-Currency
Surebeans tracks money in more than one currency, plus securities like stocks and crypto. If you use a single currency, nothing changes and none of the controls below appear.
Commodities
A commodity is any unit you can hold an amount of: a currency (USD, EUR),
a stock (AAPL), or crypto (BTC). A currency is just a commodity that happens
to be money. Surebeans treats them all the same way.
Accounts are not locked to one commodity. A single account can hold USD and
EUR at once, or cash plus shares. Each posting carries its own commodity.
2025-03-01 Salary
    Assets:Euro      2000.00 EUR
    Income:Salary

2025-03-02 Random gift
    Assets:Cash       100.00 USD
    Income:Gifts
The reporting currency
The reporting currency is the single currency reports convert into so you get one number to read. It is your main currency, set in Settings. For a single-currency journal it is just your only currency, so no conversion happens.
Native amounts are always the truth. The reporting-currency figure is recomputed from your native balances and the prices below, so your history never silently rewrites itself.
Prices
To convert one commodity into another, Surebeans needs prices. Prices live in
your journal as plaintext P directives, so they version and sync like the rest
of your data.
P 2025-03-01 EUR 1.08 USD
P 2025-04-01 EUR 1.11 USD
You can type prices yourself, or use Fetch prices on the
Net Worth report. Fetching pulls current rates and
appends P directives:
- Currencies come from Frankfurter (European Central Bank data, no key).
- Crypto comes from CoinGecko (no key).
- Stocks and funds come from Twelve Data, which needs a free API key. Add it in Settings.
Fetching only ever happens when you ask for it, or on the schedule you choose in Settings. Reports never reach the network; they read the plaintext prices only.
If a commodity has no price to the reporting currency, Surebeans shows it
un-converted and flags it rather than guessing. Use Fetch prices or add a P
directive to resolve it.
Exchanging between currencies
To move money between two different-currency accounts, use Transfer on the Records view. When the two accounts use different currencies the dialog becomes an exchange: enter what you gave up and what you received, and Surebeans records both real amounts and the rate between them, so the books stay balanced in every commodity.
How exchange rates affect net worth
Net worth is shown in the reporting currency using current market prices, so it moves as exchange rates move. If you hold euros and the euro strengthens against your home currency, your net worth rises even though you neither earned nor spent anything. This is normal, and it is called unrealized currency gain.
The Net Worth report separates this out on a currency change line, so a swing caused by rates never looks like income or spending. Your budget and spending reports are unaffected by rate movement: a foreign purchase is recorded at the rate on its date and never re-valued.
See Tracking Securities for stocks and crypto.
Tracking Securities
Stocks, funds, and crypto are tracked as commodities, the same way
currencies are. A share of AAPL is a commodity you hold a quantity of, valued
in money through a price.
Buying
Record a purchase as a normal transaction. The shares carry a cost basis in braces, which is what you paid per unit:
2025-02-11 Buy shares
    Assets:Brokerage:AAPL    10 AAPL {183.07 USD}
    Assets:Cash          -1830.70 USD
The account now holds 10 AAPL. The cost basis ({183.07 USD}) is remembered
for working out gains later. It is not the same as the market price.
Pricing
To value your holding, Surebeans needs a market price for the security:
P 2025-06-01 AAPL 200.00 USD
Add it with Fetch prices on the Net Worth report, or type it yourself. Stock and fund prices come from Twelve Data, which needs a free API key (see Settings). Currency and crypto prices need no key.
Net worth and unrealized gain
Net worth values your holding at the latest market price, not at cost. So 10 AAPL bought at 183.07 shows as 2,000.00 USD once the price reaches 200. The
difference between market value and cost is your unrealized gain: real, but
on paper until you sell.
Because net worth tracks market value, it moves as prices move, just as it does with currencies. A price drop lowers net worth with no transaction on your part.
Selling
Record a sale at the price you sold for. Surebeans matches the sale against your purchase lots using the cost basis method set in Settings (FIFO by default), and the difference between proceeds and cost basis is a realized capital gain you can book to an income account:
2025-03-01 Sell 15 AAPL
    Assets:Brokerage:AAPL   -15 AAPL @ 150.00 USD
    Assets:Cash            2250.00 USD
    Income:Capital Gains    -650.00 USD
Here 15 shares are sold under FIFO: 10 from the first lot (cost 100) and 5 from the second (cost 120), for a cost of 1,600 against 2,250 proceeds, a 650 gain. Five shares remain.
You can choose a different method in Settings under Multi-currency:
- FIFO (first in, first out): sells your oldest lots first.
- LIFO (last in, first out): sells your newest lots first.
- HIFO (highest in, first out): sells your costliest lots first, which minimizes the taxable gain.
- Average cost: every share carries the weighted-average cost of all shares you hold.
Seeing your gains
The Gain/Loss report totals realized and unrealized gain per commodity, across securities and currencies, with per-lot drill-down.
Rules
Automate record categorization. Rules match records by pattern and apply actions (set category, memo, etc.).
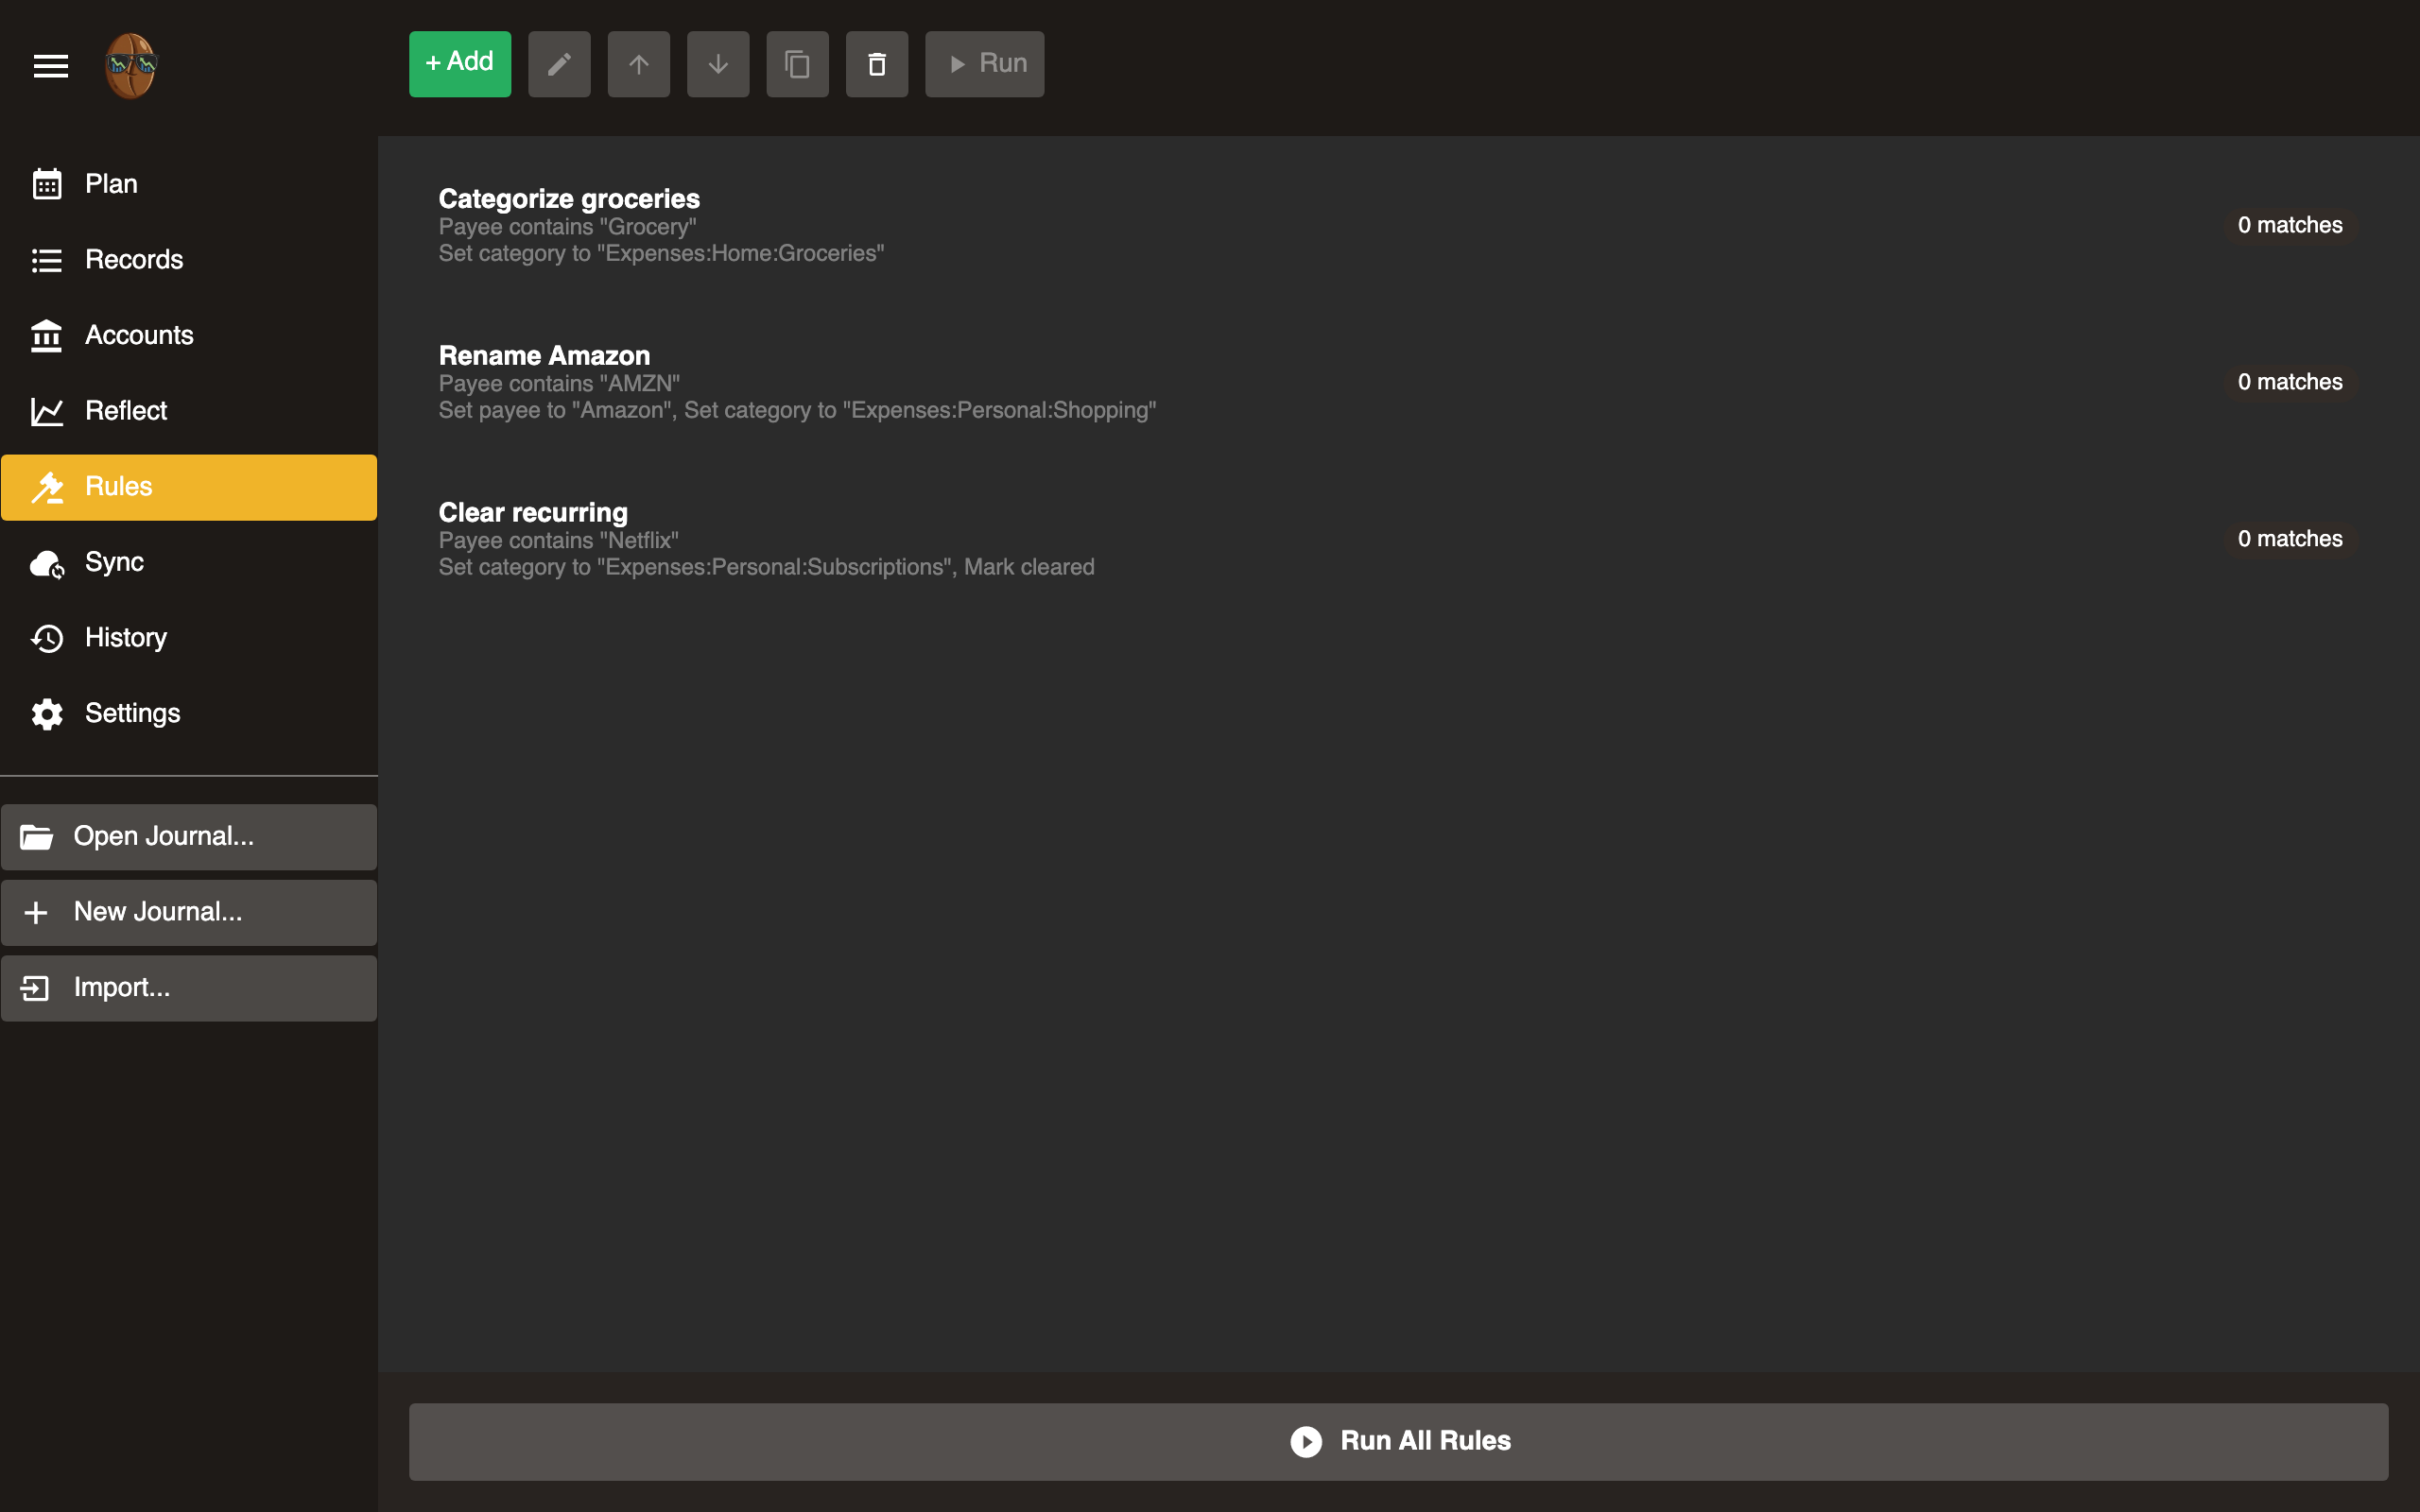
How rules work
When you run rules, Surebeans evaluates each uncategorized record against the rule list from top to bottom. The first matching rule wins. If no rule matches, the record is unchanged.
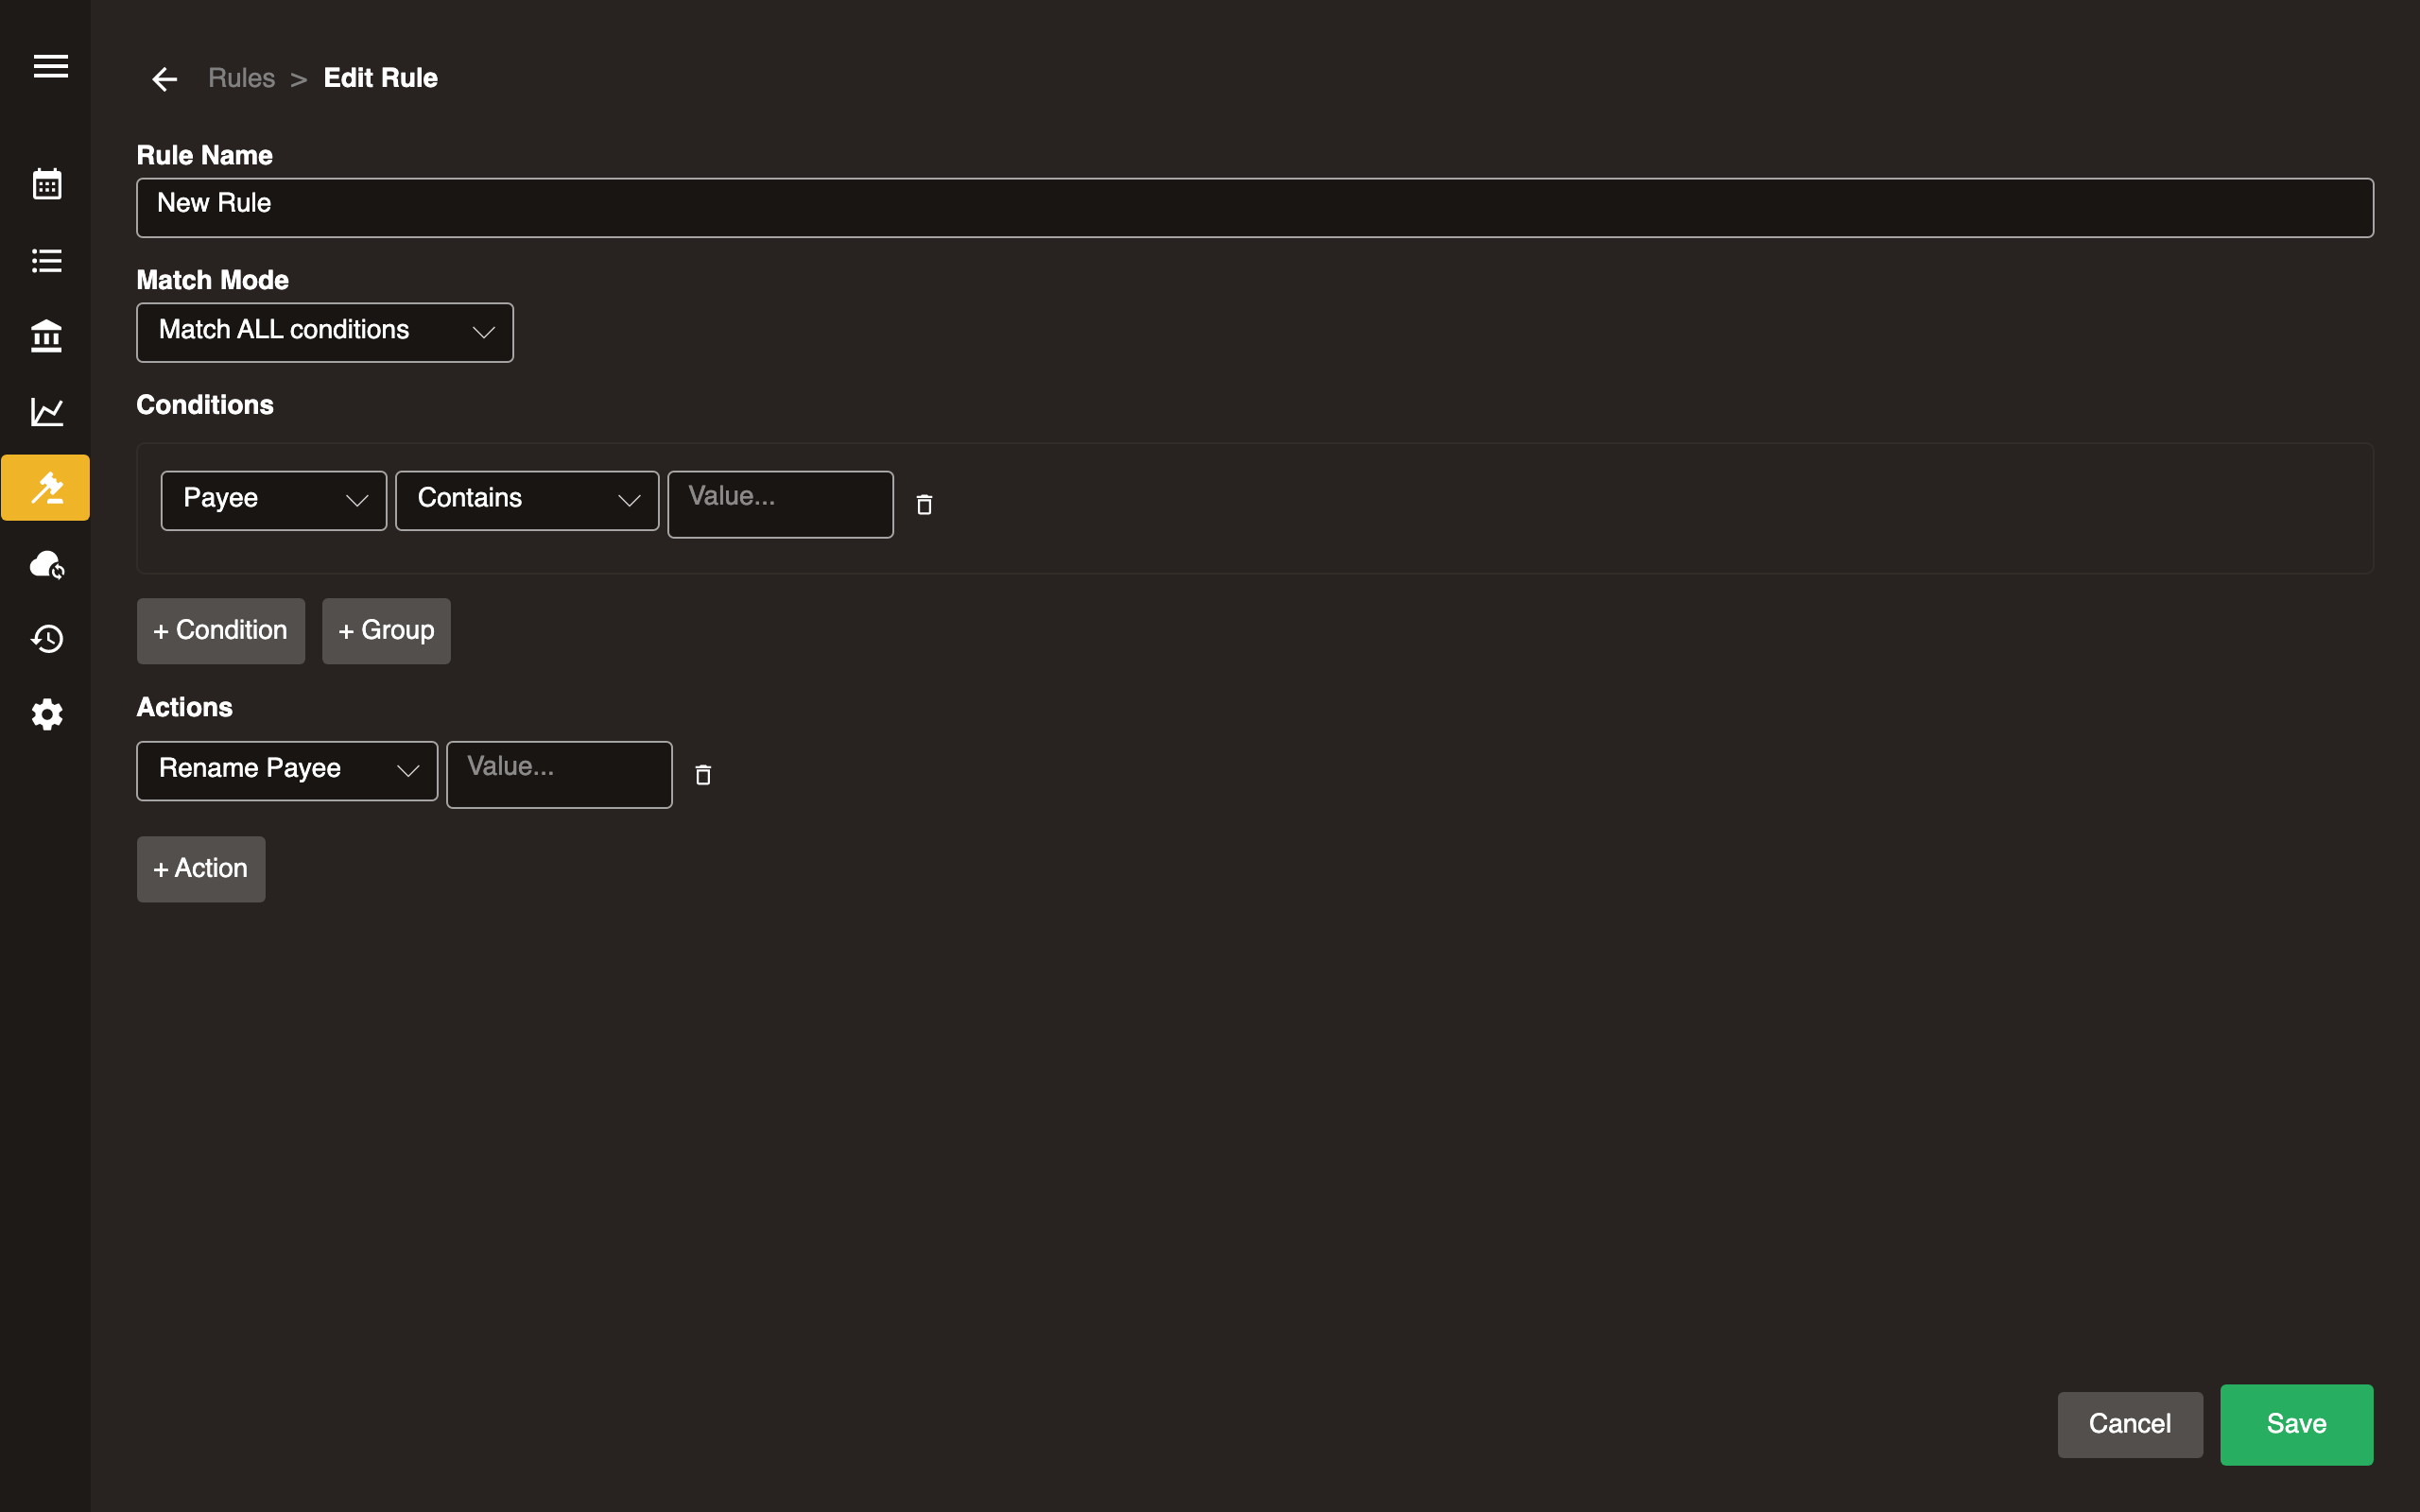
Rule structure
Each rule has:
- Condition: Pattern to match against payee and/or memo (e.g.,
AMAZONmatches any record containing “AMAZON”). - Action: What to do when matched (set category, set memo, etc.).
- Match count: Number of existing records this rule would match.
Operations
| Action | Description |
|---|---|
| Add | Create a new rule |
| Edit | Modify an existing rule’s condition or action |
| Move up | Increase rule priority (rules are evaluated top-to-bottom) |
| Move down | Decrease rule priority |
| Duplicate | Copy a rule as a starting point for a new one |
| Delete | Remove a rule (two-stage confirmation) |
| Run | Apply this rule to all matching records |
| Run All | Apply all rules in order to all uncategorized records |
Tips
- Put more specific rules higher in the list.
- Use Run on a single rule to preview its effect before running all.
- Rules only apply to records that don’t already have a category (unless the rule is configured to override).
Sync
Sync your journal to a remote server for backup and multi-device access. Sync is manual: click Sync Now to push/pull changes.

How it works
Your journal is a git repository. Sync pushes and pulls commits to/from a remote. If both sides changed since the last sync, Surebeans merges the changes. Conflicts are rare but handled with a resolution UI if they occur.
Adding a remote
- Navigate to Sync.
- Click Add Remote.
- Select a remote type and enter connection details.
- Click Sync Now to perform the first sync.
Supported remotes
| Remote | Desktop | Browser |
|---|---|---|
| GitHub | Yes | Yes |
| GitLab | Yes | Yes |
| Gitea | Yes | Yes |
| Generic Git | Yes | No |
| S3 | Yes | Yes |
| WebDAV | Yes | Yes |
| SFTP | Yes | No |
| Dropbox | Yes | Yes |
Managing remotes
- Edit: Change connection details for an existing remote.
- Delete: Remove a remote (two-stage confirmation). Does not delete remote data.
- Last sync: Timestamp of the most recent successful sync.
Conflict resolution
If a merge conflict occurs, Surebeans shows the conflicting changes side-by-side. Choose which version to keep or manually edit the result.
Browser limitations
Some remote types require native network access not available in the browser. See the table above. Git forges require CORS headers to work from the browser. By default Surebeans routes that traffic through a CORS proxy. If you self-host your forge, you can enable CORS on it and connect directly instead. See CORS for Browser Sync.
CORS for Browser Sync
The browser version of Surebeans runs at https://surebeans.net. Browsers block requests from that origin to your git forge unless the forge returns a specific set of CORS headers (Cross-Origin Resource Sharing). This page explains how to satisfy that requirement.
You have two options:
- Use a CORS proxy (default). Surebeans routes git traffic through a proxy that adds the headers for you. This is the only option for hosted forges you cannot configure, such as
github.comandgitlab.com. - Enable CORS on your own forge. If you self-host (Gitea, Forgejo, GitLab, or similar), you can let the browser talk to your forge directly and turn the proxy off.
Enable CORS on your own forge
Two kinds of request go to your forge, both from your app origin:
- REST API Paths containing
/api/list files, download raw content, upload, delete, create the repository, set the default branch. - Git smart-HTTP: These check for repo existance and send and receive git history. The paths end in
/info/refs,/git-upload-pack, and/git-receive-pack.
Both must allow your app origin. An easy mistake to make is enabling CORS only on the API. Sync then fails because Surebeans checks for repo existnce using /info/refs.
What to allow
| Setting | Value |
|---|---|
| Allowed origin | https://surebeans.net and https://www.surebeans.net |
| Methods | GET, HEAD, POST, PUT, PATCH, DELETE, OPTIONS |
| Request headers | Authorization, Content-Type, Git-Protocol, Cache-Control, Pragma, X-Requested-With |
Common mistakes:
- Missing headers. If your
Access-Control-Allow-Headersreply is missing even one of the above headers, the browser blocks the request, even if the preflight returned204. As an alternative to a fixed list, you can echo the request’sAccess-Control-Request-Headersback inAccess-Control-Allow-Headers. See below for examples. - Duplicate headers. If both your forge and a reverse proxy in front of it add
Access-Control-Allow-Origin, the browser sees a duplicate header and rejects the response.
Examples
These illustrate the idea. Adapt them to whatever sits in front of your forge.
Caddy
@cors_preflight method OPTIONS
handle @cors_preflight {
    header Access-Control-Allow-Origin "https://surebeans.net"
    header Access-Control-Allow-Methods "GET, HEAD, POST, PUT, PATCH, DELETE, OPTIONS"
    # Echo the requested headers back, so nothing the client sends is rejected.
    header Access-Control-Allow-Headers "{http.request.header.Access-Control-Request-Headers}"
    header Access-Control-Max-Age "86400"
    respond 204
}
header Access-Control-Allow-Origin "https://surebeans.net"
reverse_proxy your-forge:3000
Nginx
location / {
    if ($request_method = OPTIONS) {
        add_header Access-Control-Allow-Origin "https://surebeans.net" always;
        add_header Access-Control-Allow-Methods "GET, HEAD, POST, PUT, PATCH, DELETE, OPTIONS" always;
        # Echo the requested headers back, so nothing the client sends is rejected.
        add_header Access-Control-Allow-Headers "$http_access_control_request_headers" always;
        add_header Access-Control-Max-Age 86400 always;
        return 204;
    }
    add_header Access-Control-Allow-Origin "https://surebeans.net" always;
    proxy_pass http://your-forge:3000;
}
Gitea / Forgejo app.ini
[cors]
ENABLED = true
ALLOW_DOMAIN = https://surebeans.net,https://www.surebeans.net
ALLOW_METHODS = GET,HEAD,POST,PUT,PATCH,DELETE,OPTIONS
ALLOW_HEADERS = Authorization,Content-Type,Git-Protocol,Cache-Control,Pragma,X-Requested-With
GitLab
Self-hosted GitLab does not expose a general CORS setting for the git and API routes. You’ll need to use a reverse proxy.
Verification
In Surebeans
Once your forge returns CORS headers:
- Go to https://surebeans.net
- Open the remote in Sync and click Edit.
- Uncheck Route git traffic through CORS proxy.
- Click Sync Now.
From the command line
A correct setup returns 204 and an Access-Control-Allow-Origin matching your origin.
curl -i -X OPTIONS \
  -H "Origin: https://surebeans.net" \
  -H "Access-Control-Request-Method: GET" \
  -H "Access-Control-Request-Headers: authorization" \
  "https://git.example.com/you/my-budget.git/info/refs?service=git-upload-pack"
If you see 403, 404, or no Access-Control-Allow-Origin header, the git routes are not covered yet.
GitHub
Sync your journal to a GitHub repository.
Setup
- Create a private repository on github.com.
- In Surebeans: Sync → Add Remote → GitHub.
- Enter the repository URL.
- Authenticate with one of the methods below.

Option A: Personal Access Token
- Generate a Personal Access Token with
reposcope. - Paste the token into the Token field.
Option B: OAuth
- Toggle Use OAuth in the sync setup.
- Click Sign in. Your browser opens for GitHub authorization.
- Approve the request and return to Surebeans.
A default GitHub client ID is built in, so no additional configuration is needed.
Configuration
| Field | Required | Notes |
|---|---|---|
| Repository URL | Yes | https://github.com/you/my-budget |
| Token | PAT only | ghp_xxxxxxxxxxxx |
| Use OAuth | OAuth only | Toggle on, then click Sign in |
Platform support
| Platform | Supported |
|---|---|
| Desktop | Yes |
| Browser | Yes |
In the browser, by default Surebeans routes web requests to GitHub through a proxy at cors.surebeans.net. This is necessary since GitHub’s CORS settings do not allow requests to github.com from surebeans.net. Per our privacy policy, we do not store or track any data.
Tips
- Use a private repo to keep financial data confidential.
- The token is stored locally and never sent anywhere except GitHub.
GitLab
Sync your journal to a GitLab repository.
Setup
- Create a private project on gitlab.com (or your self-hosted instance).
- In Surebeans: Sync → Add Remote → GitLab.
- Enter the repository URL.
- Authenticate with one of the methods below.
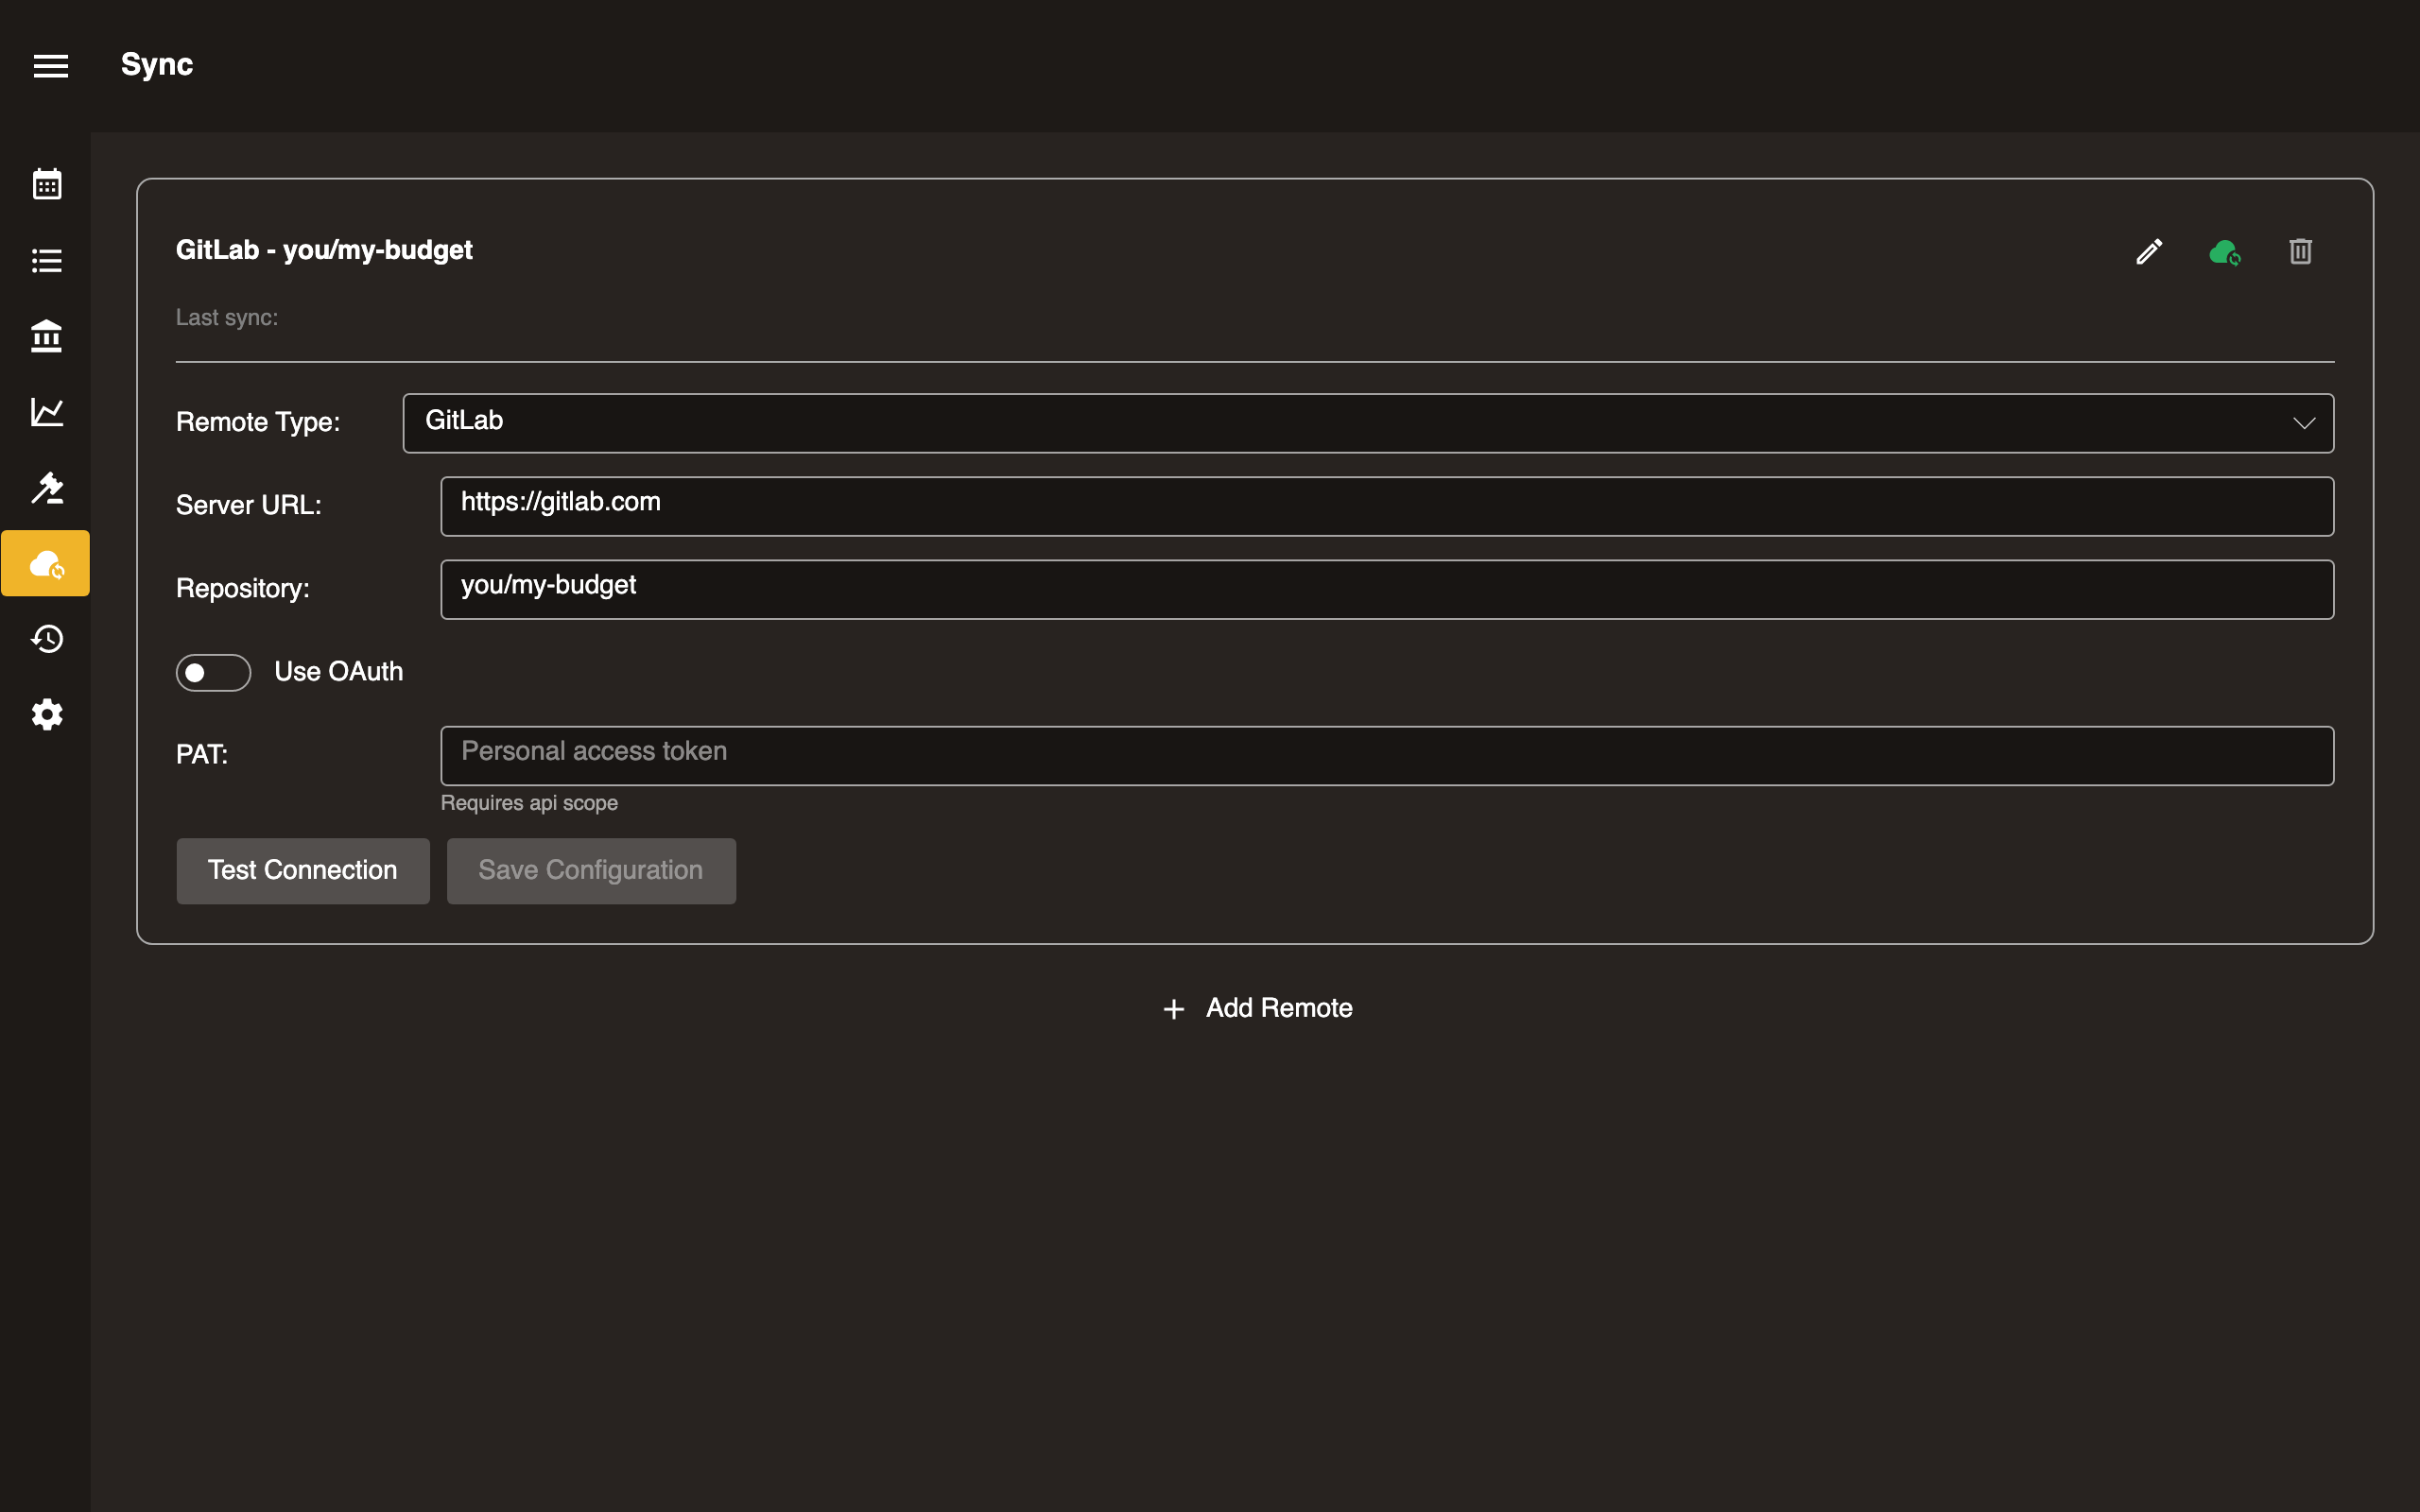
Option A: Personal Access Token
- Generate a Personal Access Token with
write_repositoryscope. - Paste the token into the Token field.
Option B: OAuth
- Create an OAuth application in your GitLab account or instance (Settings → Applications).
- Enter the Client ID in Surebeans.
- Click Sign in. On desktop, a redirect flow opens your browser. In the browser version, the device flow is used instead.
- Approve the request and return to Surebeans.
Configuration
| Field | Required | Notes |
|---|---|---|
| Repository URL | Yes | https://gitlab.com/you/my-budget |
| Token | PAT only | glpat-xxxxxxxxxxxx |
| Client ID | OAuth only | From your GitLab OAuth application |
Platform support
| Platform | Supported |
|---|---|
| Desktop | Yes |
| Browser | Yes |
In the browser, by default Surebeans routes web requests to GitLab through a proxy at cors.surebeans.net. This is necessary since GitLab’s CORS settings do not allow requests to gitlab.com from surebeans.net. Per our privacy policy, we do not store or track any data.
Gitea
Sync your journal to a Gitea instance.
Setup
- Create a private repository on your Gitea server.
- In Surebeans: Sync → Add Remote → Gitea.
- Enter the repository URL.
- Authenticate with one of the methods below.

Option A: Access Token
- Generate an access token in Settings → Applications on your Gitea instance.
- Paste the token into the Token field.
Option B: OAuth
- Create an OAuth application on your Gitea instance (Settings → Applications → Manage OAuth2 Applications).
- Enter the Client ID in Surebeans.
- Click Sign in. A redirect flow opens your browser for authorization.
- Approve the request and return to Surebeans.
Configuration
| Field | Required | Notes |
|---|---|---|
| Repository URL | Yes | https://gitea.example.com/you/my-budget |
| Token | Token only | xxxxxxxxxx |
| Client ID | OAuth only | From your Gitea OAuth application |
Platform support
| Platform | Supported |
|---|---|
| Desktop | Yes |
| Browser | Yes |
In the browser, by default Surebeans routes web requests to your forge through a proxy at cors.surebeans.net. Per our privacy policy, we do not store or track any data. This is necessary only if your forge’s CORS settings do not allow requests from surebeans.net. You can alternatively enable CORS and connect directly. See CORS for Browser Sync.
Generic Git
Sync to any git remote accessible via SSH or HTTPS.
Setup
- Set up a bare git repository on your server.
- In Surebeans: Sync → Add Remote → Generic Git.
- Enter the remote URL.
Configuration
| Field | Example |
|---|---|
| Remote URL | [email protected]:budget.git or https://yourserver.com/budget.git |
Authentication depends on the transport:
- SSH: Uses your system SSH key.
- HTTPS: Enter username and password/token.
Platform support
| Platform | Supported |
|---|---|
| Desktop | Yes |
| Browser | No. Requires native git/SSH access. |
S3
Sync your journal to an S3-compatible object store (AWS S3, MinIO, Cloudflare R2, Backblaze B2, etc.).
Setup
- Create a bucket on your S3 provider.
- Generate access credentials (Access Key ID + Secret Access Key).
- In Surebeans: Sync → Add Remote → S3.
- Enter bucket, region, and credentials.
Configuration
| Field | Example |
|---|---|
| Bucket | my-budget-backup |
| Region | us-east-1 |
| Endpoint | https://s3.amazonaws.com (or custom for non-AWS) |
| Access Key ID | AKIAXXXXXXXXXX |
| Secret Access Key | xxxxxxxxxxxxxxxx |
Platform support
| Platform | Supported |
|---|---|
| Desktop | Yes |
| Browser | Yes (may require CORS configuration on the bucket) |
CORS (browser)
If syncing from the browser, configure your bucket’s CORS policy to allow requests from https://app.surebeans.net (or wherever you host the app).
WebDAV
Sync your journal to a WebDAV server (Nextcloud, ownCloud, etc.).
Setup
- Ensure you have a WebDAV endpoint. Nextcloud provides one at
https://your-instance.com/remote.php/dav/files/USERNAME/. - In Surebeans: Sync → Add Remote → WebDAV.
- Enter the URL and credentials.
Configuration
| Field | Example |
|---|---|
| URL | https://nextcloud.example.com/remote.php/dav/files/you/budget/ |
| Username | you |
| Password | xxxxxxxx |
Platform support
| Platform | Supported |
|---|---|
| Desktop | Yes |
| Browser | Yes (may require CORS proxy) |
SFTP
Sync your journal to any server with SSH/SFTP access.
Setup
- Ensure you have SSH access to the target server.
- In Surebeans: Sync → Add Remote → SFTP.
- Enter connection details.
Configuration
| Field | Example |
|---|---|
| Host | myserver.com |
| Port | 22 |
| Path | /home/you/budget/ |
| Username | you |
| Authentication | SSH key or password |
Platform support
| Platform | Supported |
|---|---|
| Desktop | Yes |
| Browser | No. Requires native SSH access. |
Dropbox
Sync your journal to Dropbox.
Setup
- In Surebeans: Sync → Add Remote → Dropbox.
- Authorize Surebeans to access your Dropbox account.
- Choose a folder path within Dropbox.
Configuration
| Field | Example |
|---|---|
| Folder | /Apps/Surebeans/my-budget |
Authorization uses OAuth. Surebeans never sees your Dropbox password.
Platform support
| Platform | Supported |
|---|---|
| Desktop | Yes |
| Browser | Yes |
History
Every change to your journal is a git commit. History shows the full commit log.

Commit log
Displays commits in reverse chronological order.
| Column | Description |
|---|---|
| When | Timestamp |
| Change | Commit message describing what changed |
| ID | Short git SHA |
Use pagination controls (First, Previous, Next, Last) to navigate.
Revert
Select a commit to restore the journal to that point in time. This creates a new commit that undoes all changes after the selected point. No data is destroyed.
Undo / Redo
| Action | Shortcut |
|---|---|
| Undo | Ctrl+Z (Cmd+Z on macOS) |
| Redo | Ctrl+Y (Cmd+Y on macOS) |
Undo reverts the most recent commit. Redo re-applies it. Both are global: they affect the entire journal, not just the current view.
How it works
Surebeans uses git under the hood. Each save operation (add record, edit record, change budget allocation, etc.) creates a git commit. The History view is a UI over git log.
This means:
- Every change is tracked and reversible.
- You can sync your journal to any git remote (see Sync).
- Advanced users can interact with the journal’s git repo directly.
Settings
App configuration and status.
Theme
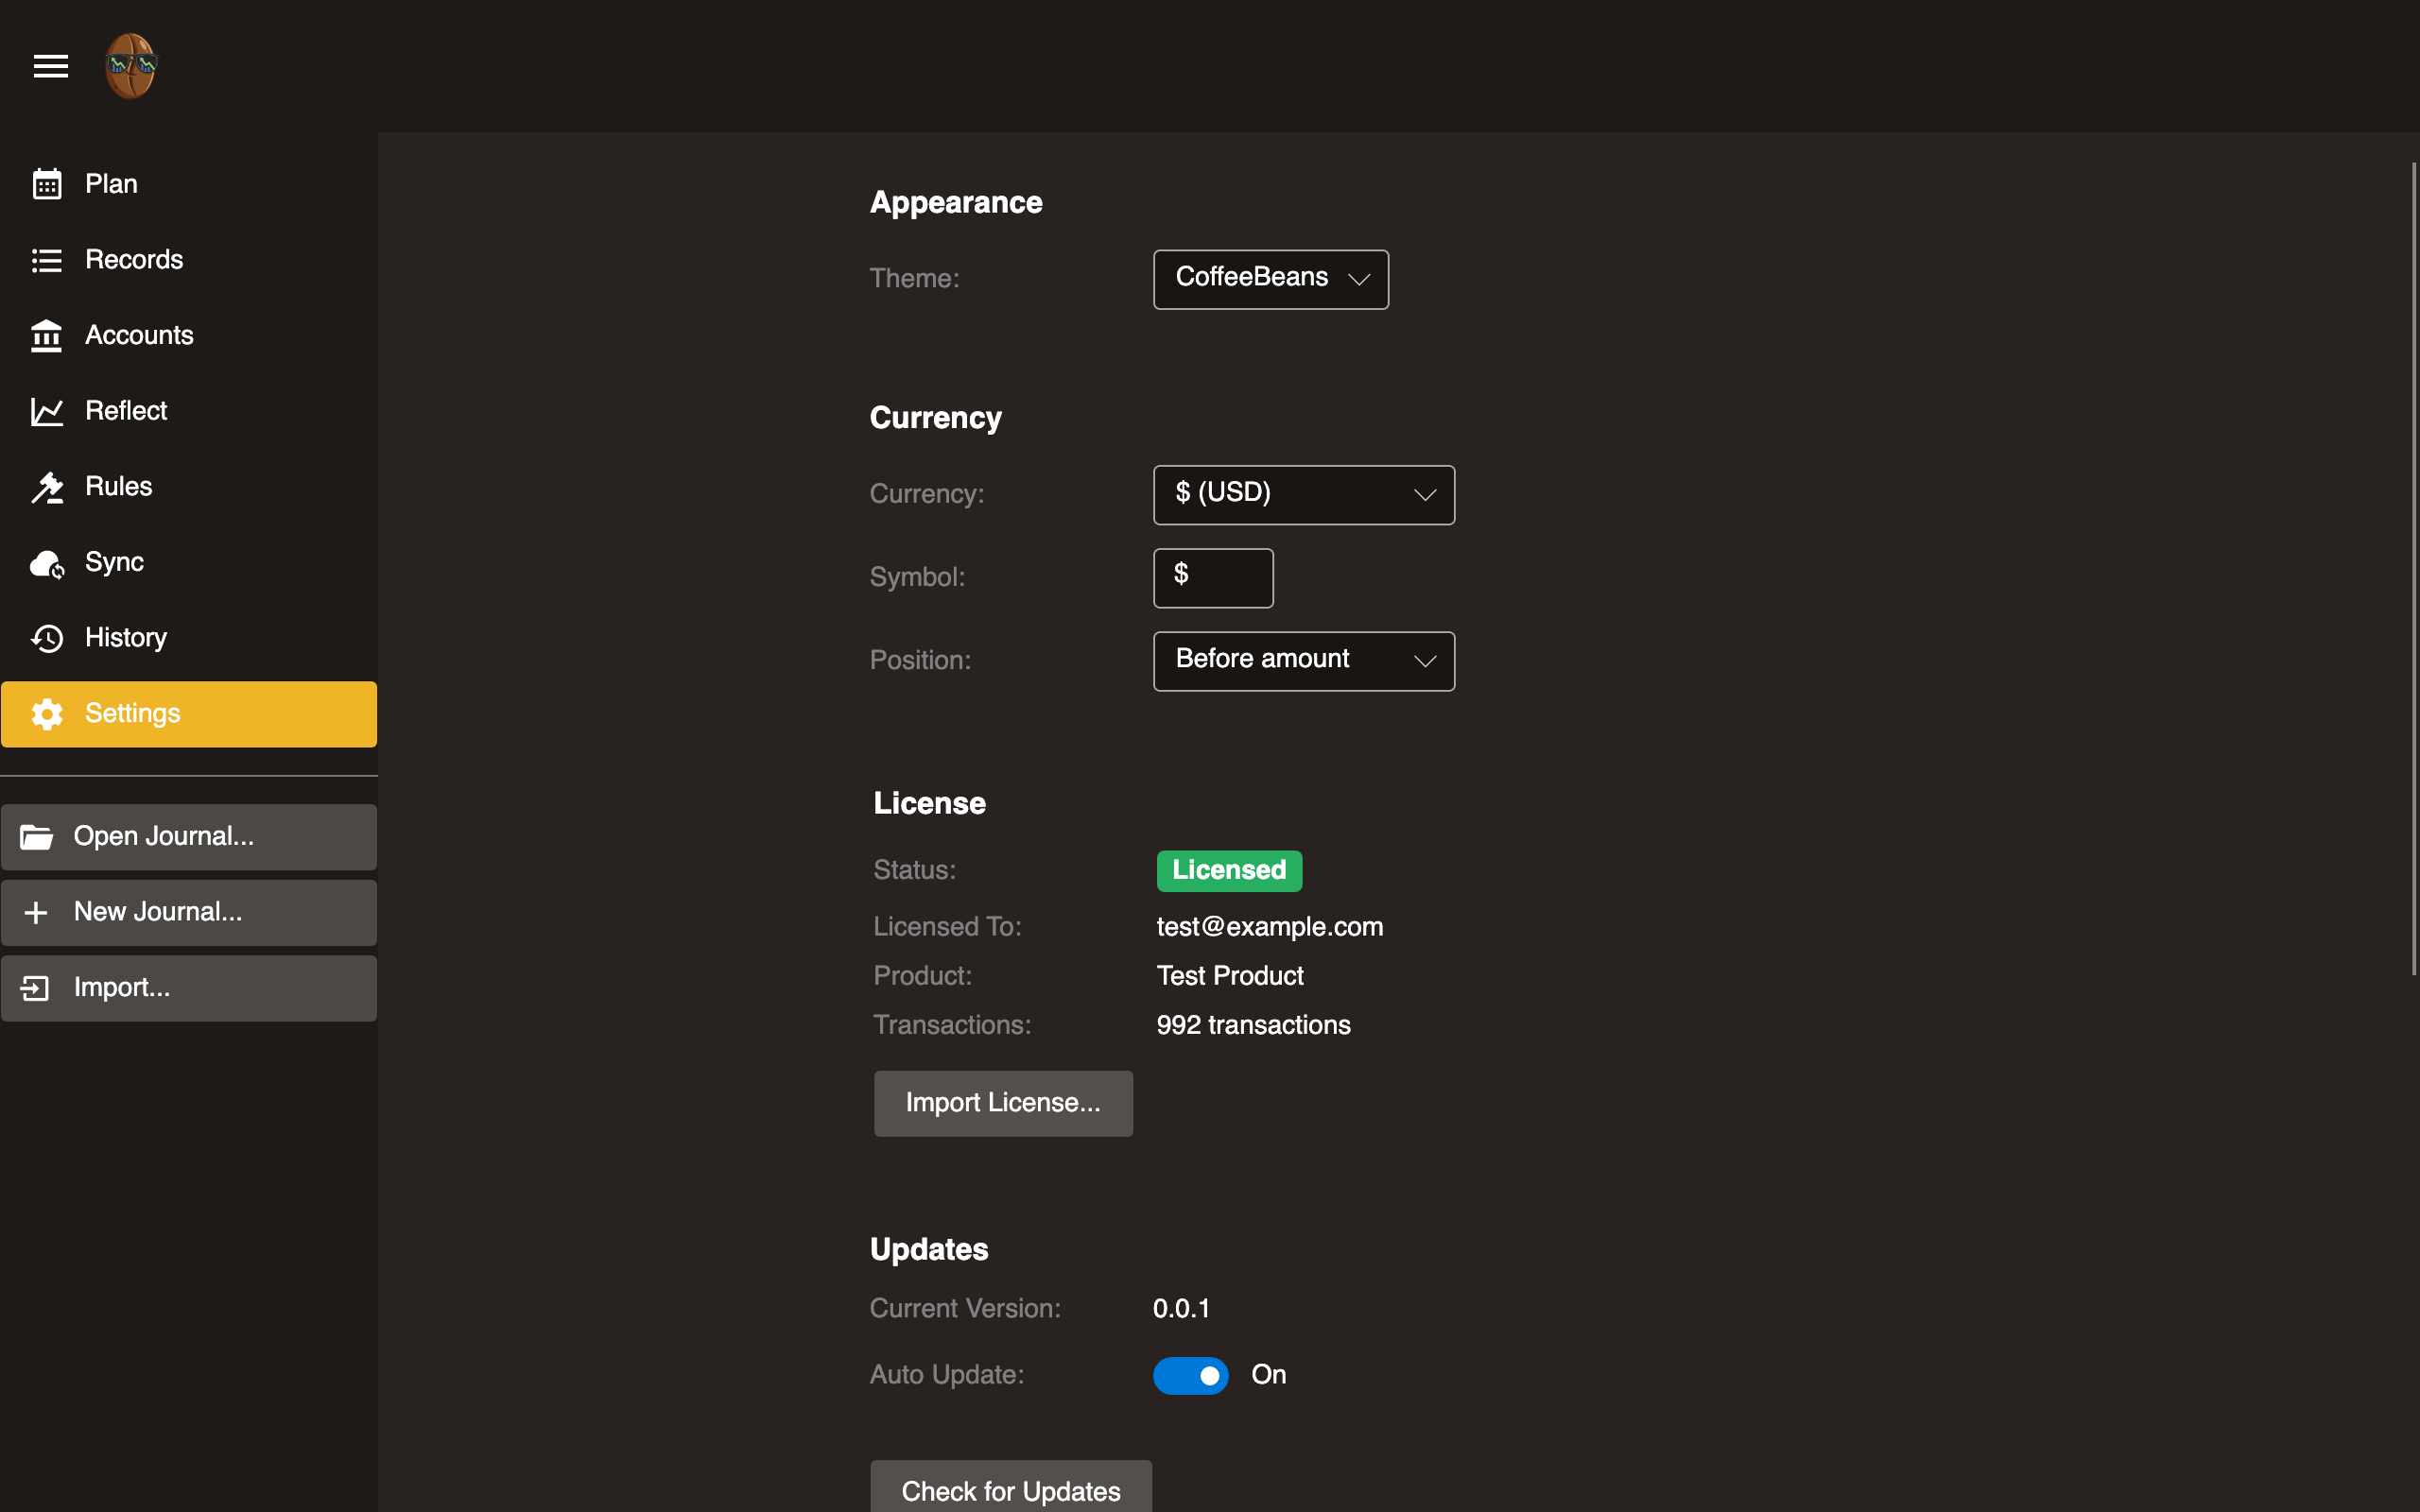
Switch between Light, Dark, and Auto (follows system preference). Changes apply immediately.
Currency
Configure your main currency: how amounts are displayed, the default for new entries, and the currency reports convert into. This is a per-journal setting saved to the journal config file.
Presets
| Preset | Symbol |
|---|---|
| USD | $ |
| EUR | € |
| AUD | A$ |
| GBP | £ |
| CAD | C$ |
Select a preset or enter a custom symbol.
Symbol position
| Option | Example |
|---|---|
| Before amount | $1,234.56 |
| After amount | 1,234.56 € |
| Don’t show | 1,234.56 |
Multi-currency
These settings appear once your journal holds more than one currency or any securities. See Multi-Currency for the full picture.
- Auto-fetch prices: How often Surebeans fetches prices in the background while open: Off, Hourly, or Daily. You can always fetch manually from the Net Worth report.
- Cost basis method: How a security sale is matched against its purchase lots for realized capital gains: FIFO, LIFO, HIFO, or Average cost.
- Securities prices: Stock and fund prices use Twelve Data, which needs a free API key. Paste it here; the page links to where you create one. The key is stored in your device’s secure store, never in the journal. Currency and crypto prices need no key.
License
- Status: Shows Licensed or Trial.
- Email: Licensed email address (if licensed).
- Record count: Current count and trial limit.
- Enter license key: Paste the license key you received by email or after checkout.
- Buy: Link to purchase a license.
The trial allows a limited number of records. Purchase a license to remove the limit.
Updates Desktop
- Check for updates: Queries for available versions.
- Download and install: Applies the update.
- Current version: Displayed at bottom.
Not available in the browser. The browser version updates automatically.
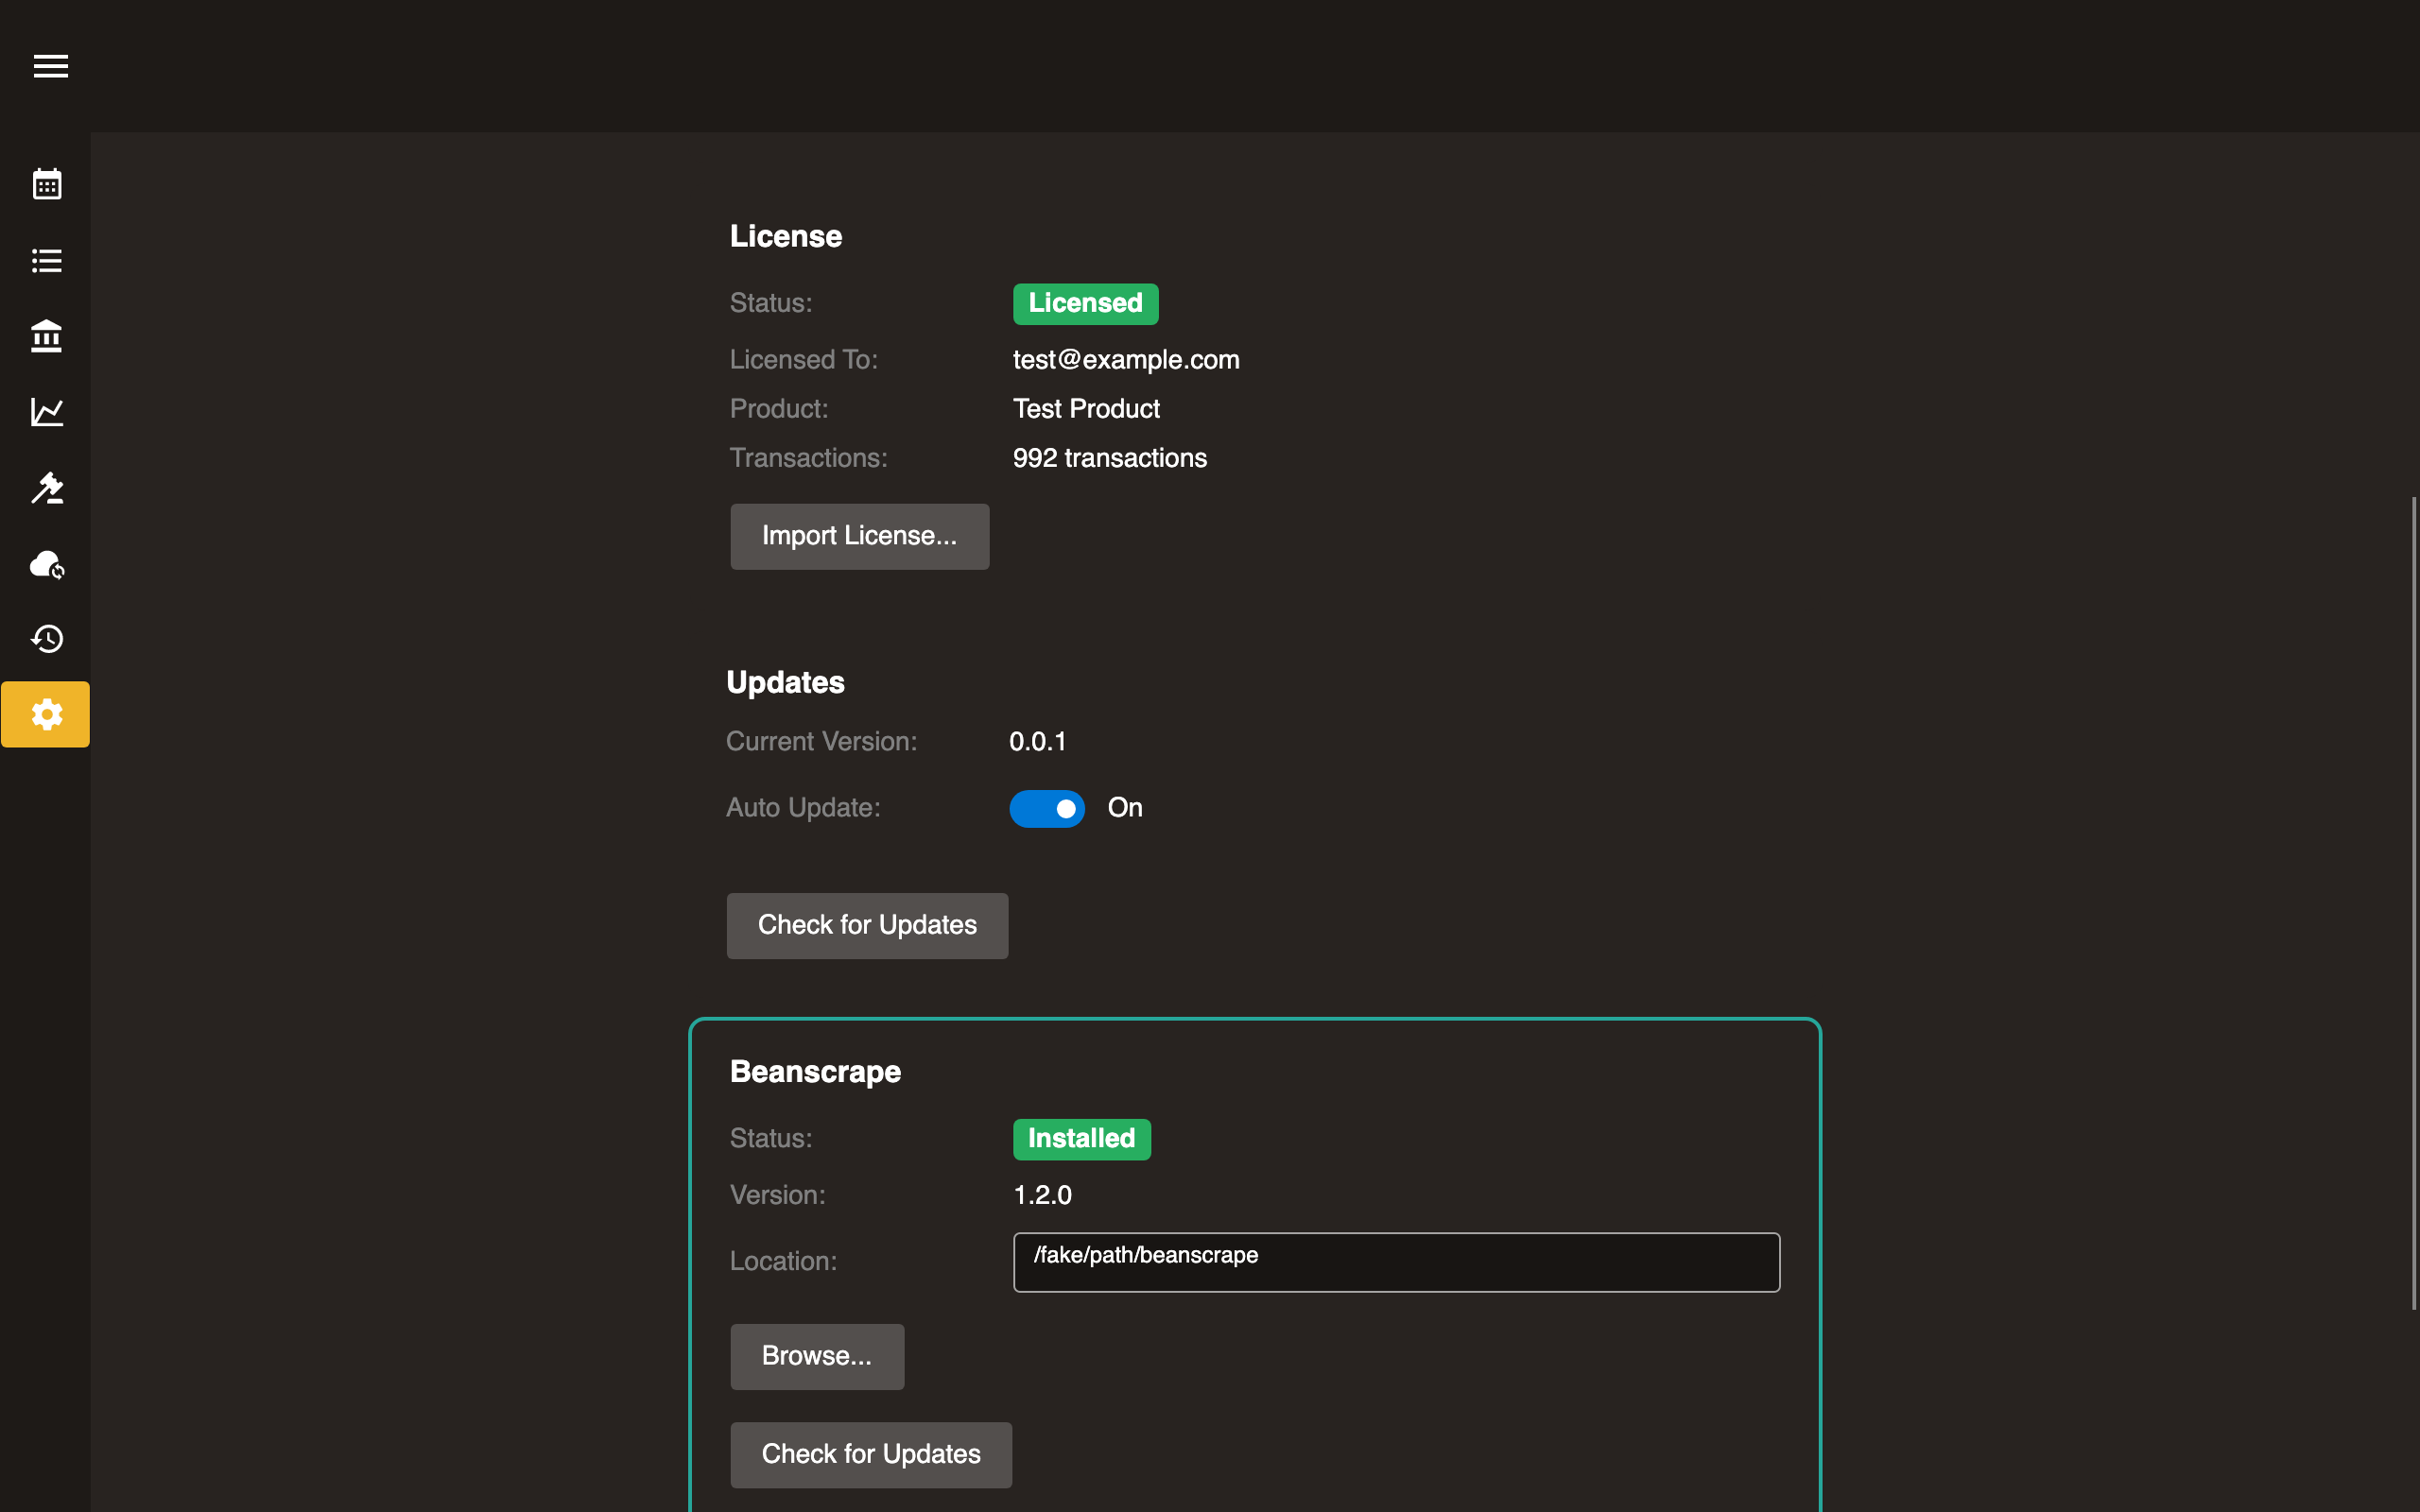
Beanscrape Desktop
- Installation status: Whether Beanscrape is installed.
- Version: Installed version number.
- Download/Install: Install or update Beanscrape.
- Custom path: Override the Beanscrape executable path.
For full Beanscrape documentation, see the Beanscrape section.
Import
Bring data into Surebeans from external sources.
New Journal creates a fresh journal from the import. Existing Journal adds records to a journal you already have open.
| Source | New Journal | Existing Journal | Description |
|---|---|---|---|
| nYNAB | Yes | Yes | Import from nYNAB export |
| nYNAB API | Yes | Yes | Import directly from the YNAB API |
| YNAB 4 | Yes | Yes | Import from YNAB 4 budget folder |
| File (CSV, OFX/QFX) | No | Yes | Import records from bank-exported files |
| SimpleFIN | No | Yes | Import via account aggregation service |
| hledger | No | Yes | Import from an hledger journal file |
| Beanscrape | No | Yes | Import via browser-based bank scraping |
For sources that don’t support creating a new journal, create one from scratch first.
nYNAB Import
Import a budget from an nYNAB export. Can create a new journal or import into an existing one.
What gets imported
| YNAB concept | Surebeans equivalent |
|---|---|
| Accounts | Accounts (Assets, Liabilities) |
| Category Groups | Category groups |
| Categories | Budget categories (envelopes) |
| Transactions | Records |
| Monthly budgets | Plan allocations |
| Payees | Payee field on records |
| Memos | Memo field on records |
| Cleared status | Reconciliation status |
Export format
YNAB exports a .zip file containing CSV files for accounts, budgets, and records.
Incremental import
You can also add new records to an existing journal. Open the journal you want to update, then go to ☰ → Import → From nYNAB export…. Surebeans adds any records that are not already present rather than creating a new journal.
To skip the manual file export, use the nYNAB API import instead.
Import Review
After importing, Import Review appears.
Limitations
- Scheduled records are not imported.
- Goal targets are not imported.
- Loan accounts may need manual review.
nYNAB API Import
Import records directly from the YNAB API using a Personal Access Token.
Unlike the nYNAB file import, this method connects to YNAB’s API so there is no need to manually export and upload a file.
Setup
- Generate a Personal Access Token in your YNAB account settings.
- In Surebeans: ☰ → Import → From nYNAB API…
- Paste your Personal Access Token.
- Select a budget from the dropdown list.
- Click Import.
New journal or incremental import
The API import supports two modes:
| Mode | When to use |
|---|---|
| Create new journal | First-time import; builds a full journal from your YNAB budget |
| Add to existing journal | Incremental import; adds new records to your current journal |
To do an incremental import, open an existing journal first, then run the import. Surebeans will add any records that are not already present.
For incremental imports, the process has two steps:
- Conflict review: if any existing records were modified in YNAB, you choose which version to keep (local or YNAB).
- Record review: new and conflicting records are shown per-account in the Import Review screen.
Stored settings
Your Personal Access Token and selected budget are saved locally so you do not need to re-enter them on subsequent imports.
What gets imported
See nYNAB Import - What gets imported for the full mapping between YNAB and Surebeans concepts.
Import Review
After importing, Import Review appears.
Tips
- The Personal Access Token is stored locally and never sent anywhere except the YNAB API.
- Use incremental import to keep your Surebeans journal up to date without re-importing everything.
- The YNAB API limits 200 web requests per hour. If you get errors, wait up to an hour and try again.
YNAB 4 Import
Import a budget from YNAB 4 (classic desktop version). Can create a new journal or import into an existing one.
What gets imported
Same mapping as nYNAB import: accounts, categories, records, and budget allocations.
Data format
YNAB 4 stores budgets as .ynab4 folders containing JSON/SQLite files. Surebeans reads this format directly.
Typical locations
| OS | Path |
|---|---|
| macOS/Linux | ~/Dropbox/YNAB/ |
| Windows | C:\Users\<you>\Dropbox\YNAB\ |
Import Review
After importing, Import Review appears.
Limitations
- Scheduled records are not imported.
- YNAB 4’s “Red Arrow Right” behavior is not replicated.
File Import (CSV, OFX/QFX)
Import records from bank-exported files into an existing journal.
Supported formats
- CSV. Comma-separated values. Columns are auto-detected from headers and can be adjusted manually.
- OFX. Open Financial Exchange. Self-describing, no column mapping needed.
- QFX. Quicken variant of OFX. Treated the same as OFX.
CSV options
- Delimiter: Comma, semicolon, or tab.
- Date format: e.g.,
yyyy-MM-dd,MM/dd/yyyy. - Invert amounts: Flip the sign (some banks export expenses as positive).
- Split inflow/outflow: Use separate columns instead of a single amount column.
- Account: Which account these records belong to.
OFX/QFX options
- Account: Which account these records belong to.
- Invert amounts: Flip the sign if needed.
Import Review
After selecting a file, Import Review appears.
SimpleFIN
Import records from your bank via SimpleFIN, an account aggregation service.
What is SimpleFIN?
SimpleFIN connects to your bank through a read-only data feed. It retrieves records without screen scraping, using official bank data feeds where available. SimpleFIN is a paid service ($1.50/month at time of writing).
Setup
- Create a SimpleFIN account.
- Connect your bank accounts within SimpleFIN.
- Generate a SimpleFIN access token.
- In Surebeans: ☰ → Import → From SimpleFIN.
- Paste the access token.
- Map SimpleFIN accounts to Surebeans accounts.
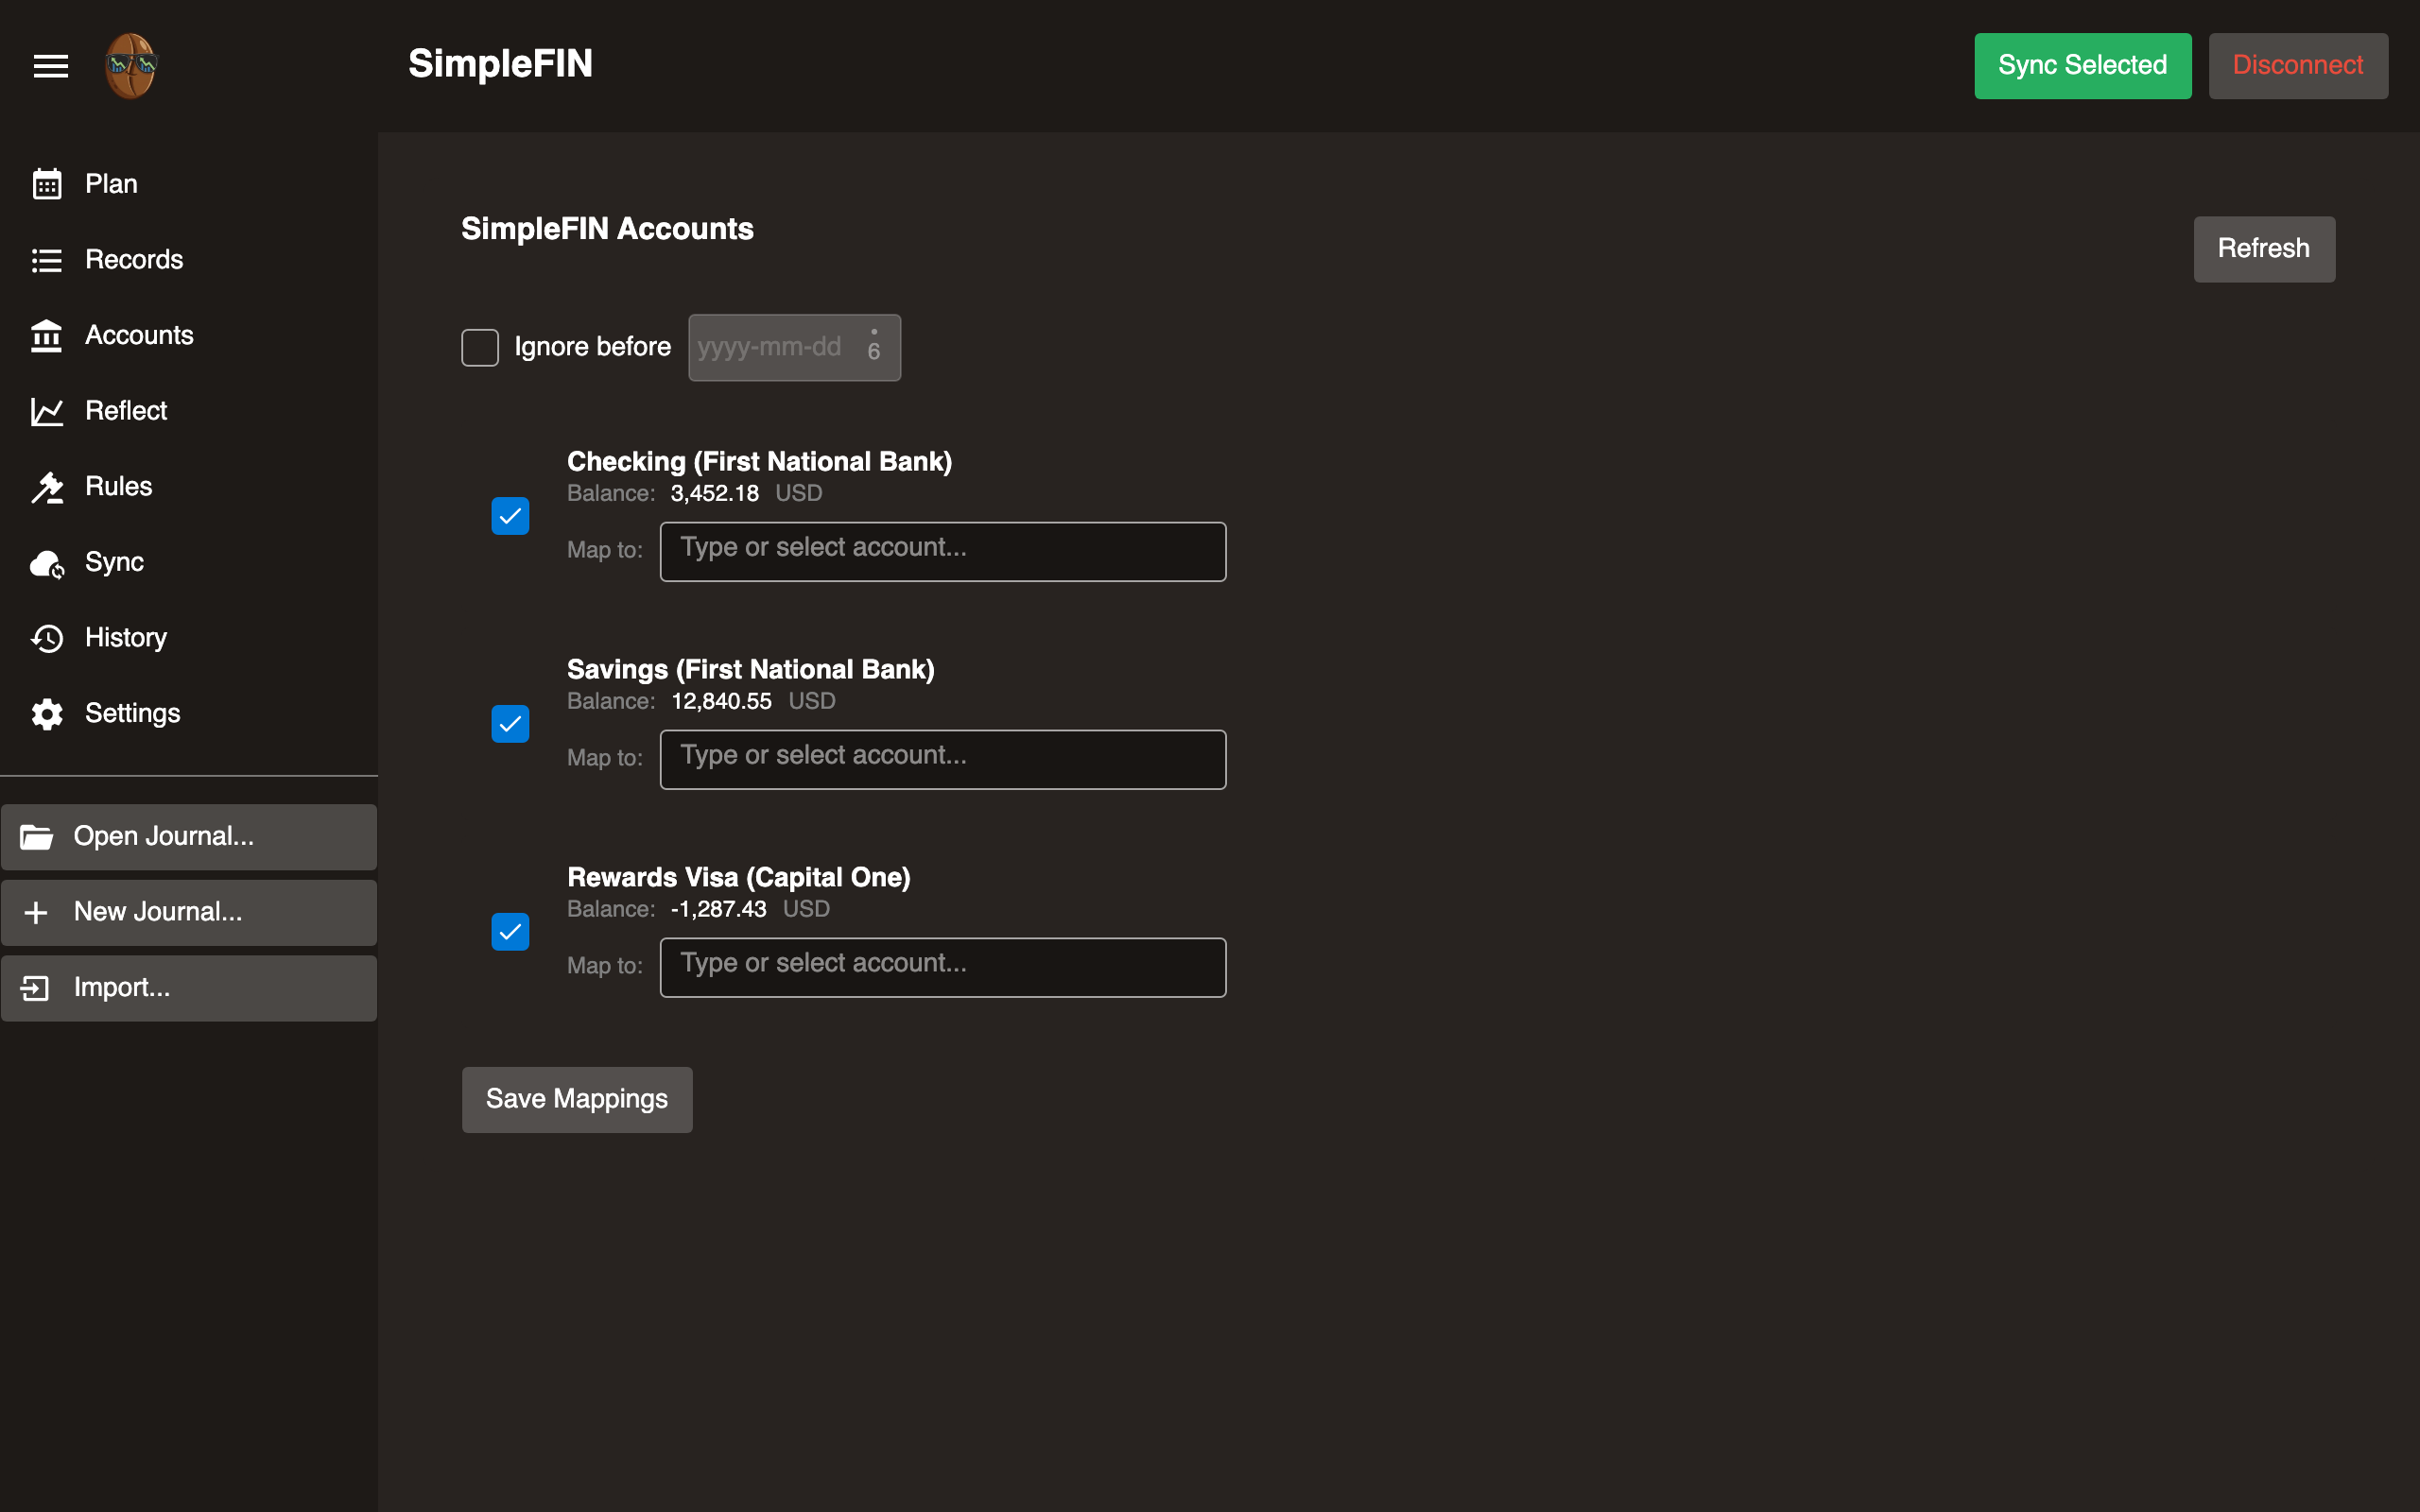
Importing records
Once configured, import fetches recent records from all connected accounts.
Import Review
After importing, Import Review appears.
SimpleFIN vs Beanscrape
| SimpleFIN | Beanscrape | |
|---|---|---|
| Method | Bank data feeds | Browser automation |
| Setup | Create account, paste token | Install CLI, create scripts via LLM |
| Cost | $1.50/month | Free |
| Bank coverage | Wide in the US | Any bank with a website |
| Privacy | Data passes through SimpleFIN servers | Fully local, no third parties |
hledger Import
Import records from an hledger journal file into your Surebeans journal.
When to use
Use this when you have an existing hledger journal and want to bring its records into Surebeans. Records are matched by account, so multi-account hledger files are split across the appropriate Surebeans accounts.
How to import
- Open your Surebeans journal.
- Go to ☰ → Import → hledger.
- Select an
.journalfile. Surebeans followsincludedirectives automatically.
What gets imported
- All transactions from the hledger file (and any included files)
- Account names are mapped directly from hledger paths
- Cleared status is preserved (
*= Cleared,!= Pending)
hledger rules import
If the selected file has a corresponding .csv.rules file, Surebeans can import if/account2 blocks as automation rules. Click Import Rules on the import screen to convert them.
Import Review
After importing, Import Review appears.
Limitations
- Only works with existing journals (no “create new journal” mode)
- Virtual postings (budget allocations) are not imported
- Comments and tags are not preserved
Import Review
After importing records from any source, Surebeans opens the Import Review screen. This lets you inspect each incoming record and preview its effect on your running balance before committing it to the journal.
Account name

The records will be applied to the shown account.
If you imported from multiple banks, import review cycles through them one at a time.
Toolbar

Near the top of the screen is the toolbar.
Period
Records are grouped by time period. Choose between Day, Week, and Month.
- By default, periods where everything matches are collapsed.
- By default, periods with new, conflicting, or updated records are expanded.
- Click any period header to collapse or expand it.
Each period has a summary row at the bottom showing end-of-period balances.
Tolerance
How many days apart records with different dates can be matched. They must have the same payee, memo, and amount. Default: 3 days.
For example, the incoming record 2026-01-04 | Amazon | MEMO1234 | $10.23 can match the existing record 2026-01-01 | Amazon | MEMO1234 | $10.23.
Accept All
Click this button to check Accept next to all records. Uncheck to uncheck them all.
Apply Rules
Click this button to apply automation rules on the incoming records.
Edit Rules
Click this button to navigate to the rules editor.
View Data
Click this button to see the raw imported data text, e.g. CSV, OFX, or JSON, depending on the source.
Status bar

If all balances match, a green “All balances reconciled” bar appears. If there’s a discrepancy, a warning bar shows the amount. You can still click Apply.
Summary bar

Beneath the toolbar, the summary bar shows counts of each record change type: matched, updated, new, and conflict.
Records

Record change type
Import Review compares each record to import with your existing Surebeans records and assigns a change type.
| Pill | Meaning |
|---|---|
| matched (grey) | Already in Surebeans. No action needed. |
| updated (blue) | Amounts match but the cleared/pending status changed. |
| new (green) | Exists in the bank but not in Surebeans. |
| conflict (red) | Exists in both but amounts differ, or exists only in Surebeans |
Date
The date from the incoming data appears here.
Payee, Memo, Category
The payee, memo, and category fields from the incoming data appear here. On rows with change type new and conflict rows, you can edit them.
Balances
When the imported data includes a running balance, the review shows Bank and Surebeans (SB) columns side-by-side, and the Diff column highlights any discrepancy in yellow.
When the imported data doesn’t include a running balance, the these columns show only the Surebeans balance.
Accepting and rejecting
Every unmatched row has an Accept checkbox, checked by default.
- Checked accepts the bank’s value.
- Unchecked keeps what’s already in Surebeans.
Action bar

At the bottom is the Action bar. Use the Back and Next buttons to navigate between accounts. The Apply button appears on the last account.
Glossary
Key terms used throughout Surebeans.
Core Concepts
- Record:A single dated transaction (date, payee, status, postings)
- Posting:One line of a record: an account + amount
- Commodity:Any held unit: a currency, stock, or crypto
- Transfer:A record where both postings are to asset/liability accounts
- Virtual Posting:A posting in
[brackets], used for budget allocations - Account:A named ledger (e.g.,
Assets:Checking,Expenses:Groceries) - Account Type:Asset, Liability, Income, Expense, Equity, Budget, Tracking
- Journal:The ledger file containing all records
Import
- Bank Record:A flat representation of a transaction from an external source
- Bank ID:Source identifier on a Bank Record (e.g.,
"ynab","hledger","discover") - Import Tag:Per-posting deduplication tag:
import:{bankId}:{6-char hash} - Import Review:UI for comparing imported records against existing journal records
Accounting
- Envelope:Budget category that money is allocated to before spending
- Double Entry:Every record’s postings must sum to zero
- Cleared Status:Uncleared, Cleared, or Pending
- Running Balance:Cumulative account balance up to a given record
Account
A named ledger identified by a colon-separated path. The first segment determines the Account Type.
Examples: Assets:Checking, Expenses:Home:Groceries, Liabilities:Mortgage
The DisplayName is the last segment (e.g., Groceries). The full path is used for Postings and matching.
Account Type
Inferred from the first segment of an Account path.
| Prefix | Type | Meaning |
|---|---|---|
Assets: | Asset | Money you have (checking, savings). Both sides of a Transfer. |
Liabilities: | Liability | Money you owe (credit cards, loans). Both sides of a Transfer. |
Expenses: | Expense | Money spent |
Income: | Income | Money earned |
Equity: | Equity | Opening balances, adjustments |
Budget: | Budget | Envelope allocations |
Tracking: | Tracking | Off-budget accounts (YNAB concept) |
Bank ID
Source identifier on a Bank Record. Used to generate the Import Tag for deduplication.
Examples: "ynab", "hledger", "discover", "csv:transactions.csv"
Each importer provides its own value. Not stored in the Journal; only used transiently during import.
Bank Record
A flat (non-Double Entry) representation of a transaction from an external source. Has a single amount (inflow or outflow), payee, date, and Bank ID.
Used as an intermediate format during import. Converted to/from Records during the import process. For Transfers, the target account is preserved in the Category field during the roundtrip.
Each Bank Record generates an Import Tag for deduplication during Import Review.
Cleared Status
Reconciliation state of a Record.
| Status | Marker | Meaning |
|---|---|---|
| Uncleared | (none) | Not yet confirmed |
| Cleared | * | Confirmed against bank statement |
| Pending | ! | In progress (e.g., pending transaction) |
Commodity
Any unit you can hold an amount of: a currency (USD, EUR), a stock (AAPL),
or crypto (BTC). A currency is just a commodity that happens to be money.
Surebeans handles them all the same way.
A Posting carries its amount in one commodity. An Account is not locked to a single commodity; it can hold several at once.
2025-02-11 Buy shares
    Assets:Brokerage:AAPL    10 AAPL {183.07 USD}
    Assets:Cash          -1830.70 USD
See Multi-Currency for reporting currency, prices, and how exchange-rate moves affect net worth.
Double Entry
Every Record’s Postings must sum to zero. Money always comes from somewhere and goes somewhere.
A purchase debits an expense and credits an asset:
    Assets:Checking     -$50.00
    Expenses:Groceries   $50.00
This constraint ensures the books always balance.
Envelope
A budgeting method where money is allocated to categories (envelopes) before it’s spent. When you buy groceries, the money comes from the Groceries envelope.
In Surebeans, envelopes are represented as Budget: Account Type accounts. Money is allocated via Virtual Postings:
2026-03-01 Budget allocation
    [Budget:Home:Groceries]    $500.00
    [Income:Ready to Assign]  -$500.00
This moves $500 from the shared pool (Income:Ready to Assign) into the Groceries envelope. The YNAB import flows generate these allocations automatically.
Import Tag
Per-posting deduplication identifier for matching imported Bank Records to existing Postings in the Journal. Written as the import tag inside a posting comment using hledger key:value syntax (e.g., ; import:schwab:abcdef).
Format: {bankId}:{6-char hash}
The hash covers the bank ID, date, signed amount, payee, and memo. The bank prefix is retained for debuggability — date and amount are omitted since they’re already on the posting.
Exception: YNAB API uses ynab:{transactionId} (YNAB’s stable UUID) instead of the hash-based format.
Import Review
UI for comparing imported Bank Records against existing Journal Records, per-account.
See Import Review for full documentation.
Journal
The ledger file (.journal) containing all Records and Account declarations. Uses hledger-compatible plain text format. Every record follows Double Entry rules.
Can include other files via include directives.
Records are imported from external sources via Import Review, which converts Bank Records into journal records.
Posting
One line of a Record: an Account and an amount. Every record has at least two postings that balance to zero (Double Entry).
    Assets:Discover    -$22.39    <- this is one posting
    Expenses:Groceries  $22.39    <- this is another
A posting can be a Virtual Posting (wrapped in [brackets]), used for Envelope allocations. Virtual postings don’t affect asset/liability balances.
Record
A single dated transaction. Contains a date, payee, memo, Cleared Status, and a list of Postings.
2026-03-16 Kroger
    Assets:Discover    -$22.39
    Expenses:Groceries  $22.39
A record’s postings must follow Double Entry: they sum to zero. A record with exactly two asset/liability postings is a Transfer.
Running Balance
Cumulative balance of an Account up to and including a given Record, computed by summing all Postings to that account in date order.
In Import Review, two running balances are shown when the import source provides its own (currently only Beanscrape):
- Bank: from the bank’s reported running balance
- SB: computed from journal records and user choices
When the source doesn’t provide running balances, the balance columns are not shown. See also Journal, Double Entry.
Transfer
A Record where both Postings are to asset or liability accounts. Represents money moving between your own accounts rather than income or expense.
2026-03-16 Transfer : Discover
    Assets:Schwab Checking  -$1,957.54
    Assets:Discover          $1,957.54
When one side is a credit card, the UI displays the payee as Payment To: / Payment From: instead of Transfer To: / Transfer From:.
Virtual Posting
A Posting wrapped in [brackets]. Used for budget Envelope allocations. Virtual postings don’t affect asset/liability balances and are excluded from Transfer detection.
2026-03-01 Budget allocation
    [Budget:Home:Groceries]    $500.00
    [Income:Ready to Assign]  -$500.00
Beanscrape
Beanscrape is a local, privacy-focused CLI tool that scrapes records from financial institution websites using browser automation.
Features
- Fully local. Runs on your machine. No credentials or data leave your computer (except to your bank’s website).
- Free and Open Source (FOSS). You may view, modify, and redistribute the source code.
- Scriptable. Bank scripts are C# scripts.
- Extensible. Create scripts for any bank using the interactive
teachcommand and an LLM.
How it works
- Beanscrape opens a real browser (Chromium via Playwright).
- You log in to your bank. If you saved your credentials, it logs in for you.
- Navigates to the transaction page.
- Extracts transactions.
- Outputs JSON or CSV.
You then import the output into Surebeans (or any budgeting tool).
Legal basis
You agree to follow your bank’s terms of service. Most banks have a “use at your own risk” policy toward finance automation tools, but some deploy technical or contractual mechanisms to block them.
In general, accessing your own financial data via automated tools is supported by:
- CFPB Section 1033 (Dodd-Frank Act): consumers have the right to access their financial data.
- GDPR Article 20: right to data portability.
- Van Buren v. United States (2021): accessing data you’re authorized to view is not a CFAA violation.
Sections
| Page | Description |
|---|---|
| Install | Download and install Beanscrape |
| Run | Scrape transactions |
| Credentials | Store bank login credentials securely |
| Scripts | Bank scripts overview |
| Teach | Interactive session to capture bank website details |
| Script Creation | Generate new scripts using an LLM |
| Troubleshooting | Common issues and fixes |
Install
Beanscrape is a single-file executable. No runtime dependencies.
From Surebeans (recommended)
- Open Surebeans → Settings.
- Scroll to the Beanscrape section.
- Click Install.
Surebeans downloads and installs the correct version for your platform.
Manual download
Download from surebeans.net/beanscrape.
| Platform | File |
|---|---|
| Windows | beanscrape-win-x64.exe |
| Windows (ARM) | beanscrape-win-arm64.exe |
| macOS (Intel) | beanscrape-osx-x64 |
| macOS (Apple Silicon) | beanscrape-osx-arm64 |
| Linux | beanscrape-linux-x64 |
| Linux (ARM) | beanscrape-linux-arm64 |
Place the executable somewhere on your PATH.
First run
On first launch, Beanscrape downloads and installs the Playwright browser engine (~150 MB). This only happens once.
$ beanscrape run amex

Playwright browsers not installed. Installing chromium...
Self-update
$ beanscrape update
Checks for and installs the latest version.
Run
Scrape transactions from one or more banks.
Basic usage
$ beanscrape run ./mybank.csx
Multiple banks
Pass multiple .csx file paths to scrape in parallel (each in its own browser tab):
$ beanscrape run ./amex.csx ./discover.csx ./schwab.csx
Options
| Flag | Short | Description | Default |
|---|---|---|---|
--outdir | -d | Output directory | output/ |
--format | -f | Output format: json or csv | json |
--keep-open | -k | Keep browser open after scraping (for review) | off |
--node | Node.js mode: system, download, or auto | auto | |
--debug | Enable debug logging | off |
Output
Transactions are written to <outdir>/<bank-id>.json (or .csv).
JSON format
{
  "bank": "amex",
  "scrapedAt": "2026-01-13T21:22:25Z",
  "transactions": [
    {
      "date": "2026-01-12",
      "payee": "GROCERY STORE",
      "memo": null,
      "outflow": 85.50,
      "inflow": null,
      "runningBalance": 1228.78,
      "isPending": false,
      "category": "Supermarkets"
    }
  ]
}
CSV format
Columns: date, payee, memo, outflow, inflow, runningBalance, isPending, category.
Progress UI
While scraping, a browser panel shows real-time progress with step indicators. You can pause or cancel from this panel.
2FA
If your bank requires two-factor authentication, Beanscrape pauses and waits for you to complete the verification in the browser. Once you approve, scraping resumes automatically.
Next steps
Import the output into your ledger software, or use the JSON/CSV files directly. See Import Review for how Surebeans handles this.
Credentials
Beanscrape stores bank login credentials in your OS-native secure storage.
Storage locations
| OS | Storage |
|---|---|
| macOS | Login Keychain |
| Windows | DPAPI-encrypted file at %LOCALAPPDATA%/beanscrape/credentials.dat |
| Linux | freedesktop Secret Service, or AES-256-encrypted file at ~/.local/share/beanscrape/credentials.dat |
Credentials never leave your machine.
Add credentials
$ beanscrape credential add <bank-id> -u <username>
Password: ********
The password is read from stdin (not echoed).
List stored credentials
$ beanscrape credential list
Shows which bank IDs have stored credentials (passwords are not displayed).
Update credentials
$ beanscrape credential update <bank-id> -u <new-username>
Password: ********
Remove credentials
$ beanscrape credential remove <bank-id>
Environment variables
As an alternative to the credential store, set environment variables:
export [email protected]
export AMEX_PASSWORD=mysecretpassword
Variable names follow the pattern {BANKID}_USERID and {BANKID}_PASSWORD (uppercase, hyphens replaced with underscores).
You can also use a .env file in the current working directory.
Priority order: Environment variables > .env file > credential store.
Scripts
Bank scripts are C# files (.csx) that tell Beanscrape how to log in, navigate, and extract transactions from a specific bank’s website.
Running a script
Pass a .csx file path to beanscrape run:
$ beanscrape run ./mybank.csx
See Run for details.
Reviewing scripts
Scripts are plain text C# files. Open them in any editor to review what they do before running. You can verify a script doesn’t exfiltrate your credentials.
Creating scripts
See Teach and Script Creation for how to create a new script for your bank.
Teach
The teach command opens an interactive browser session to capture the details Beanscrape needs to generate a bank script.
Usage
$ beanscrape teach <bank-id>
Example:
$ beanscrape teach chase
What happens
- A browser window opens with the Teach UI panel.
- Navigate to your bank’s login page.
- The panel guides you to capture:
- Login page URL
- Username and password field selectors
- Login button selector
- Transaction page URL and selectors
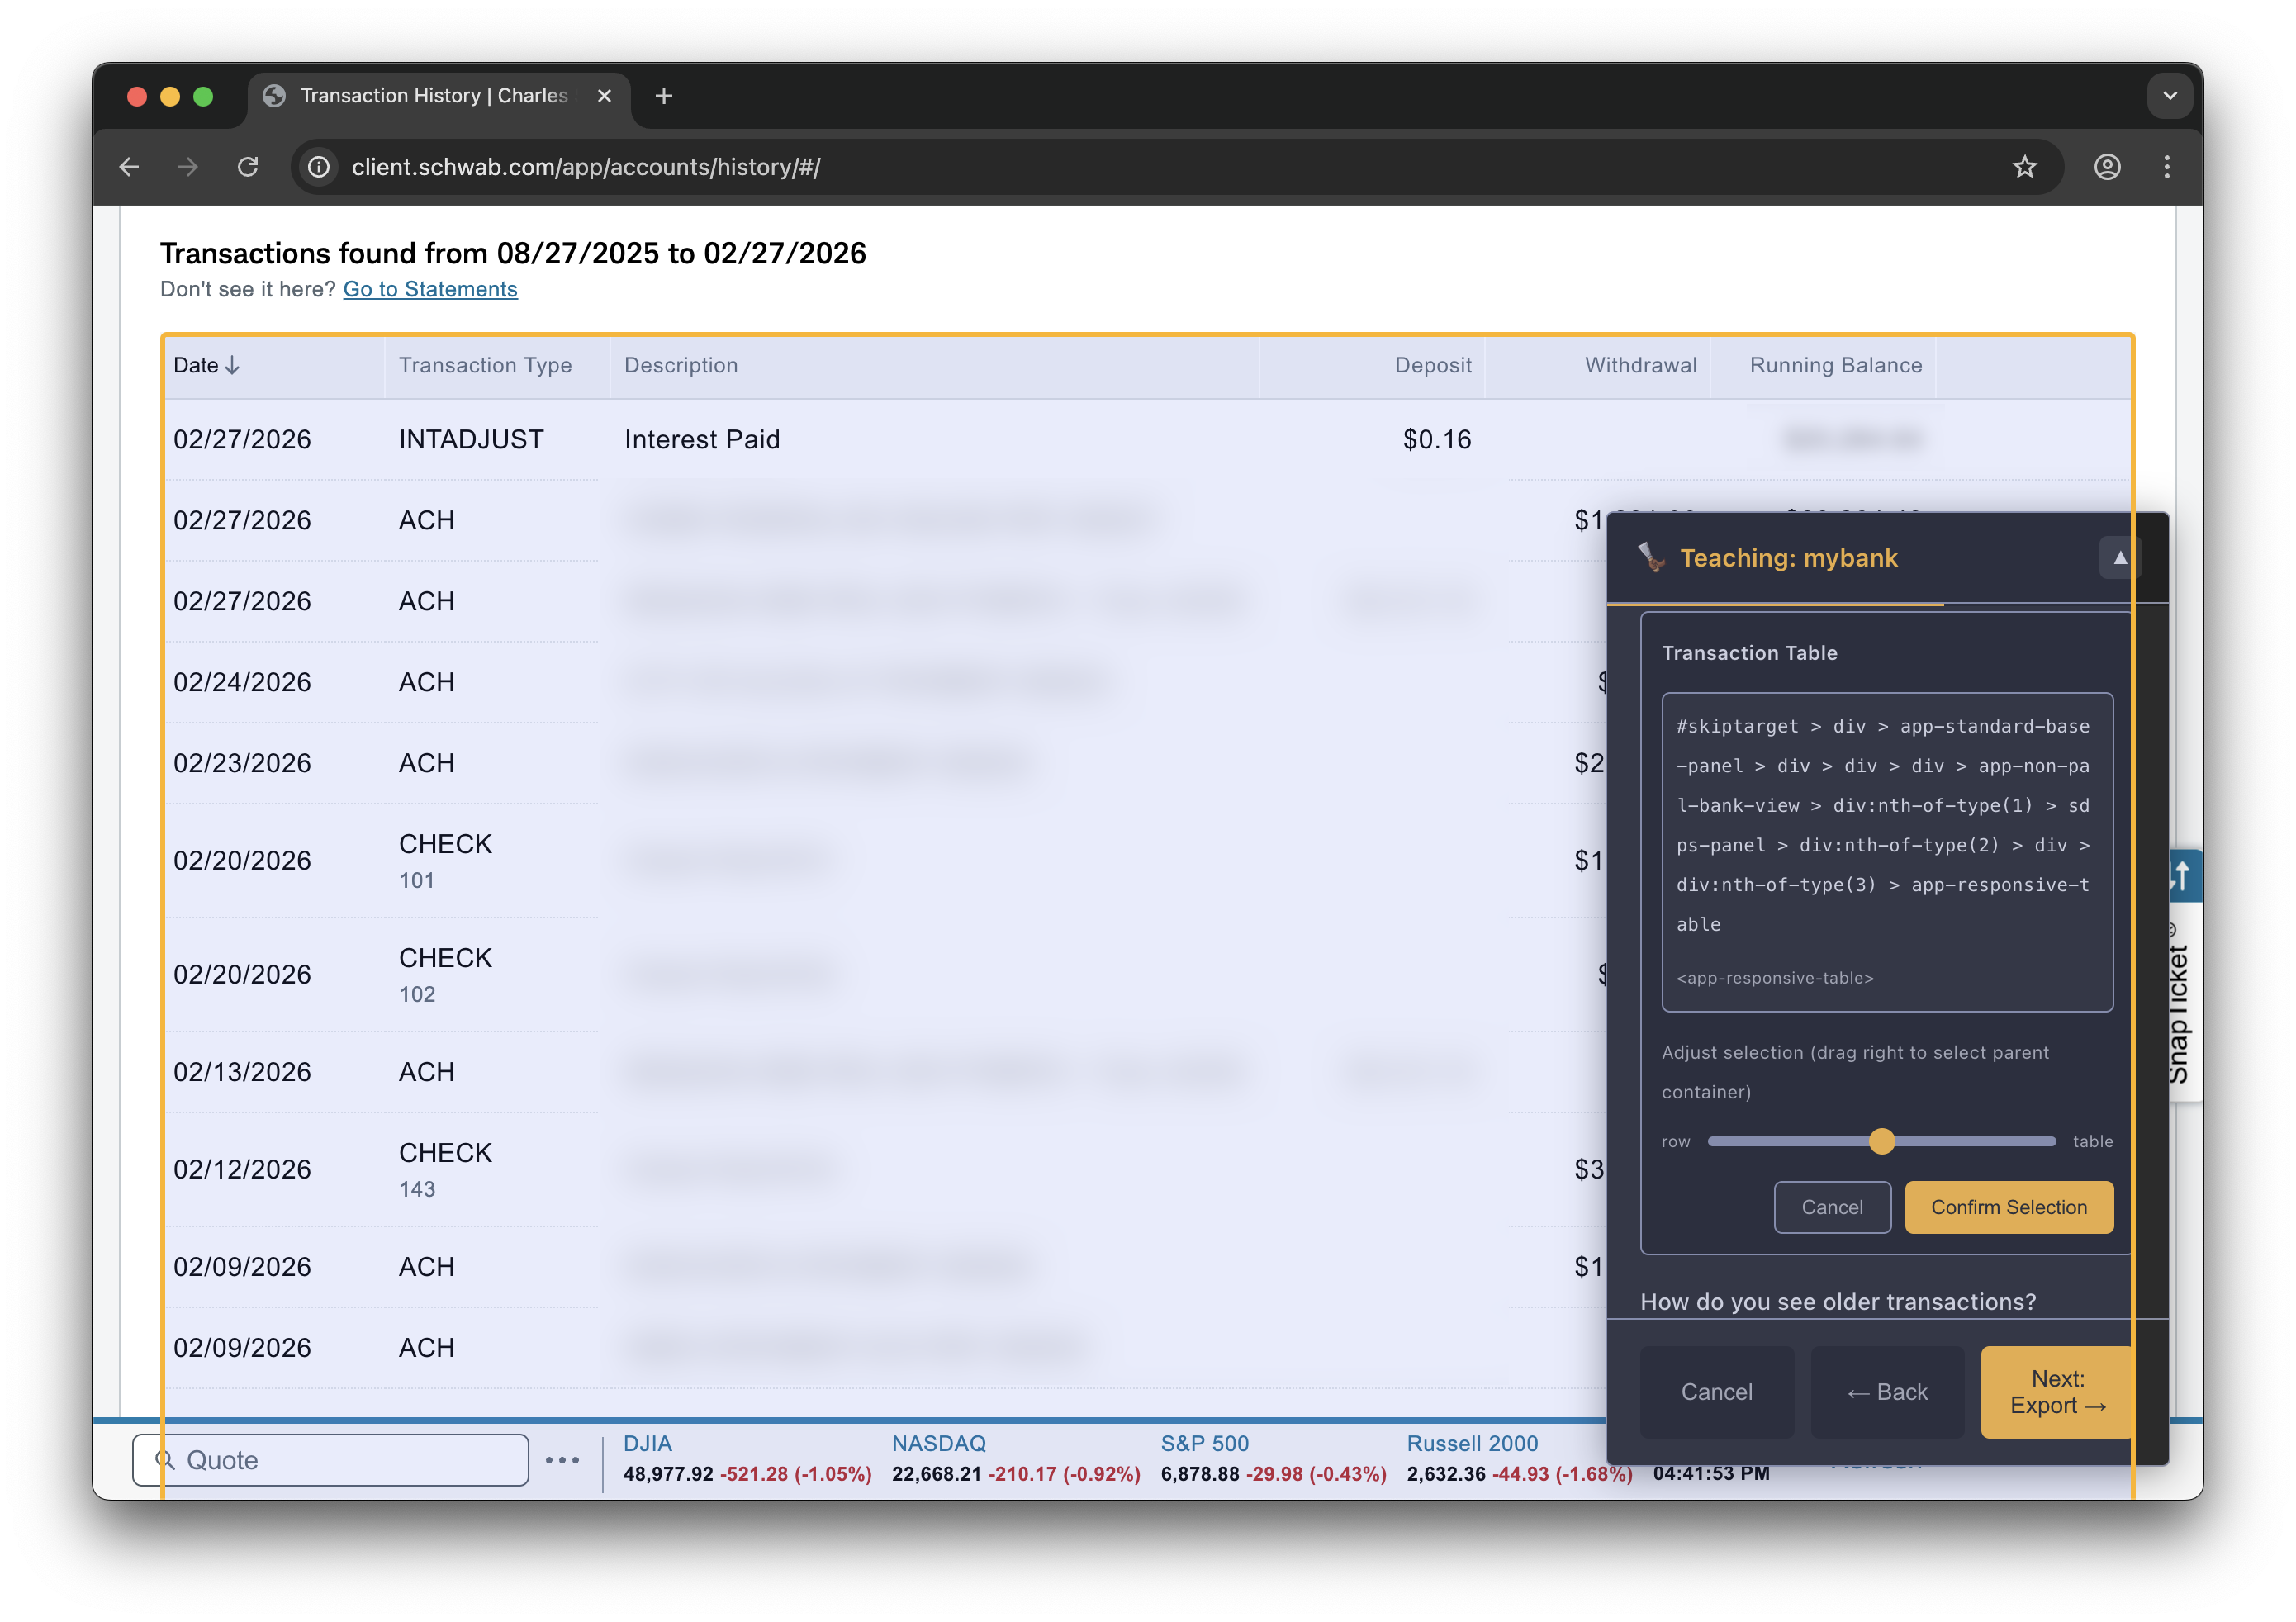
- Transaction table structure (date, payee, amount columns)
- Optionally capture screenshots of each step.
The teach panel opens alongside the bank website. Here’s what a typical session looks like:
Step 1: Navigate to your bank’s website

Step 2: Log in to your account
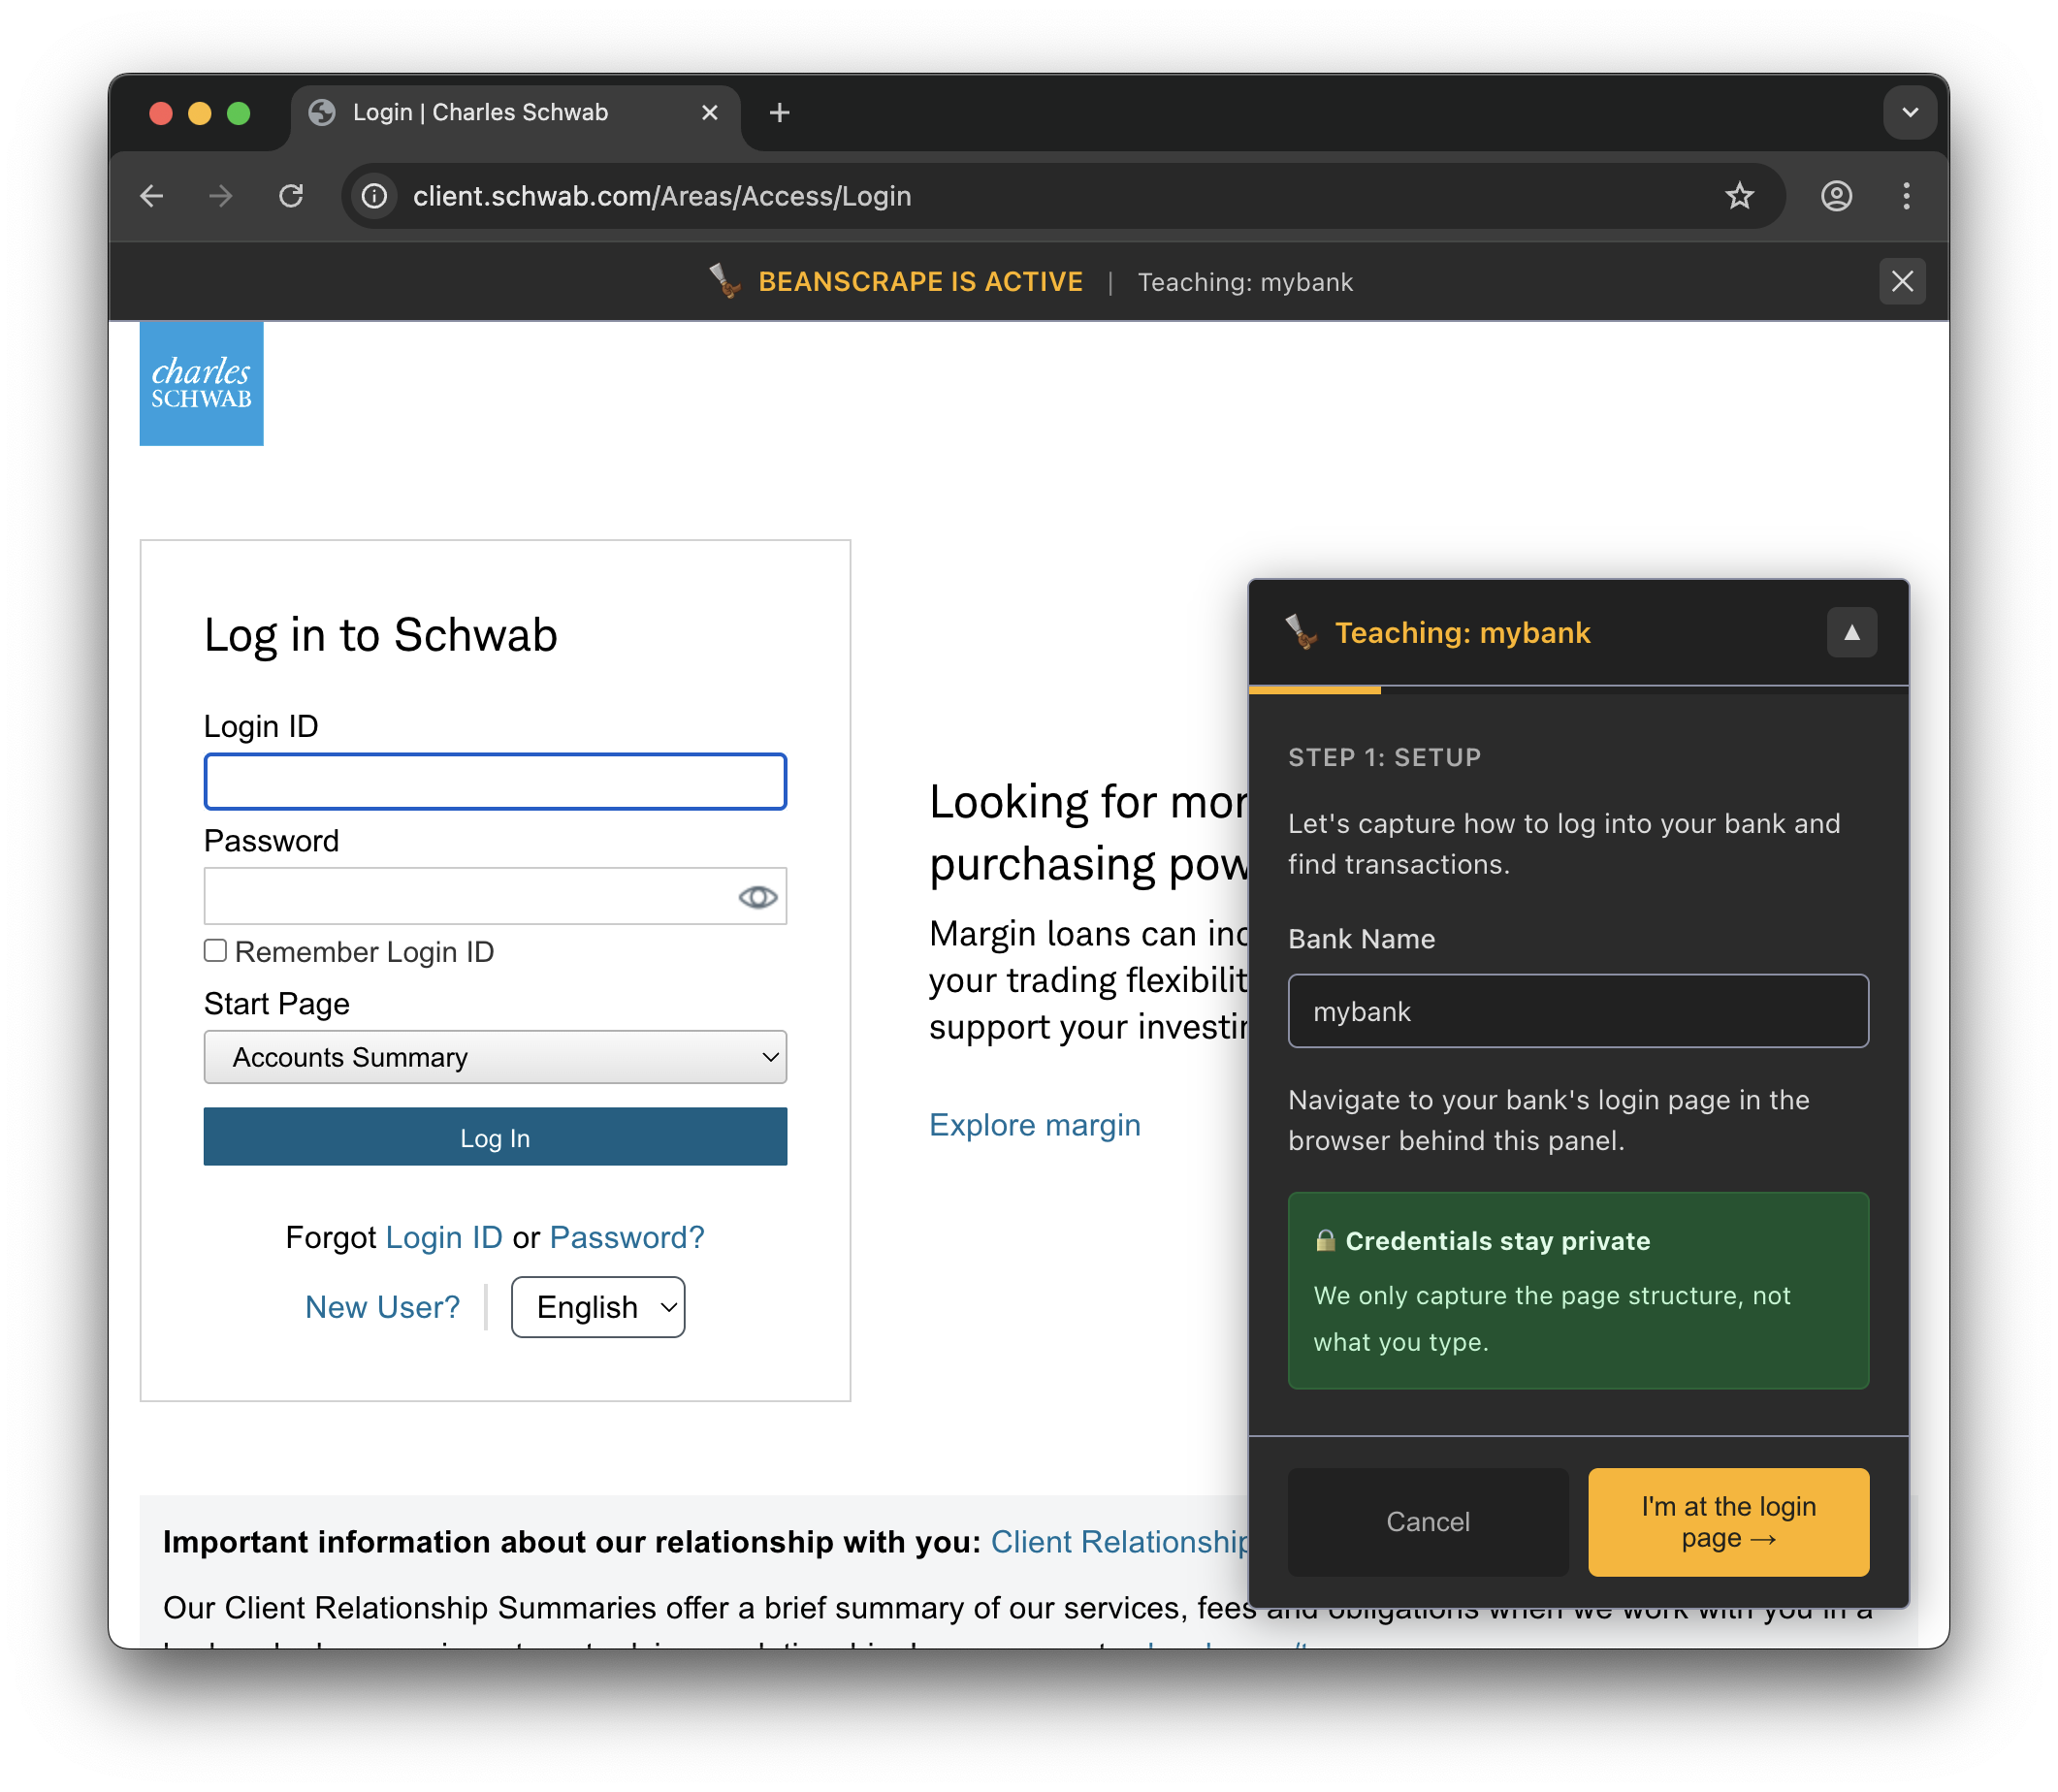
Step 3: Navigate to transaction history
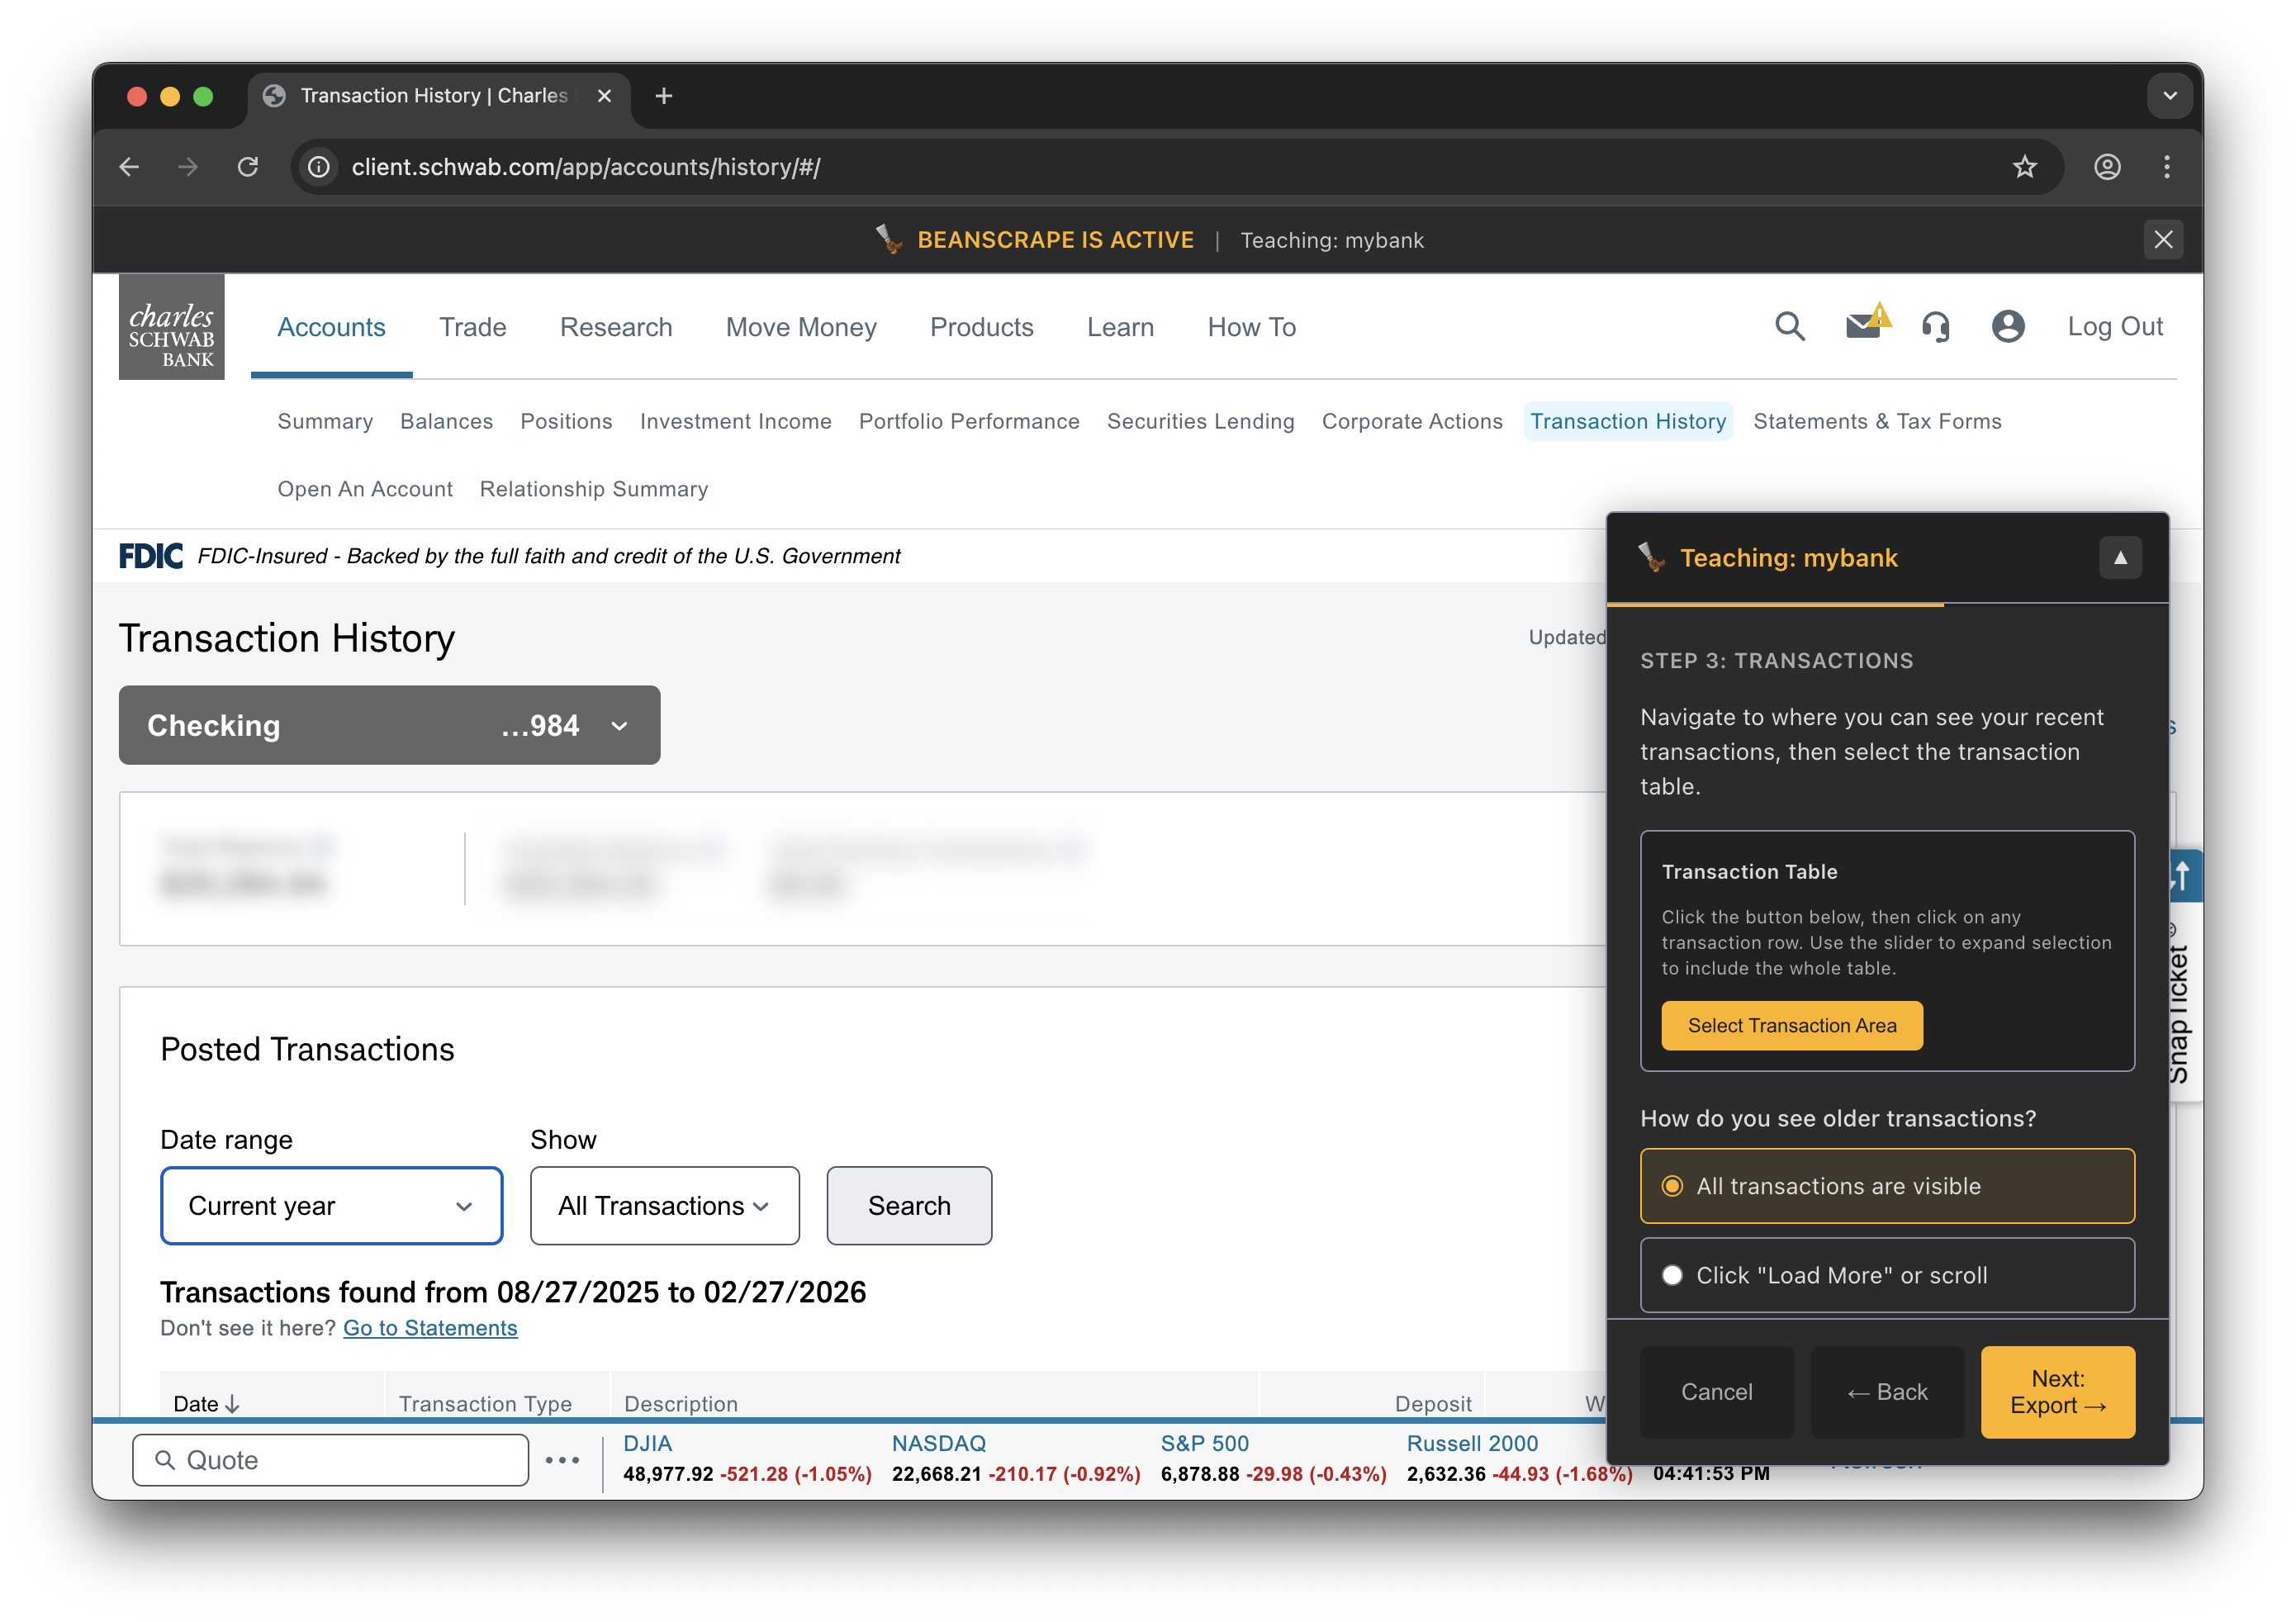
Step 4: Select account and date range
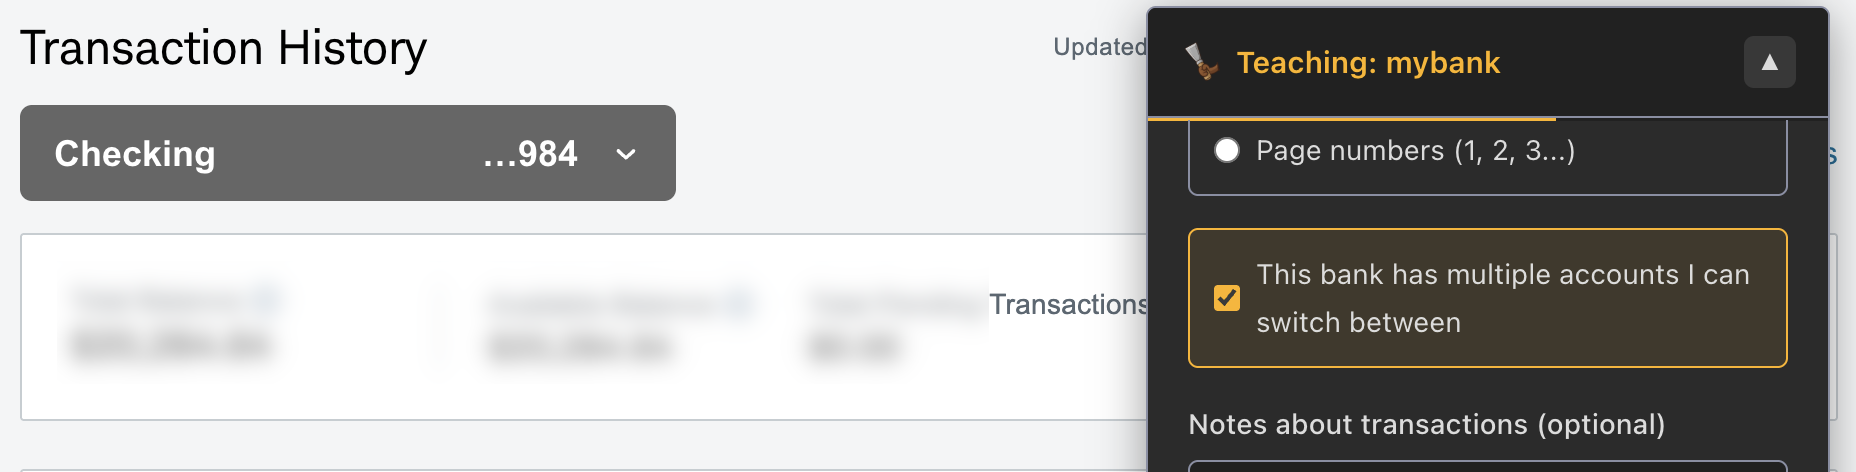
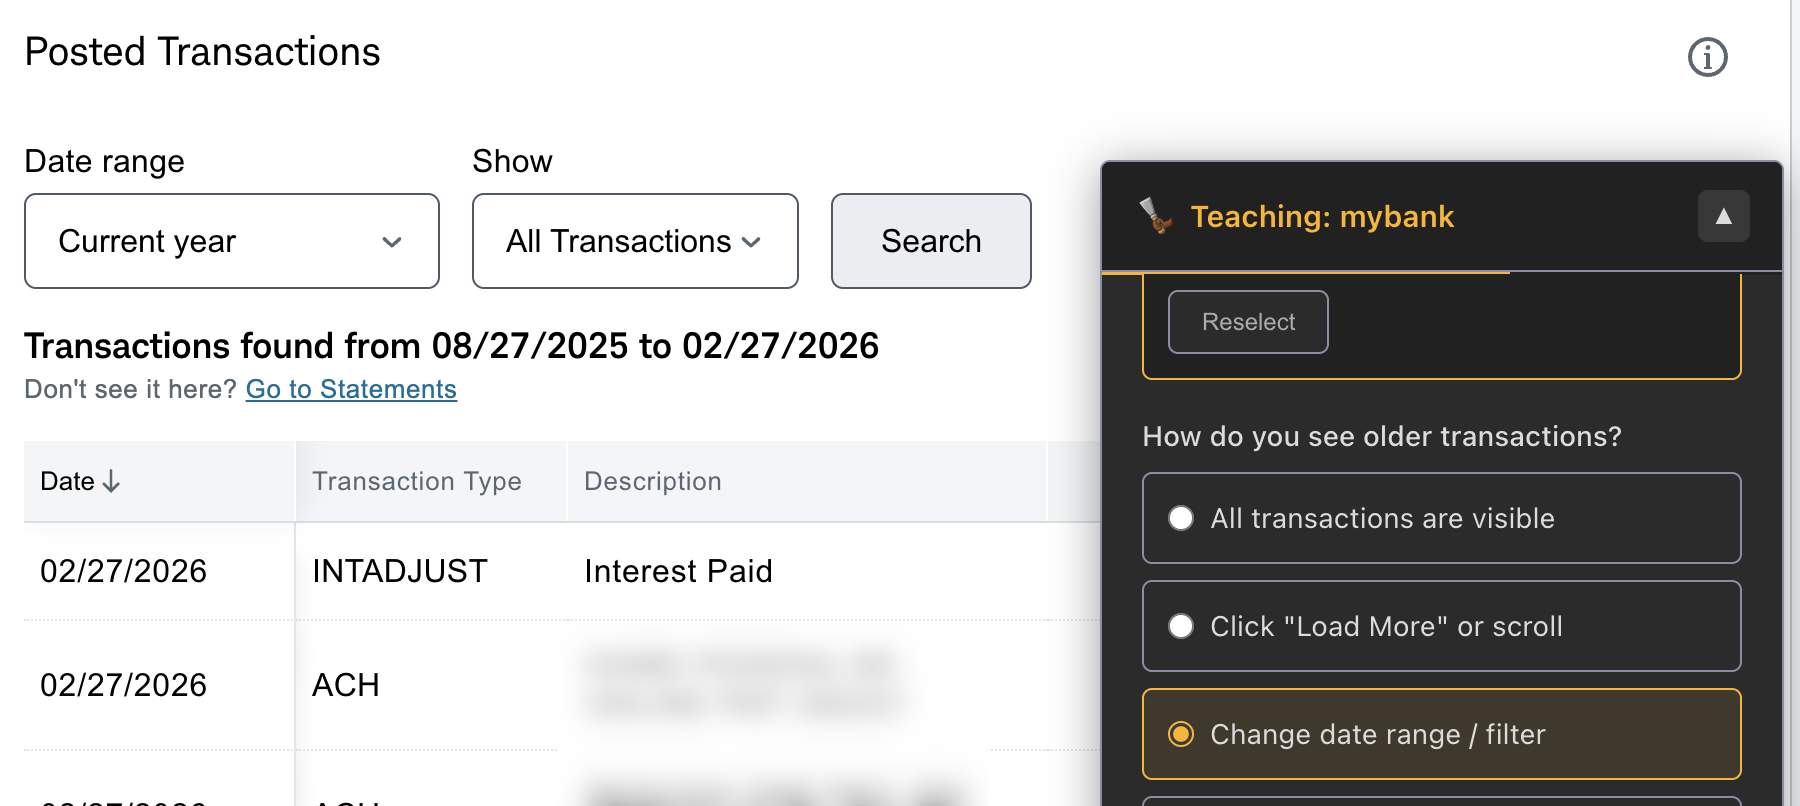
Step 5: Identify the transaction table
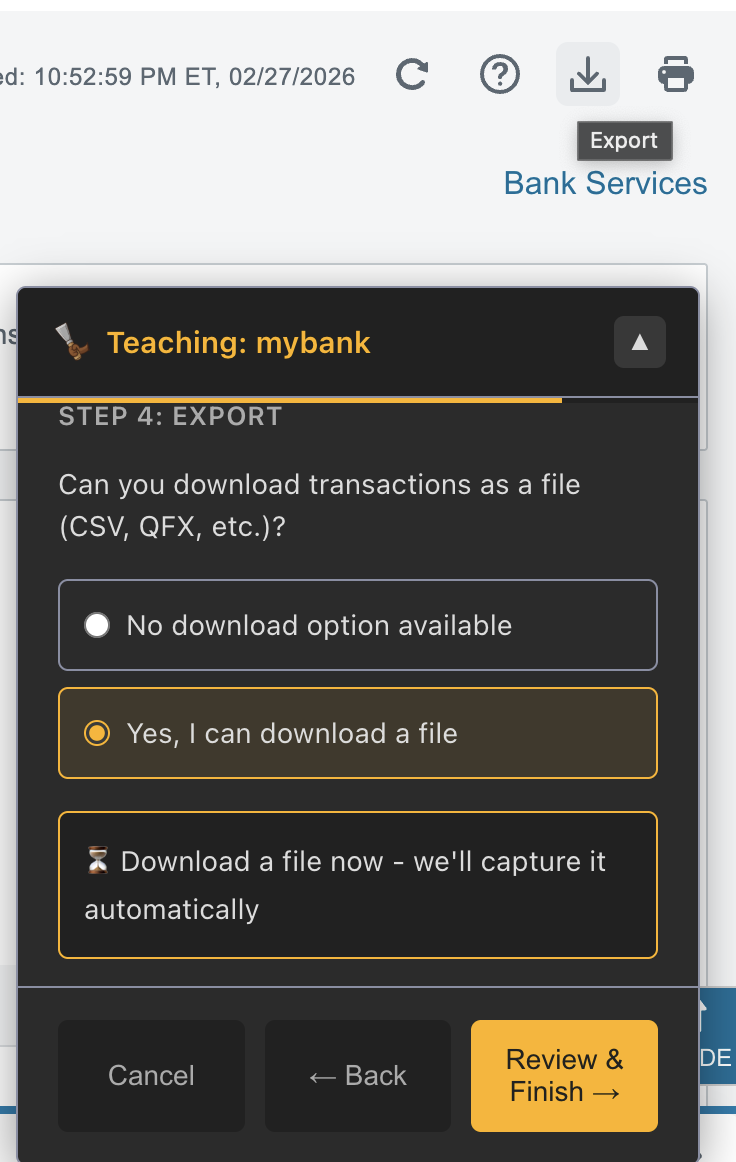
Step 6: Export and finish
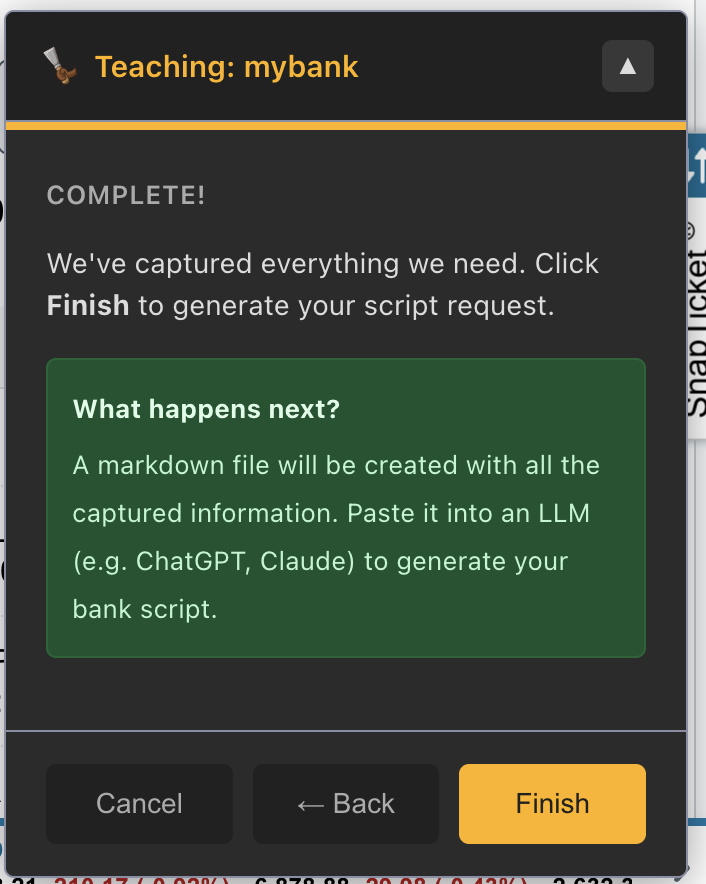
Output
Teach generates a markdown file at ./prompts/<bank-id>.md containing:
- Captured URLs
- DOM selectors
- Screenshots (as base64 or file references)
- Structural notes about the page layout
This file is the input for Script Creation.
Options
| Flag | Short | Description |
|---|---|---|
--output | -o | Override output file path |
Tips
- Log in manually during the teach session so the panel can observe the DOM structure.
- If your bank has multiple transaction views (recent, statements, downloads), capture all of them. You can choose the best approach when generating the script.
- The teach session does not store credentials.
Script Creation
Generate a new bank script by combining the output of Teach with an LLM.
Workflow
- Run
beanscrape teach <bank-id>to capture bank website details. Output:./prompts/<bank-id>.md. - Open the prompt file and the script generation guide (bundled with Beanscrape, also at
docs/new-script.mdin the source repo). - Paste both into an LLM (Claude, ChatGPT, etc.).
- The LLM generates a
.csxscript. - Save the script as
<bank-id>.csx. - Test:
beanscrape run ./<bank-id>.csx --debug. - Iterate with the LLM if the script needs adjustments.
Script structure
A bank script is a C# script (.csx) that uses Beanscrape’s runtime API:
// Required: bank metadata
BankId = "mybank";
BankName = "My Bank";
BankUrl = "https://www.mybank.com";

// Required: scrape function
Scrape = async (page) =>
{
    // 1. Navigate to login page
    await NavigateAsync(page, "https://www.mybank.com/login");

    // 2. Enter credentials
    await FillAsync(page.Locator("#username"), Env("MYBANK_USERID"));
    await FillAsync(page.Locator("#password"), Env("MYBANK_PASSWORD"));
    await ClickAsync(page.Locator("#login-button"));

    // 3. Navigate to transactions
    await NavigateAsync(page, "https://www.mybank.com/transactions");

    // 4. Extract transactions
    var rows = await page.Locator(".transaction-row").AllAsync();
    foreach (var row in rows)
    {
        AddTransaction(new Transaction
        {
            Date = ParseDate(await row.Locator(".date").TextContentAsync()),
            Payee = await row.Locator(".payee").TextContentAsync(),
            Outflow = ParseAmount(await row.Locator(".amount").TextContentAsync()),
        });
    }
};
Available API
Metadata & environment
| Property/Method | Description |
|---|---|
BankId | (Required) Unique bank identifier, used to match transactions to accounts |
BankName | (Required) Display name for the bank |
RequiredEnvVars | Array of environment variable names the script needs |
Steps | Array of step names for the progress UI |
ScriptPath | Full path to the executing .csx file (read-only, set by runtime) |
Env(name) | Read environment variable or credential |
Log(message) | Write to debug log |
StartStep(index) | Mark a step as started in the progress UI |
Browser helpers
| Method | Description |
|---|---|
NavigateAsync(page, url) | Navigate with retries |
ClickAsync(locator) | Click with human-like delay |
FillAsync(locator, value) | Type text with human-like delay |
HumanDelayAsync(min, max) | Random wait (default 500-1500ms) |
WaitForSelectorAsync(page, selector) | Wait for element |
IsElementVisibleAsync(page, selector) | Check element visibility |
Parsing helpers
| Method | Description |
|---|---|
ParseDate(string) | Parse various date formats to DateOnly |
ParseAmount(string) | Parse currency string to decimal |
ParseAmountAccounting(string) | Parse accounting format (parentheses = negative) |
File parsing
| Method | Description |
|---|---|
ParseQfx(filePath) | Parse OFX/QFX file to transactions |
ParseQfxContent(content) | Parse OFX/QFX string content |
Available libraries
Scripts have access to:
- Playwright: browser automation
- CsvHelper: CSV parsing
- QFXparser: OFX/QFX parsing
- System.Text.Json: JSON handling
- Standard .NET libraries (Linq, Regex, IO, Collections)
Tips
- Use
--debugwhen testing to see detailed logs. - Use
--keep-opento inspect the browser state after a scrape. - Some banks serve different content based on viewport size. The default viewport works for most.
- For banks that offer CSV/OFX download, prefer downloading the file and parsing it rather than scraping the DOM. It’s more reliable.
Troubleshooting
Browser fails to install
Beanscrape downloads Chromium via Playwright on first run. If this fails:
- Check your internet connection.
- Check firewall/proxy settings. Playwright downloads from Microsoft’s CDN.
- Try running again. The download resumes where it left off.
Login fails
- Wrong credentials: Run
beanscrape credential update <bank-id>to re-enter. - 2FA timeout: If the 2FA prompt times out, re-run the scrape. Beanscrape waits for manual 2FA completion.
- Bank changed their login page: The script may need updating. Run
beanscrape teach <bank-id>to recapture the login flow and regenerate the script.
No transactions returned
- Date range: Some scripts only fetch recent transactions. Check the script or run with
--debugto see what date range is being queried. - Account selection: If the bank has multiple accounts, the script may default to the first one. Check the script source.
- Page structure changed: Bank websites change frequently. The script may need updating.
Script errors
Run with --debug for detailed error output:
$ beanscrape run ./amex.csx --debug
Common issues:
- Selector not found: The bank’s HTML structure changed. Update the script.
- Timeout: The page took too long to load. Try running again; bank websites can be slow.
Browser state issues
Beanscrape saves browser session state (cookies, etc.) between runs. If you’re having persistent issues:
- Clear browser state:
| OS | Path |
|---|---|
| macOS | ~/.config/beanscrape/browser-state/ |
| Linux | ~/.local/share/beanscrape/browser-state/ |
| Windows | %LOCALAPPDATA%\beanscrape\browser-state\ |
- Delete the contents of this directory and re-run.
Getting help
- Forum
- Email: [email protected]